• This Forum is for adults 18 years of age or over. By continuing to use this Forum you are confirming that you are 18 or older. No content shall be viewed by any person under 18 in California.

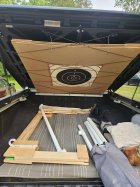
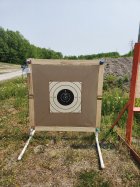
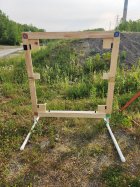
Portable SHOTMARKER target frame construction

So folks, wood being the humidity affected material that it is, is it really advisable to build the target frames from wood. Having been in construction for over 40 years I have seen perfectly straight flat wood twist over time with changes in humidity levels. From my reading of this system its accuracy can be greatly affected by wind buffeting, poor frame alignment to the target and "frames that are warped or not flat. I guess in the end it all comes down to the accuracy level you are seeking. Nothing system is going to be perfect other than actually looking at the paper targets first hand. Personally, I am not going to win any national competitions and if I were to compete at that level I would expect to see people pulling targets in the pits and scoring them by hand. And even that could go lacking. We don't live in a perfect world and should not expect perfect results.
 
So folks, wood being the humidity affected material that it is, is it really advisable to build the target frames from wood. Having been in construction for over 40 years I have seen perfectly straight flat wood twist over time with changes in humidity levels. From my reading of this system its accuracy can be greatly affected by wind buffeting, poor frame alignment to the target and "frames that are warped or not flat. I guess in the end it all comes down to the accuracy level you are seeking. Nothing system is going to be perfect other than actually looking at the paper targets first hand. Personally, I am not going to win any national competitions and if I were to compete at that level I would expect to see people pulling targets in the pits and scoring them by hand. And even that could go lacking. We don't live in a perfect world and should not expect perfect results.
Don't over think it. Build a wood frame and be happy. I have experimented with warped, crooked, and flimsy frames and have seen no errors that would materially effect the outcome of matches. The cardboard that most targets are attached to warps just from the humidity and the sun. Coroplast helps with that.
 
made mine to fit into our club carriers, semi gloss paint should take care of any warpage, used 3/4 plywood.
waiting on the SM to come. Slotted top and bottom, coroplast slides out and a 600 center on the reverse.
 

Attachments

  • 20220519_161517.jpg
    20220519_161517.jpg
    296 KB · Views: 168
I just fabricated a new frame for my ShotMarker. I decided to mount the Sensor Hub on edge to minimize the chance of being hit. It is on a hinged plate so it can lay flat. (The PDF shows a fixed mount for the Hub, but I changed it to being hinged) I also wanted to make it lighter, as I hang it on the 600 yard frames at our range, and I have to lift it over my head to hang it. It weighs 18 pounds.

The material used is 3/4 " Baltic/Russian Birch plywood. It is 13 layers thick, is very stiff and flat. It is typically used in cabinet/furniture and drawers. This material is generally available at wood stores, typically in 5' X 5', 4' X 8' , and some times the stores cut a 4 x 8 in half and sell a 4' x 4' piece, which will make this frame. The frame has hangers on the back to hang at our ranges 100, 200, 300, 400, and 600 yard lines. They fit a 2 x 4, you can make them any depth. You could also make a set of legs to set it on the ground if you don't want it to hang.

This frame is made like a face frame on a cabinet, with the vertical and horizontal pieces held together with Kreg screws. https://www.kregtool.com/store/c1/joining-solutions/#tab1394 then a 6x6 plate is glued/screwed on the rear for strength. The coroplast sits on a 1/2 X 4mm ledge which I routed around the inside. I hold the coroplast in place with packing tape. I drew vertical and horizontal lines to be able to place my targets at the centerpoint.

I have attached a PDF of the plans.

View attachment 1133189


View attachment 1133190
The pads in the center of the side rails are there to make it hangs straight on our 100 and 200 yard target frames which are shorter, and the bottom of the ShotMarker frame hangs below the target frame.

View attachment 1133193

View attachment 1133194
Like the hanger idea. My range has a permanent target board that I am thinking about hanging my frame on. Would the wood target board interfere with the shotmarker?
 
I’ve gone through a few iterations over the years but this was has served me well.
Shotmarker Tips & Tricks Ep. 5 Building a Frame
 
Here is my attempt at a portable stand. Made of 2040 aluminum extrusion that can be disassembled and put In a bag. Target is coroplast sign(from Lowe’s) with a target spray glued to it and held with sliding clamps for easy changing of targets. Cords are held in place by t slot covers. I can always add more braces if there are rigidity problems.


qKYxTy2.jpg


HvvPP54.jpg


VQBLtt5.jpg
Where did you get the clamps, did you 3-D print them or can they be purchased? Where did you purchase the extruded aluminum? I like it. Only thing I would do is put 4 feet on the bottom so it is easier to use on uneven ground.
 
Where did you get the clamps, did you 3-D print them or can they be purchased? Where did you purchase the extruded aluminum? I like it. Only thing I would do is put 4 feet on the bottom so it is easier to use on uneven ground.
The clamps are 3D printed specifically for this. I initially was just going to let the target rest in the grooves of the aluminum. A small corner piece and some paper clamps would probably work just as well.

I got the extrusion in a 1220mm 6 pack off of Amazon.

Feet are a really good idea. I may try to add some adjustable feet like a shooting rest because nothing is ever flat.
 
Stray8 did you 3-D print clamps yourself or did you buy them from someone else? I would like to get some, I really like your design.
 
Stray8 did you 3-D print clamps yourself or did you buy them from someone else? I would like to get some, I really like your design.

I adapted them from another design and printed them myself. I need to revisit if to make it easier to print. Send me a message, I can send you some.

Now this is a slick frame!
Any rigidity problems?

The aluminum is very rigid. The corners could be triangulated with some shorter pieces and 45 degree brackets if needed. There are also larger sizes of extrusion.
 
My only concern would be that unless you have *very* flat/level ground to set that on, it might not be very solid/sturdy as it sits, even if you stake it down. Maybe a couple shorter lengths under the end of each leg to act as 'feet' and allow it to conform to the ground surface a little better?
 
My only concern would be that unless you have *very* flat/level ground to set that on, it might not be very solid/sturdy as it sits, even if you stake it down. Maybe a couple shorter lengths under the end of each leg to act as 'feet' and allow it to conform to the ground surface a little better?

Flipped the bottom rails to be more sturdy vertically. Also made some feet that will adjust to uneven terrain.


7TqVtT1.jpg
 
I believe they were M5 screws and t nuts that fit into the slots. They go into the stock holes but may need to be enlarged a little. Since they are in the slots you can slide them up and down if you change your target size.
 
Parts List

- 2040 Extrusion 1220mm, 6x

- Corner Brackets -there are many options, some may be better, you may trade rigidity for ease of assembly

- Stronger Corner Brackets - Stronger corner brackets (these help with frame squareness)

- 2020 series T nuts - 240 piece set. These are like M-Lok nuts, they turn sideways and come out when loosened. They are good for attaching vertical posts to the horizontal posts on the ground.

- Regular t slot nuts that do not unlock when loosened. They have to be put in the end of the slot, alignment can be fiddly if your bracket has more than one in a row.

- T Slot Bars - These are not required but make assembly easier, modification is required. I used them with the "stronger corner brackets" above. The holes do not match the bracket to I drilled and tapped ones that aligned correctly.

- Plano Grab-N-Go 16 inch tool box with tray - got this to keep spare parts and assembly tools

- 6 meters 2020 series aluminium extrusion slot cover - This stuff slides in to keep the wires n the slots and well controlled. You can hide the wire completely with a long solid piece, looks very professional but is more time consuming to assemble. I now use several short pieces.

- M5 100pcs screw set 8/12/16/20/30 mm, used for mounting the sensors

- Silver sharpie for marking bracket locations for ease of reassembly

- Metal leveling feet made from steel anle iron and threaded rod

- 3D printed target brackets, could probably pop foam board or coroplast into the slots but the brackets make alignment and assembly easy

- string for target aligment

Carry bag for target frame - Gator cases dual compartment 50"
 

Upgrades & Donations

This Forum's expenses are primarily paid by member contributions. You can upgrade your Forum membership in seconds. Gold and Silver members get unlimited FREE classifieds for one year. Gold members can upload custom avatars.


Click Upgrade Membership Button ABOVE to get Gold or Silver Status.

You can also donate any amount, large or small, with the button below. Include your Forum Name in the PayPal Notes field.


To DONATE by CHECK, or make a recurring donation, CLICK HERE to learn how.

Forum statistics

Threads
165,022
Messages
2,188,624
Members
78,647
Latest member
Kenney Elliott
Back
Top