• This Forum is for adults 18 years of age or over. By continuing to use this Forum you are confirming that you are 18 or older. No content shall be viewed by any person under 18 in California.

Nervous to try Bedding a Tikka

Dimner

I do believe in Captain Crunch.
I'm going to take my first stab at bedding and I'm getting a case of the yips/nerves. I have read so much information and watched so many videos that my head is kind of spinning. I'm having a hard time deciding which methods or tips to go with.

Is there an end all be all video on bedding? Or a thread that has good accolades on the method? I just don't want to blindly follow some rando you tube guy's advice

My first attempt is going to be bedding my tikka into its factory plastic stock. I'm doing this mostly for practice. I will be using marine tec and doing a pillar bedding job as well. If this goes all wrong and I do a horrible job, I'm okay with tossing the stock. However, is there a way to re-do a bedding job?

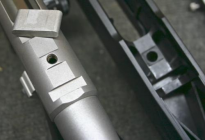
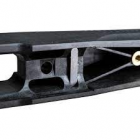
As for the recoil lug, tikka is different than most actions. How do you guys suggest I bed the lug? I have heard people say, bed just the front, bed all sides and the bottom, dont bed the bottom, and bed the lug in the slot so it's permanent. I really do not which option to try. I have an extra lug, so I don't mind permanent bedding as long as that is the right approach.

Here is a pic of how the lug is designed in the TIkka:
1683906619296.png

Here is a pic of the lug in the stock
1683906657848.png
Last question is on pillar bedding. So, I think I subscribe to the opinion of not having your pillars go all the way up and contact the action. Even if the pillars are contoured. I will be putting bedding compound over the tops of the pillars. However, I'm unclear how to approach the bottom of the pillars. Should the bottom metal/trigger guard come in direct contact with the pillars? Should the bottom metal/trigger guard remain in contact with the stock with the pillars recessed? Or should the pillars be recessed and the bottom metal come in contact with the bedding compound that I am using to lock the pillars in place?

I'm not trying to create a benchrest gun or anything. I just want some good learning experience and have some practice at bedding so I can bed two long range hunting rifles (to me long range is 4-600 yards) and have it be a worthy endeavor. If it helps I can outline the entire bedding process I have planned as of yet.
 
The only thing I'd be nervous about is the "glue" [NOT] sticking to the "plastic" stock. When I bedded my TIKKA (a wood stocked, SS version, .300WSM), I simply installed pillars, threw away the recoil-lug, and allowed the final (over the pillars) bedding "replace" the recoil-lug. For both gluing-in the pillars, and bedding, I used J-B Weld. The finished job, featuring the counterfeit recoil-lug has stood the test of a decade now, and with a 165 Gr. bullet, at 3200+ FPS, the rifle reliably shoots .5" 5-shot groups - it's a pretty decent huntin' rifle. RG
 
Last edited:
Make a slightly thicker recoil lug from steel or stainless and skim both faces of the recoil lug slot in the action until it's a neat fit. Use a drop of low strength locktite to retain the recoil lug in the action slot during bedding. Bed the action with pillars as you normally would and when you pop it out scrape any excess Loctite off the recoil lug and action slot.
 
If you want to retain a factory type recoil lug, Mountain Tactical makes a nice one that I've used on a couple of 'Teekers'. I put the lug into the action with either JB Weld or LocTite 680 retaining compound...my preference being the 680 unless the fit is a bit loose in the action when using the original lug. Then JB Weld does it. Pillars with a 5/16" O.D. and a flanged sleeve with a 1/4" I.D. glued into the pillars to center the dummy pins used in place of action screws when bedding. The pins should not be threaded any more than to engage loosely into the action....long shank bolts with the heads cut off work fine.

Once that's done, I tape for clearance on the front, side and bottom of the lug and bed per normal. On the poly stocks, I fill the cavities alongside the the front of the receiver with JB Weld, etc. and let it set up for a day to stiffen this area up prior to the final bedding. Don't use excessive bedding compound trying to fill these areas as part of your bedding process...do it as a seperate step a day or two before. Makes a big difference.

R.G.'s caution on the bedding adhering to the stock is good advice. On the poly Tic-Tac stocks I've done, I scuffed everything with 80 grit paper and a Dremel coarse flap drum, washed the beejeezus out of them with acetone and used ProBed 2000.

For what it's worth... -Al
 
Last edited:
That's worth alot to me Al :)

I have stock pins that I made from metric lag bolts. Lopped the heads off.

Just so I'm clear, you loctite the lug to the action so it is permanent? I have the permatex equivalent of loctite 620, it's a bearing sleeve retainer. Would that do the trick?

And thanks to all, I do plan on roughing the entire thing up. And I love the tip on doing the receiver cavities 2 days before.

Now back to the bottom metal/trigger guard. Do I let it touch the pillars?
 
Last edited:
The bedding is the easy part. LOL! No one has mentioned release agent. Use plenty cause your gonna sweat bullets until the action comes loose from the stock. Every time I bed one of mine I always hope I used enough release agent. First time is the worse also. After that its gets easier each time.
 
Or go buy a GRS Bifrost Stock,torque it down correctly and go shoot tiny groups. Mine works just fine.

 
So I'm picking this project back up this weekend... one last thing is perplexing me.... how far in front of the recoil lug should I wrap tape around the barrel so I can center it in the barrel channel and free float it?
 
I found and really like the advice that AlNyhus shared. Find the balance point of the barreled action... that's where the tape goes. Action just happily rests in the mud until it dries.
 
may I suggest Lumley arms ,,get bottom metal ,it comes with correct length pillars and stainless over size recoil lug and new screws site also has video on how to bed or as I did just pillar s
 
Last edited:
Are your pillars already epoxied in and the cavities filled? -Al
Not yet. I have on gotten as far as relieving the stock where the bedding will go and drilling the holes for the pillars

And lumey arms is what I'm using. Didn't know they had a video. I'll check that out.
 
I found and really like the advice that AlNyhus shared. Find the balance point of the barreled action... that's where the tape goes. Action just happily rests in the mud until it dries.
That sounds like a great rule of thumb.

I'm assuming this is the balance point without the the stock? Also, does it matter if the trigger or scope is installed? I guess I'm trying to ask... is it the balance point when the rifle is complete...or just the stripped action and barrel.
 
That sounds like a great rule of thumb.

I'm assuming this is the balance point without the the stock? Also, does it matter if the trigger or scope is installed? I guess I'm trying to ask... is it the balance point when the rifle is complete...or just the stripped action and barrel.
When it's stripped and ready to bed. You want it balancing on the tape when the glue is setting up.
 
I'm assuming this is the balance point without the the stock? Also, does it matter if the trigger or scope is installed? I guess I'm trying to ask... is it the balance point when the rifle is complete...or just the stripped action and barrel.
Remove everything that can get in the way or get bedding in it...trigger, etc, etc.

This is one I'm doing now. Balance point marked on the barrel and on the stock for reference.
z14Awwqh.jpg

sElKd0Bh.jpg


If this is your first bedding job, the Easy Button is to tape the barrel at the end of the stock. But that also makes it so you need a more 'mechanical' means (c-clamp, etc) to hold the action into the stock. All in all...not that big of a deal either way. However you do it, have your holding means figured out, trialed and adjusted and ready before it goes into the bedding.

When the barrelled action is dropped into the bedding is not the time to figure out how to hold stuff together. :eek:

Hope this helps...just my way of doing it. -Al
 
When the epoxy is about halfway through curing, I crack the guide pins loose a half turn or so....makes a difference when you remove them after it's cured.

-Resist the urge to take it apart before it's cured.
-Remove the guide pins before trying to remove the barrelled action from the stock.
-Clean the guide pins up and reinstall them so they bottom into the action. Give them a rap with a steel hammer to 'shock' the barrelled action loose. Then remove them.
-Turn it over on your lap and give the barrel (right ahead of the stock) a good rap with a rubber hammer.
-Don't use the barrel like a jack handle to get it out out the stock.
-If the tang area isn't cooperating, tap the stock behind the tang with a rubber hammer.

Looking forward to seeing your pics and progress report. :) -Al
Half way cured... like 12 hours? I'm doing this in my basement... 70*.
 

Upgrades & Donations

This Forum's expenses are primarily paid by member contributions. You can upgrade your Forum membership in seconds. Gold and Silver members get unlimited FREE classifieds for one year. Gold members can upload custom avatars.


Click Upgrade Membership Button ABOVE to get Gold or Silver Status.

You can also donate any amount, large or small, with the button below. Include your Forum Name in the PayPal Notes field.


To DONATE by CHECK, or make a recurring donation, CLICK HERE to learn how.

Forum statistics

Threads
165,781
Messages
2,202,440
Members
79,101
Latest member
AntoDUnne
Back
Top