You are using an out of date browser. It may not display this or other websites correctly.
You should upgrade or use an alternative browser.
You should upgrade or use an alternative browser.
Maximum height of bullet trajectory?
- Thread starter Alexander-M
- Start date
I barely made it out of 8th grade parochial school, still I offer this info from my notes be it right or wrong. (BTW - Watch out for Sister Theresa, she keeps a ruler in her cincture (rope belt).
Maximum Ordinate – Maximum ordinate is the greatest height, actually beyond midpoint, the projectile will travel above the line of sight on its path to the point of impact. This apex of the trajectory, when adjusting the scope parallax, can be used to read wind/mirage at that distance and height.
Step 1 - Target Elevation MOA - (Target Mid-Rangeyards + 10%) Elevation MOA = Maximum Ordinate MOA
Step 2 – (Maximum Ordinate MOA x MOA inch x Mid-Range100 of yards) ÷ Inches per Foot = Maximum Ordinate feet
Absolute Drop - Vertical descent of a projectile below the line of departure from the bore. When shooters refer to bullet drop they typically consider drop as measured from the line of sight.

[1] Wind 2/3s distance is important but wind reading begins at shooter and is the only wind verifiable with any degree of certainty.
Maximum Ordinate – Maximum ordinate is the greatest height, actually beyond midpoint, the projectile will travel above the line of sight on its path to the point of impact. This apex of the trajectory, when adjusting the scope parallax, can be used to read wind/mirage at that distance and height.
Step 1 - Target Elevation MOA - (Target Mid-Rangeyards + 10%) Elevation MOA = Maximum Ordinate MOA
Step 2 – (Maximum Ordinate MOA x MOA inch x Mid-Range100 of yards) ÷ Inches per Foot = Maximum Ordinate feet
Example: ([20.3MOA 800yards - 7.5MOA 440yards] x 1.0472” x 4.4) ÷ 12 = 4.92 feet[1]
Absolute Drop - Vertical descent of a projectile below the line of departure from the bore. When shooters refer to bullet drop they typically consider drop as measured from the line of sight.

[1] Wind 2/3s distance is important but wind reading begins at shooter and is the only wind verifiable with any degree of certainty.
A very valuable set of figures.I believe the term you are looking for is "Mid Range Trajectory". It used to be published in some loading manuals years ago.
I figured they are gone because the ad men came with all new bullshit to sell new shooters. They are very successful.
Highpower-FClass
Gold $$ Contributor
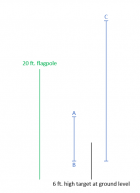
Here is a visual to further illustrate the difference between the apex of the bullet trajectory and the 'bullet drop' value provided by trajectory calculators.
The x-axis has no relevance in this depiction, but the length of the lines are to scale, relative to each other, for the scenario that Alexander provided. Someone shooting a 284 Winchester at 1000 yards with a muzzle velocity of 2825 fps.
The black line is a 6 ft. target placed at ground level. The X on the target face is located 3 ft. above ground (vertical center of target).
The green line is a 20 ft. flag pole at ground level.
"A" is the height of the apex of the bullet trajectory. This is the highest height above ground the bullet will reach on its way to the target. (Again, the x-axis has no relevance in this depiction, the actual location where the bullet reaches this height will of course be somewhere somewhat close to halfway to the target).
"B" is the height at which the bullet will be at the target. Congratulations on the waterline shot!
"C" is the Bullet Drop value provided by trajectory calculators. This is the height at which the bullet would have been at the target if there was no gravity. This measure is not the apex of the bullet trajectory. The fact that this measure is sometimes provided in inches by trajectory calculators is what confuses some to believe that it has to do with the apex of the bullet trajectory even though it does not.
** This depiction assumes that the shooter and rifle is located vertically centered to the target

No. The easy way to find your bullet trajectory apex (max ord) is to set the zero range in your ballistic app to your target range and then find the point where the bullet is at max height in the trajectory table.Would it be correct to say, when shooting on a level range, that the maximum bullet arc height, would be “ roughly half” the bullet drop ?
For example, if your target is 1000 yards then set your zero distance at 1000 yards. You may want to set the range increment small to get a better estimate of max ord.
Last edited:
OK. Thanks. So, given Your example, with any chambering You choose, “WHAT IS THE MAXIMUM ARC HEIGHT IN INCHES ON A LEVEL RANGE” ?No. The easy way to find your the bullet trajectory apex (max ord) is to set the zero range in your ballistic app to your target range and then find the point where the bullet is at max height in the trajectory table.
For example, if your target is 1000 yards then set your zero distance at 1000 yards. You may want to set the range increment small to get a better estimate of max ord.
Thanks Again in advance
For my 308 win FTR rifle with a 200 grain Berger , the max ord for a 1000 yard target is about 9.5 feet. It all depends on your MV, ballistic coef, and air density (density altitude).OK. Thanks. So, given Your example, with any chambering You choose, “WHAT IS THE MAXIMUM ARC HEIGHT IN INCHES ON A LEVEL RANGE” ?
Thanks Again in advance
Alexander-M
Gold $$ Contributor
Which is exactly what I did, per my original post.No. The easy way to find your the bullet trajectory apex (max ord) is to set the zero range in your ballistic app to your target range and then find the point where the bullet is at max height in the trajectory table.
For example, if your target is 1000 yards then set your zero distance at 1000 yards. You may want to set the range increment small to get a better estimate of max ord.
Alex
For my 22N AR (28") shooting 88gr ELD-M @ right at 3000fps,
Drop @ 1000 from a 100 yard zero is almost 22 feet.
Drop @ 1000 from a 100 yard zero is almost 22 feet.
Last edited:
That's the distance between the line of sight and the bullet trajectory. If you think of iron sights the back sight is much higher than the front sight. This means the line of sight crosses the bullet trajectory. This explanation I think is correct. I still hear casual shooters say the bullet rises. It doesn't raise it crosses the line of sight. Where the line of sight crosses the trajectory is your zero'ed in distance. Post #23 shows the same thing I am saying.About what? Bullets do not rise after leaving the muzzle.
Point it up !@ 45 degrees (or even 1 degree/60MOA) and tell me it doesn't rise 
Highpower-FClass
Gold $$ Contributor
About what? Bullets do not rise after leaving the muzzle.
It rises. Look at Ned Ludd’s post #11 and #13. The sights (glass or open) are used to set the launch angle theta. That’s it.
You know what, you are both correct! The ambiguity of the question is what allows this to be the case.
These are two more precise questions that will illustrate:
- After the bullets leaves the muzzle, does it ever rise above the plane at which the muzzle is pointing?
The answer is No. This is the question Butch answered and he is correct.
- After the bullet leaves the muzzle, does it ever rise further above the ground than the height at which it leaves the muzzle?
The answer is Yes. This is the question marine52 answered and he is correct.
The key is to make the question explicit and specify 'rise relative to what?'.
Relative to the plane at which is fired - No - because of gravity
Relative to the ground - Yes - because of launch angle
I would like to find a graphic like this one for rifle bullets.
It's an Mathlet from MIT for throwing rocks but is fun to look at the curves.
 mathlets.org
No matter where I set the various controls I can't get the rock to go above the launch angle
It's an Mathlet from MIT for throwing rocks but is fun to look at the curves.
Ballistic Trajectory - MIT Mathlets
A thrown stone responds to the forces of gravity and drag.
Lee in Texas
Gold $$ Contributor
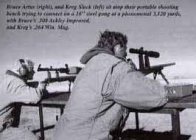
Here’s another visual. This is from an article in Precision Shooting, back around 1999 or so. Kreg Slack and Bruce Artus were firing at a steel gong 3120 yards away. A prairie dog popped up 5 yards beyond, and after several shots, one of them hit it. Anyway, check out that wild scope mount and the angle it needed for all the MOA, plus the height to see over the barrel. I did a bit of searching on this. One of those rifles fired its projectile to a max height of 276 feet above line of sight. There is a follow up article in the book Precision Shooting at 1000 Yards, in which they shoot at prairie dogs 3520 yards away (2 miles)
Attachments
Lee in Texas
Gold $$ Contributor
Here’s something else; when I was in the Army 20+ years ago, soldiers were taught that the bullet from an M-16 climbed for the first 100-150 meters. I’m sure that was originally an oversimplification of barrel angle and sight position, but a lot of soldiers and NCOs believed that it could climb from a level barrel. There were lots of urban legends about guns, including the Abrams 120mm main gun (and 155, I would imagine). It always blew my mind that soldiers in combat arms could believe such nonsense, but they’re human, just like the rest of us.
Similar threads
- Replies
- 5
- Views
- 465
Upgrades & Donations
This Forum's expenses are primarily paid by member contributions. You can upgrade your Forum membership in seconds. Gold and Silver members get unlimited FREE classifieds for one year. Gold members can upload custom avatars.

Click Upgrade Membership Button ABOVE to get Gold or Silver Status.
You can also donate any amount, large or small, with the button below. Include your Forum Name in the PayPal Notes field.
To DONATE by CHECK, or make a recurring donation, CLICK HERE to learn how.

Click Upgrade Membership Button ABOVE to get Gold or Silver Status.
You can also donate any amount, large or small, with the button below. Include your Forum Name in the PayPal Notes field.
To DONATE by CHECK, or make a recurring donation, CLICK HERE to learn how.


