Using the Sinclair Gen II flash hole deburring tool for the first time on a batch of FC.223REM cases produced 30 grains of brass chips from 100 cases. I was impressed with how deep the chamfer cut is on the inside of the case. Just wondering if this is normal before doing proceding with a second batch of cases.
.3 grains seems like a LOT of brass to be cutting away from a 223 case head!
General instructions with most deburring tools is to cut away the minimum required to remove potential burrs.
Do you have access to a bore scope? That's an excellent tool to evaluate just how much the tool is taking off the flash hole. Even a good, strong flashlight is helpful to take a peek inside the first case or two.
As a visual guide, the width of the observable chamfer should be barely visible to the naked eye: perhaps less that 1/8 the diameter of the flash hole... just a bright hairline ring, not a "funnel."
A Gen II has an adjustable depth stop?
As a guide I'll set mine by firmly seating the cutter in a new case, then adjust the depth stop to a point no more than perhaps .003-5" beyond where it otherwise would be resting on a squared-off and chamfered case neck. This is enough for me to be assured I'm catching whatever burrs may be present, as well as take the square edge off the flash hole.
It's also important to have all your cases trimmed to the same length & case necks chamfered inside & out. Otherwise the depth-of-cut will be quite random, even with a properly positioned (off of one random case) depth stop.
OOPS - agree with SPClark. 30 grains is a huge amount. You must have the depth stop way too deep.... May end up being weak in the primer pocket now?
I dont have that brand of tool, but wouldn't the case OAL have a lot to do with how deep it cuts?, Shouldn't its stop work off the inside head of the case?
I only reload Lapua brass, and dont touch the flash holes, just look at them once when the brass is new. I think my tool is an RCBS, but it doesent get much use.
Mike, I have the older sinclair and they space off the inside base of the casehead as you say. There is a depth stop on cutter blade. The tapered bush at mouth should be used to hold handle central in shell so the chamfer is even. If off centre it certainly will cut shallower on one side than the other - I doubt it would "overcut" though with different OAL. Overcutting is all to do with depth stop.
Well I bought this tool because it is supposed to have the depth stop built into the cutter tip, and it does work that way. Its just that the chamfer is deep and does look like a funnel more than just a breaking of the sharp edge. Sinclair does say that it deburs and chamfers the hole and boy they weren't kidding. As said above,the adjustable cone is for centering the tool in the neck does not act as a stop. There still seems to be enough brass left down there so will fire a few few rounds of medium loads and see what gives. Thanks for the comments folks.
The other thing too. The depth stop is really only there as a "safety stop". I only give mine a couple of light turns, like deburring or chamfering.
More on the Sinclair Gen II deburring tool:
Let me say for starters that the Sinclair Gen II tool worked as advertised but with two hitches. The integral stop works great which is the main reason why I bought this tool. I followed instructions and did a test to see what the tool does to a case before proceeding. The actual size of the chamfer was comparable to the factory chamfer on a Gevelot 222 case so it was not a worry at first.
The first hitch: The tool is designed to be used by hand but it was always hanging up on a burr and required excessive pressure to cut the burr. After processing around a dozen cases but before getting blisters I decided to chuck the tool up in a portable drill. Holding the case in a gloved hand and spinning the tool at the higher drill speed life became interesting. It was easier to control feed to the bit and cut the burr gradually. I could feel the cutting stop when the bit bottomed on the base. This was how I expected it to work. Note that Sinclair does not recommend using this tool under power. The only apparent reason is that the flat on the shaft makes it very tricky to fit straight in a chuck.
The second hitch: It was only when cleaning up after a 100 cases that the amount of brass and the size of the chips started me wondering. The ‘slight chamfer’ mentioned in the catalog is actually quite impressive. It definitely changes the capacity of the case. Is something wrong somewhere? Anyone who just wants to deburr should be aware of this issue. On the positive side the chamfers appeared very uniform from case to case. I will try to post a pic or two shortly.
My objective of deburring flash holes is uniformity. Any approach based on feel or indexed on another part of the case is unnecessarily complicated. There is no reason why a tool with an idiot proof built in stop on the tip can’t work if it is made properly. A simple change in profile of the Sinclair cutter could reduce the chamfer. This experience left me wanting to try the K&M deburring tool .
-

Deburr tool 012.JPG
41 KB
· Views: 163
that's insane man!!! That's not right.
I just bought the same Sinclair tool, and used it on my 6BR brass... it does NOT create any chips... just a very small amount of brass 'dust' that comes from the very edge of the flash hole. That's about all you'll want the tool to do.
Walt
I quit using the inside the case flash hole deburers with the 60 degree cone shaped cutter. They can easily remove to much material in not set up correctly. What happens is after a couple of firings the flash holes enlarge some. This has happed to me on some 223 cases. I sectioned a couple at the web with a file and could easily see that the tool with a stop was coning just about the whole lenght of the flash hole. I even tried to adjust the stop which is another story my itself.
What I use now is just a 7/32 drill (118 degree angled tip) glued on a 1.25" inch wooden ball. Just turn my hand and feel for any burrs. Easy, Cheap, Fast, and works for me. There will be a few tough burrs, which is why you are doing it.
Whoa!
You are cutting way too deeply with that tool. There should be a stop that hits the case mouth to control the depth of cut. It should be adjusted to where the tool just makes a chamfer barely larger in diameter than the flash hole.
Those cases that are cut to much? Toss them or use them to make dummy rounds.
Rust said:
Whoa!
You are cutting way too deeply with that tool. There should be a stop that hits the case mouth to control the depth of cut. It should be adjusted to where the tool just makes a chamfer barely larger in diameter than the flash hole.
Those cases that are cut to much? Toss them or use them to make dummy rounds.
or practice annealing!
I'm with camac on this one. Have used an old Lyman giving it just a few light turns/ just enough to break away the burrs. Holding it up to the light I can see that I just barely broke the sharp corner, and get very little brass chips. For the occassional case that catches on the cutter, I hold the case wrapped in rubber and work the cutter gently 'til the large burr is cut off. Only do this on Winchester and LC brass, never the Lapua.
Lapua brass is looking better and better to me.
")
Thanks again for your comments.
fdshuster said:
I'm with camac on this one. Have used an old Lyman giving it just a few light turns/ just enough to break away the burrs. Holding it up to the light I can see that I just barely broke the sharp corner, and get very little brass chips. For the occassional case that catches on the cutter, I hold the case wrapped in rubber and work the cutter gently 'til the large burr is cut off. Only do this on Winchester and LC brass, never the Lapua.
Frank,
What's the reason you suggest never deburring the flash hole on Lapua brass?
I'm currently using Lapua brass for my 6BR, and have found little burrs in there. I must have a funky lot of Lapua Brass, as I've found my necks to be thicker (up to .014) and more inconsistent (anywhere from .12 to .014, sometimes on the same piece) than most other guys on this forum. Now you've suggested that your Lapua brass doesn't have any burrs in the flash hole, while I've found multiple pieces that do. Interesting...
Lapua brass does occasionally have small burrs remaining after drilling the flash holes. They are pretty easy to remove and do not resemble the raised perimeter that results from punching flash holes. When I prep Winchester brass, it is typical to remove a fair amount of material around the flash hole. Lapua brass usually only requires a very light twist to break the flakes and introduce a slight chamfer.
queen_stick & sleepygator: I've never found any appreciable burrs on the inside of my Lapua in 222 Rem, 223 Rem, 220 Russian, 6BR & 308, so never saw a need to be concerned about it. But, since you have found some brass to have burrs, I'll have to spend some time checking them closer-- darn-it, more work!
Frank, it was several lots before I first saw this and it is not present on all. I will speculate that it may be whether the drill is beginning to dull or not. When drilling gummy material, it is important to use a very sharp drill or the last bit will push aside and form a flake. It tends to resemble a hole-diameter disk attached at one side. In no way does it look like the "crater-edge" appearance caused by punching flash holes.
Lapua seems to just have runs of this. My last two batches of brass have had burs on the inside but I had a really good run before that with only seeing it once before (total 3/12 batches).
Definately worth inspecting the inside though. As said they clean up easily with only a few per hundred being a little "stubborn" and not coming off with slight twist. I have never had to go for a bigger handle.
Something doesn’t settle with me about scrapping the brass processed with the Sinclair Gen II tool.
My objective in buying this tool was to uniform the flash-hole on some FC cases that had very irregular chamfers (lopsided and of variable depth) with the occasional burr that stuck up like the tip of a knife blade into the case cavity. Based on Sinclair’s advertising, the Gen II tool seems to be designed for correcting this type of condition.
I followed the instructions received with the tool; here are some related quotes from the sheet included with the tool:
• The cutter on this tool will remove the flash-hole burrs created during the manufacturing process and replace them with a chamfer for uniform powder ignition.
• This flash-hole deburring tool features an integral stop to prevent you from removing too much material from the flash-holes of your brass.
• Brass chips do accumulate in the cutter area are easily dislodged with light tapping of the tool on your bench top.
• Rotate the tool clockwise. You will feel resistance as the cutter removes the burr. When you no longer feel resistance, stop rotating the tool.
• If you are deburring 22 calibre or 6mm cartridges, it is not necessary to use the cone stop for anything other than a handle.
• This tool is not recommended for use under power.
As mentioned in the above posts the result of my using this tool was a little scary. More chips were produced from this operation than I expected. The chamfer was deeper than expected. These surprises were enough to make me wonder if the cases were ruined. However, going over the facts again after a good night’s sleep I can’t find any reason that points to scrapping this lot of cases.
Re my technique, although using the tool by hand was not as straightforward as I expected nothing indicates that my method was in error. From the start, the tool would seem to hang up in the flash-hole even when using the slightest feeding pressure. Monitoring this ‘deep hole drilling’ exercise with an otoscope, it was obvious that one flute of the tool was getting considerable bite into the high side of the flash-hole. Once past this initial lump in the flash-hole and when the second flute came in contact with the brass, it became easier to turn the cutter (but there was still some ‘resistance’). Once the ‘integral stop’ was in contact with the web all resistance was gone.
The first few cases were done very tentatively because the hand pressure to get the tool started in a new cut was extreme. After around 10 cases but before blisters appeared on my hands it became clear that we had to try something else. (In retrospect, I must have been working with very shitty brass.)
Using a glove to hold the shell, I reluctantly chucked the tool into a portable drill. After a few cases it was obvious that this technique was providing the same result but with a lot less frustration. It would be interesting to know why Sinclair does not recommend using this tool under power.
Re the chips, Sinclair advises that there will be chips. Considering how uneven the FC factory chamfers were, it stands to reason that a considerable amount of brass would have to be removed to get them uniform. Better quality brass might need less cutting to uniform them and produce fewer chips as you folks have already mentioned.
Re the deep chamfer, it turns out that Gevelot and Metalverken 222 cases from days gone by have a factory chamfer even deeper than the one cut by the Gen II tool. Although the Gevelot cases have a more rounded chamfer, a thicker web (.100’’) and a smaller diameter flash-hole(.062’’), the length of the flash-hole’s straight section is short (.055’’). By calculation, the chamfer on the Gevelot case is .045’’ deep.
A current Winchester 222 case was also deburred with the Gen II tool and then sectioned. The web of the WW case is .080’’ thick versus .071’’ for the FC case. This difference results in the straight uncut part of the flash-hole being .045’’ long versus .036’’ for the FC case.
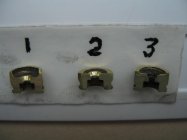
The attached photo shows the three case heads that were sectioned:
1 = FC case, 2 = Winchester case, 3 = Gevelot case
Safety is my first concern but I am not ready to jump to conclusions out of fear. So far there is no scientific explanation as to why the work done to the FC cases with the Gen II has made them unsafe. On the contrary, I have found examples of other cases that were factory made with a similar deep flash-hole chamfer. Food for thought.
-
deburr stuff 003.JPG
30 KB
· Views: 98


