• This Forum is for adults 18 years of age or over. By continuing to use this Forum you are confirming that you are 18 or older. No content shall be viewed by any person under 18 in California.

Induction brass annealer redux

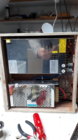
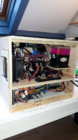
Twist the outgoing and return. You want quite heavily stranded wire in order for it to be manageable. I use LAPP Olflex 2.5mm^2 wire which has 50 strands. (Equates to 14AWG or thereabouts.). You don't need anything thicker than this, and even this may well be overkill as the runs are very short.

SGK.. I'n curious, what are you trying to accomplish and on what wire run with the LAPP wire. ? On power to the unit, any 14 gauge stranded 3 wire line cord will do.
Power to the induction PCB via the contactor relay is just DC and any 10 gauge wire will work. (stranded or solid)
 
Gina1 thank you and Thank Hollywood for making this open source machine available. You two are the tops! Also, thank you for the feedback, I found the DC chart so I settled on 10AWG but that cord was what was getting me. I wanted to make sure I wasn't building an impending electrical fire. I asked for the Heaviest cord the local electronics shop had and they gave me a multi-strand 14 AWG so it looks like I lucked out and don't need to make another trip. Thank You again for your feedback. I can't wait to scrap my little DIY propane annealer, the cheap motors are already running out of true and one of them just cant keep time anymore.
Your welcome. Glad to help Regina
 
I read the question as relating to the internal wiring from the IEC inlet to the power module, not the cord to the domestic wall socket. Highly stranded wire is much easier to twist and route. I use that wire in all of my audio electronics builds.
 
I read the question as relating to the internal wiring from the IEC inlet to the power module, not the cord to the domestic wall socket. Highly stranded wire is much easier to twist and route. I use that wire in all of my audio electronics builds.

Ahhhh, I see. In this case, since twisting a pair of wires reduces hum pick up in audio you just carried the procedure over to the annealer.
 
Parasitic inductance and noise. What we call "hum" is typically caused by DC hitting toroidal transformers. It's good practice in any event. I would do the same with all wiring, especially the wires from the PSU to the induction board. It's been found to improve greatly the performance/efficiency of the MOSFETs on the induction board. (I can dig out the reference for this if you want.) But were you objecting to the twisting comment or the recommendation of using multi stranded wire? The latter is so much easier to use and given a choice, greatly preferable.
 
Parasitic inductance and noise. What we call "hum" is typically caused by DC hitting toroidal transformers. It's good practice in any event. I would do the same with all wiring, especially the wires from the PSU to the induction board. It's been found to improve greatly the performance/efficiency of the MOSFETs on the induction board. (I can dig out the reference for this if you want.) But were you objecting to the twisting comment or the recommendation of using multi stranded wire? The latter is so much easier to use and given a choice, greatly preferable.

No objections. This is everybody's build. What ever makes for a better unit, go for it. IMHO in the "basic simple GinaErick" simple is better.
 
I have been playing with my annealer and It seems to be pretty solid. The only issue seems to be the ZVS board getting hot when I run a batch of say 100 pieces of brass through it.

I had a 120mm fan blowing down onto the ZVS board and now added a second fan underneath blowing up, we shall see but it does not seem to provide enough cooling as the bottom of the ZVS board is still pretty hot after extended continuous use.

I am thinking if this 1000w board gets cooked I may try the 1800W and see what happens.

Has anyone moved from a 1000W ZVS board to a larger one using the same coil?
Curious if there any amperage draw difference?
 
@SGK I was referring to the cord from wall outlet to IEC socket. I figured the wire from the IEC to the power supply would need to be the same gauge. Good call though, as I didn't mention using the IEC 32 type socket in my question. I have an IEC 32 socket with a built in On/Off I plan to use.

I will take your advice of twisting wire together as I know form many years ago that it does help with mosfet performance. It was suggested to solve an AMP problem and I couldn't believe it when it worked.
 
I have been playing with my annealer and It seems to be pretty solid. The only issue seems to be the ZVS board getting hot when I run a batch of say 100 pieces of brass through it.

I had a 120mm fan blowing down onto the ZVS board and now added a second fan underneath blowing up, we shall see but it does not seem to provide enough cooling as the bottom of the ZVS board is still pretty hot after extended continuous use.

I am thinking if this 1000w board gets cooked I may try the 1800W and see what happens.

Has anyone moved from a 1000W ZVS board to a larger one using the same coil?
Curious if there any amperage draw difference?

They do get hot, I've gone thru a couple. You need to keep the duty cycle low enough so it can dissipate enough heat between cycles. You can add more fans and heat sinks or slow down a little. I upgraded to the 1800w version a year ago and have had no problems with it.
http://forum.accurateshooter.com/th...-annealer-redux.3908353/page-68#post-37372111
 
@SGK I was referring to the cord from wall outlet to IEC socket. I figured the wire from the IEC to the power supply would need to be the same gauge. Good call though, as I didn't mention using the IEC 32 type socket in my question. I have an IEC 32 socket with a built in On/Off I plan to use.

I will take your advice of twisting wire together as I know form many years ago that it does help with mosfet performance. It was suggested to solve an AMP problem and I couldn't believe it when it worked.

My error.
 
The flame detector I was trying out is just the wrong wave length to sense low enough temperature (750F), it will sense when the brass just starts to glow but that's not soon enough. I've looked around for another bare bones IR phototransistor but I can't seems to find one with the correct wavelength range. I ordered the mlx90614 thermopile sensor that has a range up to 380 degC (716F), just short of 750F. Not sure how it will respond to the surface of the brass. Got one with a narrow sensing angle but it might not be narrow enough. The units with a really narrow angle were more expensive then what I was willing to try. They make an mlx90616 with a higher range but nobody seems to be able to calibrate it and its almost impossible to find for sale. Anyone have any luck with a thermopile or IR phototransistor?
 
Being new to shooting I realised that sometime, something had to be done to anneal my brass. After looking around on the internet I found this forum and after reading the first 2 pages it was clear I had to build this annealer. Thank you to Gina and Eric to make complicated things simple so It is possible for a bolts and nuts engineer to build this annealer.
Basically I did not change anything. Some details are different. The power unit has a possibility to set a max Volt and a max Ampere. See the 2 grey knobs on the front. Because the housing I built looks something like a soundboard the contactor is mounted on vibration dampers. Looking around at Alie’s I found a thermometer for less than 2 dollar, transport included. Since a lot of people experienced heat issues this thermometer had to go somewhere into the annealer. The sensor and the display are connected with a wire about a meter long so placing wherever a heat issue can occur is simple.

The coil is made of 3mm outer diameter messing tube, inner diameter 1.6. Inner diameter coil 25,4mm, 7,5 windings. After a series of 20 shells and an intercooling time setting of 5 sec it remained cool to the touch.

https://www.dennisdeal.com/products...v-1000w-with-dual-lcd-digital-display_1557594

https://nl.aliexpress.com/item/32628773678.html?spm=a2g0s.9042311.0.0.62e64c4dC2Sp7n

So far the good news. I have a problem with the V/A meter. Which wires to connect to the 12V power supply? The thin red and black wire on the 3 pole connector or the thick red and black wire on the 2 pole connector. Please help. Mine is dead now so I have to order a new one and can not test anything
 

Attachments

  • 20200104_090611.jpg
    20200104_090611.jpg
    232.1 KB · Views: 253
  • 20200209_150940.jpg
    20200209_150940.jpg
    185 KB · Views: 253
  • 20200209_151030.jpg
    20200209_151030.jpg
    237.7 KB · Views: 245
I just built a unit based on a 1000W ZVS board, a cheap power supply (36V, 400W) and a coil based on the Giraud Retrofit design. It’s controlled by an Arduino UNO R3 clone. Total costs less than 100$. Running cool and drawing around 5A annealing a 308 case. Also tried the IR photo transistor/flame sensor from the Arduino starter kit but it won’t detect before the neck is glowing red. https://www.instagram.com/p/B8WWZmKpU9X/?igshid=fv9r3isxgs1v
 
Is just glowing hot enough? I don’t want to start a fist fight but in a recent interview at shot show 2020, Alex from AMP stated that they too believed 750°F was the right temp until they started testing. Seems 750 is not hot enough for the time we typically use. So just maybe your sensor will work?? The AMP in Aztec mode uses some sort of sensor the capture the exact moment of case failure and then they “calculate” the desired time (code number) backwards time wise from that point.
I too go with the 750, just glowing, time and adjust the timer to that. Maybe we are wrong??? Just putting it out there.....
Ultimate Reloader Shotshow 2020 on You Tube if you want to check it out.
I'm also not overly concerned about seeing red :) If I get a case glowing red (all neck glowing) in 8 seconds, then doing it 2X4 seconds with 1s delay between, I get less glow, but "prettier" annealing and visually more below the shoulder. By prettier I mean not just the neck fried/silvery/tin colored, but the more (correct?) dull matte look. I tried adjusting the lengths of the 2 intervals, and found out I could get a sharp and even "ring" doing 1/3 (of the 8s), 1s delay and 2/3.. Made me do a lot of tests - picture shows different outcomes of same total time but different pause and intervals. Will experiment with more intervals, measure, and find some some "universal" start/stop approach untill glow.85081046_545536936308205_7450470443997200384_n.jpg
 
I just built a unit based on a 1000W ZVS board, a cheap power supply (36V, 400W) and a coil based on the Giraud Retrofit design. It’s controlled by an Arduino UNO R3 clone. Total costs less than 100$. Running cool and drawing around 5A annealing a 308 case. Also tried the IR photo transistor/flame sensor from the Arduino starter kit but it won’t detect before the neck is glowing red. https://www.instagram.com/p/B8WWZmKpU9X/?igshid=fv9r3isxgs1v

Drawing 5A? That seems very low to me. Mine has a peak draw of 15 amps at 47.3V (710W) annealing 308 brass (4.8s). And you are well below your PSU capability. Could be because your gapped air coil is more efficient but the current draw, absent a limiter, is determined by the load and we're both using 308 brass. Color doesn't mean much at all.
 
Last edited:
The AMP in Aztec mode uses some sort of sensor the capture the exact moment of case failure and then they “calculate” the desired time (code number) backwards time wise from that point.

I would wager they monitor current draw versus time. At melting, the current draw drops dramatically. Then they dial it back from there. See this post #114 from @LR88 . I have reproduced the graphic here. Orange is voltage, blue is coil temp and red is current draw. X-axis is time in 10ths of a second.

300-winmag-png.1120748
 
picture shows different outcomes of same total time but different pause and intervals. Will experiment with more intervals, measure, and find some some "universal" start/stop approach untill glow.

That tempilaq is fried - it changed color way before it got to look like that...

I'd almost bet you could comfortably squeeze those case necks closed between thumb and forefinger.

Your brass hits 750F well before glowing at which point it is 950F or above.
 
@Standardelg I took a look at your video. Notice how the case mouth is the first to turn red and then thicker portions of the case heat rapidly to glow after that. Try placing the case in the work coil such that the case wall near the shoulder is centered in the 'coil'.
 

Upgrades & Donations

This Forum's expenses are primarily paid by member contributions. You can upgrade your Forum membership in seconds. Gold and Silver members get unlimited FREE classifieds for one year. Gold members can upload custom avatars.


Click Upgrade Membership Button ABOVE to get Gold or Silver Status.

You can also donate any amount, large or small, with the button below. Include your Forum Name in the PayPal Notes field.


To DONATE by CHECK, or make a recurring donation, CLICK HERE to learn how.

Forum statistics

Threads
165,525
Messages
2,198,004
Members
78,961
Latest member
Nicklm
Back
Top