• This Forum is for adults 18 years of age or over. By continuing to use this Forum you are confirming that you are 18 or older. No content shall be viewed by any person under 18 in California.

Induction brass annealer redux

I'm not familiar with them.

I would suggest asking yourself what your next project might be and what would be most useful for that. For example, I used this project as a platform for learning PIC programming because they are very useful in control circuits for audio projects (e.g. state detection, protection and fan control, amongst other things, in audio amplifiers). An Arduino-style micro computer wasn't going to be as useful in that type of project. But other interests - or broader interests - might point firmly towards Arduino as a better platform. In the end, both demand C programming in some form.

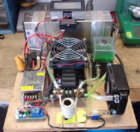
If you go down the PIC route you could take my PCB and develop the code further to replace the Sestos timer etc. Or you could head down the Arduino route with the help of others here.

If you are only considering this one project then, frankly, I would leverage the work of others. Programming the PIC for my control board was a relatively steep learning curve and, at times, frustrating. On top of the PIC programming I had to teach myself to use Fusion 360 to design my autofeeder. So as a learning exercise the whole project has been huge. But if it were just for this project it would be a colossal waste of time (albeit an intellectually stimulating one :) ).

PS if you learn a program like Eagle or KiCAD to design a PCB layout getting them printed is easy and relatively cheap via the likes of PCBWay.com
 
How far down the case body?

This is a little less than the width of the shoulder. 308 Win, 4.8s and circa 14.7A.

View attachment 1069241


Maybe these pics make things a bit easier. I cleaned the cases with Brasso before running them through the annealer.

And how do you tell whether to go less power for longer or more power for faster? Clearly with the latter the thinner case neck might get a lot hotter before the case wall below the neck comes to temp than with the former. If I turn the lights out the neck of the case eventually goes red at the mouth and that redness shoots down the neck just before the case is ejected.

IMG_3481.jpg IMG_3482.jpg

BTW my caps don't even get remotely warm when I run 10 cases through the coil as fast as I can. Maybe that changes if I run 100 but at the moment I am wondering why I need a fan at all :oops:
 
Last edited:
BTW my caps don't even get remotely warm when I run 10 cases through the coil as fast as I can. Maybe that changes if I run 100 but at the moment I am wondering why I need a fan at all :oops:

Yeah that changed when I ran 42 cases through as fast as I possibly could. 4.95s a case, 0.25s for trap door open, throw in next case. (An autofeeder would be slower.) Coolant system (radiator, water in pump etc) got rather hot. (This is with radiator fan just spinning at a low 20% duty cycle.) It's hard to tell just how much the coolant is heated by the fact that the 1/4" pipes run directly over the caps, but it certainly can't help.
 
BillK55
I got it from fleabay “dealinfinite”. $60
1800w 40a max, yes fans and 2” coil came with it. Why this one? I read and looked at all the posts here, thank you all, and studied all the pictures and problems everybody posted. This one seems to be the most ruggedly built. The traces on it are massive by comparison, with 9 caps and 2 large chokes


SGK
I intend to go with something similar to your build with a Dillon collator dropping cases into a magazine tube with the added function of a robotic arm putting the cases in the annealer coil then dropping them into a tray. Hence the plc controller. And also trying to get a job with a very large industrial contractor that uses plc in almost everything they build.

Oh also, I taught myself how to design and build vacuum tube guitar amps just for fun.
College physics major, Big Bang theory and science nerd. Not Sheldon! But not Leonard either. USMC
 
Last edited:
Sounds like a good reason to pursue the PLC! My suggestion: there's no need to over-engineer the dropping of a case into and out of the work coil; gravity does the job rather well. (Given your background, spend some time with KiCad and add PCB layout to your repertoire. Printing small PCBs is cheap as chips and opens up endless possibilities.) If you are going to add automation I think it is critical that you incorporate the ability to measure temperature at various points in the enclosure and have the ability for things to shut down if it gets too hot. I have incorporated the ability to use up to 4 NTC to measure temperature and can set the limit at which things will stop until temperatures cool. (The default limit is 70C.)

(You won't come close to using the power of your ZVS, but there's nothing wrong with overbuilding. That thing is just going to take up more space that's all. Just note the relationship between the capacitance and the inductor work coil for frequency of resonance etc. Albeit we haven't established how important it is.)
 
Last edited:
In these sorts of applications knowing temperatures to the nearest 5 degrees C is usually good enough and a simple lookup table (for both temp and fan duty cycle) saves a lot of computation and memory usage. That said, I computed temperature using float but immediately forced conversion to integer for use in setting fan speeds and reporting. Plus I created a little algorithm (4 lines of code) for determining fan DC based on temperatures. One thing PIC controllers with their limited memory do is force you to be smart about memory use and how you do computation. You might well find the same with PLC. A guy who helped me at a few points when I ran into problems had a good mantra: if it can't be done using integers you likely haven't thought well enough about the coding! I cheated in a few places to reduce approximation.

Here is some code for calculating temperature using an NTC as the upper half of a simple voltage divider with NTC_Balance_Resistor on the bottom half.


Code:
#define NTC_Balance_Resistor 4700                   //Balance resistor used in NTC voltage divider
#define Max_ADC 1023.0                               //10 bit DAC
#define Room_TempK 298.15                            //25C in Kelvin
#define Res_Room_Temp 10000                        //NTC resistance at 25C from data sheet

Code:
   Temp_NTC1=readNTC(NTC1);                    //Read temperatures
    Temp_NTC2=readNTC(NTC2);
    Temp_NTC3=readNTC(NTC3);
    Temp_NTC4=readNTC(NTC4);

Code:
//Calculate temp at an NTC in degrees Celsius
int readNTC(adc_channel_t channel)
{
    uint16_t ADC_value = ADC_GetConversion(channel);
    float rNTC = NTC_Balance_Resistor * (Max_ADC / ADC_value - 1);
    float Temp = round(NTC_Beta * Room_TempK / (NTC_Beta + (Room_TempK * log(rNTC / Res_Room_Temp))) - 273.15);
    return Temp;
}

Code:
    int High_Temp_Fan1;                     //Calculate max temp of NTC pairs
    if (Temp_NTC1>=Temp_NTC2){
        High_Temp_Fan1=Temp_NTC1;}
    else
        High_Temp_Fan1=Temp_NTC2;
 
    int High_Temp_Fan2;
    if (Temp_NTC3>=Temp_NTC4){
        High_Temp_Fan2=Temp_NTC3;}
    else
        High_Temp_Fan2=Temp_NTC4;

Then the next lot of code sets the fan duty cycles. The min DC for temps up to 25C is set by the user and the fans hit 100% DC 10C below the overheating limit. The use of int math for almost all of it produces an error of 1 if Adj_Temp is an exact integer. However, the use of int saves a lot of memory use and when there are, for example, 51 increments (CCPR values) of fan duty cycle between a minimum duty cycle of 35% and a maximum 100% the error is acceptable. In fact it is complete overkill. Just reporting a temperature to the user in even one decimal place will kill memory consumption and provide a rather useless sense of accuracy.

Code:
//Set CCPR value for duty cycle and return Duty Cycle
int Set_Duty_Cycle(int Fan_Num, int Fan_Temp)
{
 float CCPR_Min = round(Min_DC * CCPR_Max/100.0);
 uint16_t CCPR_Val = CCPR_Min;
 if (Fan_Temp > Base_Temp){
    if (Fan_Temp >= (Over_Temp - 10)) {
        CCPR_Val = CCPR_Max;
    }
    else {
        uint16_t Increment_Count = CCPR_Max-CCPR_Min;
        uint16_t Temp_Increment = (Over_Temp-10-Base_Temp)*1000/Increment_Count;
        uint16_t Adj_Temp = (Fan_Temp-Base_Temp)*1000/Temp_Increment;
        CCPR_Val = Adj_Temp + CCPR_Min + 1;
    }
 }
 switch (Fan_Num){
    case 1: PWM4_LoadDutyValue(CCPR_Val);
            break;
    case 2: PWM3_LoadDutyValue(CCPR_Val);
            break;
 }
 float Duty_Cycle = round(CCPR_Val*100/CCPR_Max);
 return (Duty_Cycle);
}

This forum isn't really here to teach people coding but I think it is worth flagging to you up front that a lot of precision with respect to temperatures inside the case isn't necessary. 2% NTC such as the ones I used provide more than accurate enough estimation of temperatures using the pretty decent fit formula above. What's much more important, especially in an autofeeder situation, is a mechanism so that a case sitting in the work coil can't be processed if temps are too high. How high is too high? Pick a number. For now I have used 70C but this can be changed on the fly by the user. (In the below, Switched_Cleared is to ensure things don't work with something in the work coil at startup.)

Code:
#define Not_Over_Heating ((High_Temp_Fan1 < Over_Temp) && (High_Temp_Fan2 < Over_Temp))

Code:
    if (Not_Over_Heating) {           //Maintain normal operation of optical switch and timer management
        OvrTmpLED_SetHigh(); //Make sure Over-Temp LED is off
        if (CASE && (Switch_Cleared=='Y')) {
            Switch1_SetLow(); //Stop feeder
            for (int countDelay=0; countDelay <300; countDelay ++)__delay_ms(5); //Delay 1.5s for case to settle
            if (CASE) {
                TimerStart_SetHigh(); //Start Sestos timer (connects Sestos pins 1 and 2 for 150ms)
                for (int countDelay=0; countDelay <30; countDelay ++)__delay_ms(5);
                TimerStart_SetLow();
                Switch_Cleared='N';
            }
        }
        else {
            if (NO_CASE) {
                Switch_Cleared='Y';
                Switch1_SetHigh(); //Start feeder (add a delay prior to this if needed)
            }
        }
    }
    else {  //Overheating. Blink LED. Operation can't commence until no longer overheating
        Switch1_SetLow(); //Stop feeder
        OvrTmpLED_Toggle();
        for (int countdelay=0; countdelay<10; countdelay++)__delay_ms(5);
    }
 
Last edited:
FWIW here is the entire main.c code for my PIC implementation. There isn't much to it. (Obviously there is other code supporting this but not stuff I had to generate. I used MPLAB MCC.)
 

Attachments

Last edited:
I have Altium and planned on using a TI MSP432 to control the system, last timei looked OSH Park could print the boards for about $5 a piece for smaller quantities. I have one drawn up with the complete induction circuit and one, just controls including case feeding. I just need to get the house done so I can get to this!
 
My 50A 1000W ZVS board came with 8 capacitors instead of the 6 on the common 20A ZVS board.


https://www.ebay.com/itm/1000W-DC12...Machine-Module-Power-Supply-P7A0/401152900878


I'll be using a 32V 1000W power supply (no current control)


https://www.ebay.com/itm/600-720-80...itching-Power-Supply-Transformer/123154981627


My caps are the same 0.33 mFd and other specs. Initially I figured I would just de-solder 2 of them from the middle of the group, otherwise I'd expect my coil frequency to drop about 15%. I got to thinking about it, if I compensate with the coil turns and diameter to keep the frequency the same, leave in all 8 caps, would my caps run cooler? Would I be spreading out the work so to speak?


I made a spreadsheet and used the formulas that GrocMax or SGK sent me a link to for calculating operating frequency of the ZVS tank circuit. I made substitutions in the formulas so that the variables become Diameter of coil (inches), Number of turns in the coil, Value of individual capacitors, and Number of capacitors. So then playing around with my spreadsheet, plugging in factors for the basic GinaErick design: 1-1/8" diameter, 8 turns, and 6 caps it comes up with 88 kHz as my baseline. My spreadsheet doesn't seem to get exactly what others have measured, but I think its close enough for me to make a relative comparison of conditions. Now when I plug in a 1" coil, 7 turns and 8 caps, it gives me 88 kHz. Not too far off and seems within reason for a usable setup.


I haven't installed any heatsinks or coolers below the rows of capacitors, so now is the time to decide if I remove 2 caps or not. In fact I'm still working out how to fit things in my case, so I'm not near operational.


Interpretation of this is WAY above my paygrade, its just intuition that brought me here, so I'm wide open to ideas, theories, postulations or just anyone else's gut feelings.


The spreadsheet I was referring to is attached.
 

Attachments

if I compensate with the coil turns and diameter to keep the frequency the same, leave in all 8 caps, would my caps run cooler? Would I be spreading out the work so to speak?

Maybe. Same ripple/sinusoidal load spread over more caps. For a given capacitance it is better to have more caps (i.e. smaller individual capacitors). But you have more caps of the same capacitance, totalling a greater level of capacitance. Homework exercise: figure out the frequency the circuit will resonate at, work out the impedance of the capacitance at that frequency and solve for current. That current load is spread across the caps. But the freq is still the same. Hmmm. Probably a good idea to model it in LTspice. Perhaps a good time and project to add that skill to your repertoire.


the basic GinaErick design: 1-1/8" diameter, 8 turns

You need to count the complete turns. You only get to "1" on the second 'line' of the work coil.

If you have a suitable mandrel for winding the 1/8" copper tubing, you could also go with a smaller diameter coil. But my case-specific shelf inserts have an outside diameter of 24mm so I guess that might place a boundary on dabbling with that. Note the EZ-Anneal has more turns and a tighter diameter.
 
Last edited:
Just curious if anyone has tried the 600 amp power supply with 45 cal casings, such as the 45-70 & 45-110? I like the very basic "original" set-up, but I am wanting to do everything from a 22 hornet to the 45-110 2-7/8" casing. I understand adjusting the timer, but will the extra time to anneal have any side effects?


To Gina & Hollywood, awesome job and a special thanks to both of you!!!
 
Hi Bob...

The original coil size (1 1/8") was designed for .308 cases. That said, it will work equally well for any case in that diameter size. With smaller cases ie: .223, the case wall is further away from the coil, so less energy is transferred to the case and it takes longer to heat up the case to annealing temperature. As far as straight wall cases, ie:45-70 it will work equally well. I just ran some Colt 45, 44 Mag and 357 cases through the annealer. Shorter annealing times, about 2.5 seconds. The Tempilaq showed good annealing temperature 3/8th's down the case wall. (did not have any .45 cases to check out)
Hope this answers your question.

Gina

You answered it perfectly. I wasn't sure if the 600 watt unit would work or not with the larger cases (not thinking closer= hotter faster). My one "big" concern has been answered....THANKS!!!!

Now I just need to order and the time to build....LOL
 
Hi, just wanted to thank Gina and Eric for their annealer plans. Here's my bread boarded version. I tried a few different timers just for fun, I have the one suggested also. This one has a simple one/shot that senses annealer power drop out to work the solenoid. Next I'll move it all into a metal cabinet. There I'm switching to analog gages for volt and amps. Old school thing. Been Fun Fun Thanks!
 

Attachments

  • annealer-breadboard-s.jpg
    annealer-breadboard-s.jpg
    188.8 KB · Views: 348
Hello, sir.
May I ask what is inserted into a coil? How many turns in it?
Thank you.
Hi, just wanted to thank Gina and Eric for their annealer plans. Here's my bread boarded version. I tried a few different timers just for fun, I have the one suggested also. This one has a simple one/shot that senses annealer power drop out to work the solenoid. Next I'll move it all into a metal cabinet. There I'm switching to analog gages for volt and amps. Old school thing. Been Fun Fun Thanks!
 
Hi, just wanted to thank Gina and Eric for their annealer plans. Here's my bread boarded version. I tried a few different timers just for fun, I have the one suggested also. This one has a simple one/shot that senses annealer power drop out to work the solenoid. Next I'll move it all into a metal cabinet. There I'm switching to analog gages for volt and amps. Old school thing. Been Fun Fun Thanks!

I think analog gauges would look neet. Nice "retro" look. :D
 

Upgrades & Donations

This Forum's expenses are primarily paid by member contributions. You can upgrade your Forum membership in seconds. Gold and Silver members get unlimited FREE classifieds for one year. Gold members can upload custom avatars.


Click Upgrade Membership Button ABOVE to get Gold or Silver Status.

You can also donate any amount, large or small, with the button below. Include your Forum Name in the PayPal Notes field.


To DONATE by CHECK, or make a recurring donation, CLICK HERE to learn how.

Forum statistics

Threads
165,827
Messages
2,204,083
Members
79,148
Latest member
tsteinmetz
Back
Top