Follow along with the video below to see how to install our site as a web app on your home screen.
Note: This feature may not be available in some browsers.
This Forum is for adults 18 years of age or over. By continuing to use this Forum you are confirming that you are 18 or older. No content shall be viewed by any person under 18 in California.
Could someone direct me to where I can learn how to read / understand what the primers are telling me in regards to pressure etc .
Only just started reloading again after many years , and the whole flattened primer / ejector mark etc as an indicator of pressure is something I need to understand better .
Thanks for that link .
It makes sense to compare a fired factory case to your reloads, and I’ll admit that I never thought of that to establish a baseline of what your brass does in your rifle .
Just be aware that by the time you normally see obvious pressure signs on the brass or primers, the load is usually way over pressure. Further, primer "over-pressure" signs can also result from having too thin a cup, an excessively large diameter firing pin, or a firing pin with too much clearance around it to the bolt face (i.e. firing pin needs to be bushed), rather than excessive pressure, per se. Likewise, ejector marks on brass are caused in part by the fact that the casehead is effectively unsupported over the ejector. Even loads that are well within SAAMI pressure specs can sometimes cause ejector marks because the casehead is unsupported in that area.
All in all, I personally don't find marks on (or the appearance of) primers or brass to be the most reliable indicators of excessive pressure. Nonetheless, you willingness to learn more about them is not a bad thing. Quite the contrary. Ernest T has provided some very good images to start you off. An internet search for brass or primer "pressure signs" (or something similar) will likely pull up a bunch more. When you find some images that are really clear/revealing, simply save them in a file so you can look at them whenever you feel the need.
As @Ned Ludd stated, primers aren't always the best indication. The best list I have ever found covering a very broad range of things to read can be found here:
Load manuals and experienced reloaders frequently advise working a load up in small charge increments while watching for pressure signs. Many beginners are unaware of all the signs. Below is a partial list of them, along with alternate causes of the same signs where I am aware of them. No one particular sign can be counted on to become apparent in all guns, nor even to be consistent with any particular set of load components. There is also no way to tell which sign will show up first in your gun and with your load and component combination, so you need to learn to watch for them all. The standard recommendation, if you get a clear pressure sign, is to back the charge weight of the load down 5%. In most instances, persistent pressure signs do not occur until your pressures are already well above SAAMI MAP.
Case bulging excessively. (This is most often at an unsupported part of the case head.)
Case cracks along its side. (May mean excess pressure, but may mean brittle, defective, draw mark scored, or worn out brass.)
Case head expansion. (A.k.a., CHE. It most often means pressure too high for the lot of brass used, but an isolated example from a lot may mean nothing, as brass is often imprecise, so CHE can occur at pressures that differ by 2:1 within a brass lot.)
Case head separation. (May mean high pressure, but may mean excess headspace or worn out brass.)
Case splits in body in fewer than 10 reloads. Back powder charge down at least 2%; 5% if in the first two or three reloads. (May also be due to excess headspace, a once-fired case from another gun that was highly stretched at first firing (use paperclip probe to feel for pressure ring inside case and reject any where you can feel one), or is less commonly due ammonia vapor exposure or to a brass defect in an individual case.)
Case mouth split in fewer than 6 reloads. (May mean high pressure or ammonia vapor exposure, but more often simply means case needed neck annealing.)
Case mouth split in fewer than 4 reloads (May mean high pressure or ammonia vapor exposure, but more often means case got too hot during annealing.)
Case pressure ring expansion (A.k.a., PRE; not much more reliable than case head expansion but may mean pressure is excessive for the particular piece of brass or lot of brass it occurs with. It can, for example, happen with Federal commercial brass, but not with Lapua brass or with military brass at the same pressure.)
Case primer pockets getting loose in five reloads or fewer. (This is a version of CHE, but may be apparent earlier in pressure. Lowering charge, as in the introductory paragraph, may fix it. However, if the load seems reasonable or is an old standard, same as in 3 and 8, switching make of brass can fix it.)
Case stretching excessively. (This is usually visible as pressure ring area stretching which may be due to excess pressure or to excess headspace. Use a bent paperclip or other probe to feel for thinning at the pressure ring. In rear bolt lug guns, the whole case may lengthen before resizing and be impossible to rechamber without sizing.)
Case, extractor or ejector marks on head, especially after increasing powder charge to next higher increment. (Most common in semi-auto rifles, but can happen with any extractor and ejector. May be due to high pressure, bad timing in a semi-auto action, or may be due to an improperly fit extractor standing proud on the bolt face.)
Case, won’t fit back into chamber after firing. (May mean high pressure, but can also result from a chamber cut at an angle off the bore axis or by an out-of square bolt face. Test for the latter two possibilities by noting head stamp orientation at firing. If case fits back in at that same orientation but no other, then one of these two conditions obtain.)
Gas leak. (See Primer Leaking, below.)
Groups start to open up at or beyond a published maximum load.
Hard bolt lift. (This often indicates excess pressure, but can also result from only one bolt lug making contact until peak pressure is reached (lugs need lapping).)
Incipient case head separation (Starting or partial case head separation or signs of it. Can also be a problem with excess headspace.)
Increase in powder charge achieves unexpected velocity. (Average velocity will tend to increase by the same number of feet per second per grain of additional powder over the normal operating pressure range. If your next charge increment fails to produce the expected additional velocity or produces too much additional velocity, pressure may be high. Poor grouping usually accompanies this symptom. It is also caused at reasonable pressures by uneven bolt lug contact (lugs need lapping), in which case still further charge increments go back to producing orderly velocity increases and grouping improves. Suspect this last situation if the charge at which the velocity anomaly occurs is in the middle of a published load range. Otherwise, back the charge off 5% from where the issue started.)
Primer blown loose. (Primer falls out when gun is opened; same as loose primer pocket, #9, above.)
Primer cratering. (May mean high pressure, or it may mean a worn firing pin or firing pin tunnel, or may mean you have a new production Remington bolt with chamfered firing pin tunnel.)
Primer flattening. (May mean high pressure, or may mean long headspace; some loads always make flat primers; softer primer cups (Federal) flatten more easily than harder ones (CCI), so it may mean nothing at all.)
Primer mushrooming; i.e., primer cup fills out radius at primer pocket perimeter. (May mean high pressure, or may mean excess headspace.)
Primer piercing. (May mean high pressure or may mean incorrect firing pin protrusion or incorrect firing pin nose shape.)
Primer leaking gas around edges of primer pocket. (May mean high pressure, may mean loose primer pocket in case, may mean damaged primer was inserted, may mean excessive chamber headspace.)
Case, short life - back load off at least 2% (under 10 reloads in non-self-loaders, or under 5 loads total in self-loaders before pressure ring is detected with paperclip probe.)
Case, sticky or hard extraction. (Especially in revolvers, this is a positive sign to knock the powder charge down at least 5%. In rifles also look for chamber ringing.)
Case, torn or bent rim. (Caused by hard extraction, see #24 & #25, above).
Case, primer pocket expanded. (A.k.a., PPE; this is the same, in principle, as #9 above, but can be made apparent by measuring with gauges before primers actually are loose. It is a somewhat more sensitive measure than O.D. CHE measurements.)
Primer loose or falls out when opening the action or after seating. (See #9 & #27, above).
Case, increase in required trimming frequency. (This refers to a sudden increase in case length growth per load cycle. It is actually a less acute version of #10. It can be caused by excess pressure, but can also be a sign of increasing head space due to some other problem. It is especially common as a pressure sign in lever action guns because the greater span from bolt face to rear lug allows more steel stretch when pressure gets excessive.)
Case, increase in apparent headspace. (This means the cases are coming out longer, including between the casehead and shoulder. It can mean bolt lug setback, which is usually an extreme pressure sign. It can also mean a loose barrel or an improperly set up Savage barrel. Whatever the cause, the gun should go straight to the gunsmith for inspection.)
Gas or Flame Cutting of revolver top strap. (Can also be due to excessive barrel/cylinder gap that needs correction.)
Gas or Flame cutting of rifle bolt face by gas leaks around primer pocket or at bolt face perimeter. (Can also be result of occasional leaks from normal rounds firing, as is observed in many military gun bolts.)
Velocity higher than manual maximum load velocity reported for same powder charge and barrel length. (May mean excess pressure or a “fast” barrel, but often is actually a chronograph error due to screens being too close to the muzzle blast, bad lighting conditions (watch for ground reflection), or a low battery. In one instance, though, a fellow loading a .243 Win load in the Speer manual and still one grain below the manual maximum was getting velocity readings 200 fps higher than the manual claimed for the higher maximum load. His single-shot action was also popping open at every shot. With QuickLOAD, we were able to calculate he had about 77,000 psi.)
Flash hole diameter growing. (This is a more sensitive version of case head expansion. See #3, #9, and #27, above. It can be checked with pin gauges in the form of numbered drill bits or by special gauge.)
Please contribute any additional signs I've missed.
Everything we look study in trying to read pressure is directly related to the yield point of the base material. The cartridge case flows into the ejector pin hole when the yield point of the brass is exceeded. Primers have different yield/failure points. Firing pin hole diameter in the bolt, fit of the firing pin in that hole, shape of the firing pin tip all influence what we see in the middle of the primer. A poorly fitted/engineered firing pin assembly will lead to premature pressure signs and could lead to pierced primers. If the brass is tough enough, the firing pin size, fit and shape is correct I watch the corners of the primers. As soon as they start to change shape, flow towards the outside I stop adding powder. That may not be over pressure but it's getting close. Then subtilties like seating depth, temperature, etc are in play but that's for another day.
As @Ned Ludd stated, primers aren't always the best indication. The best list I have ever found covering a very broad range of things to read can be found here:
While it contains some good information, some of it is flat wrong, one example being case head separation which almost always is caused by repeatedly bumping shoulders back too far during sizing, which can cause incipient separations and separations with loads that are not excessive. There are others.
Some case designs tend to reduce primer signs. In those, you need to pay close attention to bolt lift after firing, and changes in how much force it takes to prime the case. My benchrest rifle does not have an ejector so there will never be a swipe, but when pressure gets too warm bolt lift is always there to tell me.
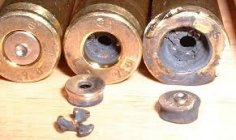
357 magnums when fired in a S&W revolver will have an extremely flattened look because of the convex bushing around the firing pin hole.
The extruded primer is just a firing pin fitting loosely.
The 500 S&W mag could be from two causes. A problem with the shape, condition, or protrusion of the firing pin. The use of a pistol primer when the S&W 500 mag should have a rifle primer.
The ejector marks are often from high pressure but sone guns will make ejector marks at normal loadings, although those look pretty pronounced. Maybe the ejector is proud of the bolt face for some reason.
The bent rims and extractor marks are more involved than I can go into here.
I've found that hard bolt lift and extractor marks to be more reliable indicator of high-pressure signs than primer appearance. In fact, I have a couple of rifles which exhibit "flattened" primers which are not high-pressure loads and in fact, on the lower side of the loading data.
I try to avoid maximum (pushing the pressure envelop) in my reloads and never found it necessary to do so to obtain high performance loads.
The only time I can recall that I encountered a significant high-pressure problems was with H380 in a 22 250 hunting ghogs in 90 degrees+ temperatures. It was a load I developed in the fall and spring and shot great but went sideways in the heat, very hard bolt life, extractor mark on case head and case head area expansion. I switched to extruded powder and never had a problem after that.
While it contains some good information, some of it is flat wrong, one example being case head separation which almost always is caused by repeatedly bumping shoulders back too far during sizing, which can cause incipient separations and separations with loads that are not excessive. There are others.
Just a thought. Unless I've missed it, I've never found any summary on AS with the breadth of the ones listed in the Shooters Forum summary I referenced. If there are things that are flat wrong, we develop a thorough summary that only has good information on this forum. Maybe it could be a sticky at the top of the Reloading Forum for all to benefit from?
I use my Lab Radar when working up unknown combinations...excessive speed is a quick indicator
to back it down and or perhaps change the bullet for said combo.
as Ned mentions by the time primers are flattened your usually way over.
The information in the link posted by jepp2 refers to mentions
"the standard recommendation, if you get a clear pressure sign, is to back the charge weight of the load down 5%."
and then
1. Case bulging excessively
The suggestion is that when your cases bulge, it is a pressure sign, so you reduce the load.
Should you be reloading for a pistol with an unsupported chamber with reduced loads, ie : loads that are below the minimum in the powder manual, you will experience bulged cases. The pressure gets too high, because combustion is erratic, causing pressure spikes.
That is a dangerous condition.
Reducing the charge further can cause the pistol to explode into pieces, also known as the secondary explosive effect.
The article is inaccurate on a number of other points, particularly where it attributes brass failing due to work hardening as a pressure sign.
It's hard to suggest that primer reading is useful -about pressure itself.
I run a MyMax test where I measure the widest (expanded) portion of case while working up in pressure.
That dimension will grow, then level off, then grow again (step change).
That 2nd growth step change represents the point where FL sizing is required for reloading.
I don't know for sure but I suspect that SAAMI uses this as their basis of Max pressure for a given cartridge.
This is exactly the method I use. At the time, buying a blade mic seemed expensive, but compared to some of the tools I see people popping for today, it's a trivial amount of money compared to the info it gives you.
This Forum's expenses are primarily paid by member contributions. You can upgrade your Forum membership in seconds. Gold and Silver members get unlimited FREE classifieds for one year. Gold members can upload custom avatars.