Follow along with the video below to see how to install our site as a web app on your home screen.
Note: This feature may not be available in some browsers.
This Forum is for adults 18 years of age or over. By continuing to use this Forum you are confirming that you are 18 or older. No content shall be viewed by any person under 18 in California.
I gave up on the Hornady gauge. The results were all over the place. I use the split neck method. It works great but only if you get the correct neck tension. Too tight and the bullet sticks, pulls out then releases.
I've been experimenting with the Hornady OAL gauge and am finding poor consistency in the results. Of course, the measurement you get depends on how hard you jam the bullet into the rifling with the tool. Nonetheless, when operating the gauge with what seems like consistent pressure on the rod, I'm still getting differences in COAL running .040" from one measurement to the next. I"ve watched the Hornady video on using the tool and am following their suggestions.
Have some of you guys used this tool to determine the OAL that has the bullet just touching the rifling? If so, have you developed a technique that yields consistent measurements?
OK guys, here is my procedure with the straight Hornady L-N-L gauge with the current plastic push rod. Using this procedure, typically 4 times, I will get results within about .0015 three of four times.
PREP
Make sure your chamber is CLEAN. No carbon or dirt or left-over foam residue.
Make sure the bullets you are using are typical of your lot. (Base to ogive can vary by .005" with some brands). Measure 10 bullets and select a typical one.
Make sure the modified case has adequate clearance. Neck turn the case if necessary. With wildcats it's not a bad idea to make your own modified case. LINK:
Our friend Gavin Gear has just released an excellent video showing how to make a threaded Modified Case for use with the Hornady Lock-N-Load Overall Length Gauge. You can watch Gavin make a Modified Case start to finish in the video below: Video Shows How to Drill and Tap Modified Case <iframe...
bulletin.accurateshooter.com
Start procedure
Thread the modified case onto tool. Make sure it is screwed all the way down (and recheck this for repeat procedures)
Insert the tool into the action, checking to make sure the bullet is not badly tilted.
Push the tool fairly firmly, and maybe rotate it a few degrees to ensure the modified case is seated at the end of the chamber. This is important -- I have seen MANY guys mess up because the tool wasn't fully seated right.
Push the gray plastic shaft gently towards the muzzle. Keep it STRAIGHT. Go SLOW. Use light pressure. STOP when you feel resistance.
After feeling resistance, retract the pusher a small bit then TAP gently 2-3 times. This will help the bullet align if it is not straight.
After the tapping, push again gently. Sometimes the bullet will move forward a bit. don’t push too hard.
Retract the tool. Most of the time the bullet will come out with the tool. If it sticks in the chamber (maybe 20% of time), tilt the gun vertical (muzzle up) and the bullet should drop out with a slight bump on buttpad.
RESULTS
I usually run this test 4 times. I will typically get the SAME measurement within .001-.002" 3 of 4 times. I use that distance as my repeatable "first touch" point, though I am guessing I am .002" or so into the lands because there may be a tiny dot mark on bullet jacket (really tiny -- NOT a stripe).
But the important point is that this IS repeatable. I have taught this method to a few shooters at my club, including a guy who was cursing about his Hornady tool. His problem was that he was working too fast, and pushing way too hard on the plastic pusher. After showing him my technique we did 7 measurements in his 30BR and 5 of 7 were within .002.
My pre-Hornady Stoney Point angled tool uses spring steel wrapped in brass wire; it's quite rigid so I can apply enough pressure to get good readings. The spring configuration is very useful because it will pop out of alignment with sufficient pressure and snap back when the pressure is released; it functions like the click of a torque wrench and makes very consistent seating of the bullet possible.
It sounds like Hornady has dropped the quality of the tool, so it may be worth looking for used ones.
OK guys, here is my procedure with the straight Hornady L-N-L gauge with the current plastic push rod. Using this procedure, typically 4 times, I will get results within about .0015 three of four times.
PREP
Make sure your chamber is CLEAN. No carbon or dirt or left-over foam residue.
Make sure the bullets you are using are typical of your lot. (Base to ogive can vary by .005" with some brands). Measure 10 bullets and select a typical one.
Make sure the modified case has adequate clearance. Neck turn the case if necessary. With wildcats it's not a bad idea to make your own modified case. LINK:
Our friend Gavin Gear has just released an excellent video showing how to make a threaded Modified Case for use with the Hornady Lock-N-Load Overall Length Gauge. You can watch Gavin make a Modified Case start to finish in the video below: Video Shows How to Drill and Tap Modified Case <iframe...
bulletin.accurateshooter.com
Start procedure
Thread the modified case onto tool. Make sure it is screwed all the way down (and recheck this for repeat procedures)
Insert the tool into the action, checking to make sure the bullet is not badly tilted.
Push the tool fairly firmly, and maybe rotate it a few degrees to ensure the modified case is seated at the end of the chamber. This is important -- I have seen MANY guys mess up because the tool wasn't fully seated right.
Push the gray plastic shaft gently towards the muzzle. Keep it STRAIGHT. Go SLOW. Use light pressure. STOP when you feel resistance.
After feeling resistance, retract the pusher a small bit then TAP gently 2-3 times. This will help the bullet align if it is not straight.
After the tapping, push again gently. Sometimes the bullet will move forward a bit. don’t push too hard.
Retract the tool. Most of the time the bullet will come out with the tool. If it sticks in the chamber (maybe 20% of time), tilt the gun vertical (muzzle up) and the bullet should drop out with a slight bump on buttpad.
RESULTS
I usually run this test 4 times. I will typically get the SAME measurement within .001-.002" 3 of 4 times. I use that distance as my repeatable "first touch" point, though I am guessing I am .002" or so into the lands because there may be a tiny dot mark on bullet jacket (really tiny -- NOT a stripe).
But the important point is that this IS repeatable. I have taught this method to a few shooters at my club, including a guy who was cursing about his Hornady tool. His problem was that he was working too fast, and pushing way too hard on the plastic pusher. After showing him my technique we did 7 measurements in his 30BR and 5 of 7 were within .002.
I've been experimenting with the Hornady OAL gauge and am finding poor consistency in the results. Of course, the measurement you get depends on how hard you jam the bullet into the rifling with the tool. Nonetheless, when operating the gauge with what seems like consistent pressure on the rod, I'm still getting differences in COAL running .040" from one measurement to the next. I"ve watched the Hornady video on using the tool and am following their suggestions.
Have some of you guys used this tool to determine the OAL that has the bullet just touching the rifling? If so, have you developed a technique that yields consistent measurements?
The tool is measuring from the datum to the ogive , your sized case from the case base to the datum will be different from the Hornady case your working with. If you could work with a case that its measurement is sized to your chamber it would be closer to being more accurate.. I can see people with a light touch finding the datum ot ogive measurement but that wiggle room in the case will through your measurements all over the place in your loaded round
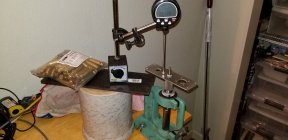
As a follow-up, here is what I've put together to assist with dialing in the headspace when using the stripped bolt:
I picked up a steel plate at the local farm store, to give the dial indicator's mag base something to hang on to. Placed it on top of a thick bit of pottery for elevation. Added some cases for counter balance. The odd plate on top of the FL Die is a scrap from work to give the dial indicator a good reference as the die spins.
Using it I can dial it down until the bolt drops without resistance, and then a couple thousandths more. I had the indicator for dialing in cams; comes in handy, and gives me a reading to the nearest tenth..
Amazingly stable for how it looks. I can lightly tap on that bottom plate and not move 0.0001"
With a bolt action using a stripped bolt , at the point when the bullet leaves the rifling is at the bolt lift , at the top lift with the bullet putting pressure on your bolt lugs there is a rearward pressure , when that pressure is removed , it is felt at the bolt lift not closure. Once the pressure is removed a click at the lift disappears. This also has to be used with a sized case with what ever headspace your using. A good time for a dummy round for keeping measurements.
If your case is rocking on the chamber, this is NOT going to help. Use a fire formed case that does not need full length sizing....very harmonious outcome. Then develop the touch.
I find that placing the case/bullet into the chamber and then standing the rifle on it’s muzzle before running the push rod gently in until contact is made, gives me more consistent readings. I believe this results in little to no jam as well.
I've been experimenting with the Hornady OAL gauge and am finding poor consistency in the results. Of course, the measurement you get depends on how hard you jam the bullet into the rifling with the tool. Nonetheless, when operating the gauge with what seems like consistent pressure on the rod, I'm still getting differences in COAL running .040" from one measurement to the next. I"ve watched the Hornady video on using the tool and am following their suggestions.
Have some of you guys used this tool to determine the OAL that has the bullet just touching the rifling? If so, have you developed a technique that yields consistent measurements?
Start by neck or full length sizing the Hornaday case and seat a bullet long. Install it on the tool (don't bother with the push stick, I removed it altogether) and insert it into the chamber with a firm push and retract. Any tendency to stick upon retraction means the bullet is in the lands. Return it to the die an seat the bullet a bit deeper. Keep repeating until you can't feel any tendency to stick upon retraction. This is the point the bullet is just clear of the lands. With a little practice you can get this down to .001" consistency.
Be sure the case (without a bullet) slides in with no friction before starting. A dragging case will give false readings.
Once you've mastered this method, toss the Hornaday case and drill and tap one of your fully fireformed cases to fit a 3 piece cleaning rod segment and perform the same test.
I've found this method to be dead accurate and takes only 5 to 10 minutes to perform, including drilling and tapping my own case.
The Hornady tool will get you "in the ballpark". Then remove the ejector and firing pin from your bolt and adjust the seating depth until the bolt will close with little to no force. This is what I call the lands. Seating the bullet any further out could cause the bullet to stick in the rifling.
Different methods , different tools , and different procedures can get us where we want to go . I had to "clean up" the burrs and mold flash on my Hornady tool to get it to work smoothly , without hanging up and causing false readings . The other thing I did was take the Hornady L-N-L .308 case and check it for fit in my chamber and measure it for proper "Bump" . I got lucky , and it was within .0005 , so it was left it as is . Reality is ; as several have said , you have to practice doing this procedure to get a "feel" for the contact . And no matter which procedure you use , you still have to practice , with that procedure . Some things in our "Instant Gratification" world just don't work that way , like it or not . If you really don't want to invest the time to learn "YOUR" procedure correctly , maybe you should be doing something else , besides re-loading . If it was easy , everybody would be doing it .
That's all I need, because I am going to have to experiment with various seating depths to find the optimal one anyway. Let's say that turns out to be a jump of what appears to me to be .008". But I misread the Hornady tool and it is really .010".
It doesn't matter because I am going to just gleefully seat to the base-to-ogive dimension that gives me what I think is .008" jump, and by doing so I will make that rifle shoot that bullet as accurately as it is possible to for them to shoot. It does not matter at all that the jump is in reality .010".
I just need for the tool to give me accuracy of +- .003", so that I am not starting with a .005" jam when I think it is a .005" jump, though even that would not be a big deal. Sooner or later I will find the optimal seat depth thru experimentation.
I take 1 measurement. I jam the bullet enough to stick in the lands. It's just a reference point. It doesn't matter if it's a consistent measurement.
Lets say my measurement is 2.312. I start my seating depth testing at 2.302" and work back from there. I find the depth that works and that's that.
There are plenty of things in precision shooting that requires a lot of thought process and consideration. Delicately finding the lands isn't one of them.
Before anyone says I'm silly.... Pretend you were measuring the same barrel I was. You measured 2.310 (2 thou less than me) by delicately measuring a dozen times.
We'd both run the same seating depth test. We'd both end up with the same overall base to ogive measurement. It doesn't matter that your measurement is "12 off the lands" and mine is "14 off the lands"
This Forum's expenses are primarily paid by member contributions. You can upgrade your Forum membership in seconds. Gold and Silver members get unlimited FREE classifieds for one year. Gold members can upload custom avatars.