• This Forum is for adults 18 years of age or over. By continuing to use this Forum you are confirming that you are 18 or older. No content shall be viewed by any person under 18 in California.

First-Time Annealing v.IsThisNormal?

I've had neck galling before from brass buildup in the neck portion of the die. In my case, it was caused by sizing new brass without first chamfering the outside of the case mouth. The square edge smeared along the inside of the die and left a tiny streak of brass behind. The next case added to it, and so on.
I also had a Forster full length sizing die with a poor surface finish in the shoulder junction.

With the first die, I used Brasso metal polish on a piece of cloth wrapped around a nylon cleaning brush chucked in a cordless drill. 5-10 minutes with that and the die surface was like a mirror again.

I don't use the Forster die any more, but the other one gets regular use.

In my experience, a dry, freshly cleaned die should have a very thin coat of sizing wax applied before you use it. Maybe coat a Q-tip with sizing lube and use that to lube the die. Otherwise, you're dealing with a dry, clean surface rubbing against a lubed one until the die gets a coating on it. That first case with a clean die takes noticeably more effort to size than the following ones.

All I use is the Lee sizing lube for about $7 per tube. I'm on my second tube in about 8 years, and have had zero problems with it.
 
Thank you.
Oxidation with lube on it. Never had a problem in many years. My understanding is that every die is honed as a final step. I cannot image a hone that follows all the contours of a case. I think the internal surface finish looks the same on the entire surface on a new die. There should be zero burrs. I think enough info has been given to solve the problem. Let us know how you solved the problem. Sweets and Butches Bore Shine are about the best at removing Cu.
 
What is the OD of the neck?
fired?
sized?
sized with bullet seated?
Die may also be over sizing the neck.

Frank

I will need to report back on this. I currently do not have any new, fired, not FL sized brass for my .280ai. I can get you the sized with bullet seated, but that is moot w/o the prior three (3) measurements.

If you size a case without the expander, you will have your answer. Die body or expander not set correctly.

I did try that. It is easier, but there are still 'slight' marks on the necks after resizing.
 
OP, do you have any un-annealed brass to try? If so, clean the die well and try some that haven't been annealed. You may need to clean the die with a good copper solvent and steel wool or similar if it has brass galled in it....or lightly polish it with med grit sandpaper and oil. If it has brass galled inside, it'll likely continue to scratch brass until you get it out. Report back.

Unfortunately I do not. I was a little out of control with Annealing once I got the AGS figured out and set up. I annealed EVERYTHING!
 
I cleaned out the FL Sizing Die, used tome polish on a towel and jag for a bit. Cleaned it up good.

Then I used the Imperial Sizing Wax on the neck instead of the Redding Dry Neck Lube via the media.

The issue is gone.

So strange though. This wasn't my first time using the dry media, it's what I've been using for a year. Then all of a sudden after annealing, the neck galling shows up.

Anyway. Thanks to all for taking the time to read about my challenge and respond with your ideas. With your help, I have got this sorted out for now.

Thanks so much, All!
 
You have found your issue, clean the die more often. Some physical property of the lube was allowing a buildup of debris. I run my die gutted, allows for a quick brush and patch after every use. I use clean/lube one shot on the inside of die for storage.
 
I cleaned out the FL Sizing Die, used tome polish on a towel and jag for a bit. Cleaned it up good.

Then I used the Imperial Sizing Wax on the neck instead of the Redding Dry Neck Lube via the media.

The issue is gone.

So strange though. This wasn't my first time using the dry media, it's what I've been using for a year. Then all of a sudden after annealing, the neck galling shows up.

Anyway. Thanks to all for taking the time to read about my challenge and respond with your ideas. With your help, I have got this sorted out for now.

Thanks so much, All!
You're probably on the right path and it may never appear again.

My concern was/is that if the brass was over annealed, it might have been the cause for the galling in the die to begin with. Being too soft would actually promote galling in the die. Even firing and sizing it once might be enough to work harden it enough that it never shows again, unless it gets over annealed again. A couple of comments in this thread lead me to believe over cooking a bit MIGHT be a factor. Just keep an eye on it and I hope it doesn't happen again. Keep us posted on it.

The over annealing I wasn't really too concerned with. I set the AGS Annealer up with the lights out. I used a few scrub pieces of brass and set it up to a point where the case was just beginning to glow ever so slightly, then I backed it off a bit. So if anything, the concern would have been more so under annealing....if that's a thing?

I'm using a single torch head and the dwell time is right about five (5) seconds. Several times throughout my annealing craze I would turn off the lights and watch the next ten (10) rounds go through. None of them glowed before dropping.
 
It appears like I might have to have to make an adjustment to my annealing process??? ¯\_(ツ)_/¯

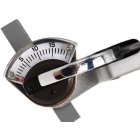
I recently bought a Webster Hardness Tester to test my various brass for the harness of their necks and to see how the results of my annealing compares to the likes of Lapua virgin brass. It's not a tool that's going to give you any kind of true Vickers harness result, but it can be used somewhat like a comparator.

First, upon getting the tool, I took a reading on the test strips to see if the tool gave me the reading I was supposed to get, and it did. Next, I tested some different virgin Lapua and Peterson brass that I've been hanging onto. The readings for my virgin Lapua brass were consistently at ~14.5 and the Petersons were just a hair over 15 (the higher the number, the harder the brass). Now I wanted to see what numbers I get with the cases I've annealed. I took readings from various various Lapua brass that has been fired a number of times and annealed after every firing and consistently got a reading @17; not as soft as I thought I was going to see. Then measuring my fired and annealed Peterson brass and my Federal brass and they too measured @17 (was expecting Federal brass to be different). Apparently, my use of the "glow method" was not getting my necks as "annealed" as I thought.

When I use the "glow method", in a darkened room I look for the necks to begin to glow and have the cases drop out of the flame at that moment. This has been working just fine in getting a good and consistent seating. But apparently, I'm going to have to let the necks stay in the flame a little longer after they start to glow if I want to get the hardness to the same level as Lapua virgin brass. :rolleyes: This is something I'll have to be testing for a while to see what the results might indicate.

Reaching back in my stash, I pulled a box of Lapua that I had just fired and annealed twice, before I really started using the "glow method". The method I used with them when annealing was to simply wait for that orangish-yellow flame to appear and then let the case drop when that happened. In testing the hardness of these, the reading was @ 18; not a surprise given my glow method was giving me something a little softer as expected.

I've got a small tub of test brass (mostly Federal range brass that I've picked up) that I use when setting up the timing for annealing and I know some of those were well over heated. Sure enough, I was getting some readings from 11 to 12 and a few at 14. I didn't expect any consistency since adjustments were being made with them to get the timing where I wanted it.

I'll report back after making some adjustments to the timing of my annealing process about what I've observed in terms of the harness test as well as what I might see when seating and the shooting results.

BTW: According to the manual that came with the tool, a reading of 15 is ~99 on the Vickers HV scale and a reading of 18 is ~ 131.
Webster Hardness Tester.jpg
 
Last edited:
OP: I see a couple things in your post. You likely know all these except maybe #1 and a bunch was already said above. I've used an AGS for a while, lots of different brass and in the hundreds for most of those as I had many thousands of once fired brass from varminting in the 1990's.

1. after flame annealing, clean your brass as there likely will be carbon deposits on the neck (inside/outside). You don't want that on outside and certainly not in your resizing die. Clean that die well... Then put a little die wax on a swab and run it in the die, very little just to get it primed after cleaning.

2. use imperial die wax for resizing, very little on your finger and thumb is plenty, just wipe the brass off with a rag after sizing. When we say very little, it will seem like it's far too little but unless you hit the mark you'll find you likely used enough for three cases on that first one before it resizes a little harder and that's your hint for more. If so pretty soon you'll know how much is very little.

3. keep that dry lube for seating or expanding if desired, works great for that but certainly not for resizing(2). Don't forget to wipe loaded rounds off, don't want the chamber dry lubed. lol

on annealing, turn the lights way down initially and you should only get a good even full neck glow and not into the shoulder before it drops but no change in flame color as that's too much, as is orange, just want the red glow. I always use Tempilaq to figure out the timing for each size case before I do them. I use 650 in the neck and 400 shoulder/body junction down the body. This is more to train my eye what good looks like. Annealing brass starts at about 580F with 650-750 being the goal, so what 400 does is tell you exactly how far down the body 400 is, the idea being you want to know for sure you haven't annealed too far down the case body. You can put 400 on the outside because you're putting it where the flame isn't touching so the change is strictly temp. I have found 400 is right about the color change (+- 1/8") meaning the annealing likely stops in the neck/shoulder where you want it. The reason i use 650 on the neck is by the time it shows you're likely to reach 700-750 or more. In my experience this is the darkish red glow then drop.

Note: the speed (time under flame) will change for every case size and why testing each helps, mostly based on neck diameter, but really neck thickness. also true for each setup you do because of variations in how you mounted the nozzle in relation to the brass. 220 Swift necks are really thin so those take less time than 22-250 and far less than many other larger or thick necked brass. It also changes by brand. I keep all my brass for any given size sorted by brand but as I move from one to another I just compare necks and watch em in dim light and adjust as needed on the fly as it's usually within a second or so. Once I got it mostly figured out I moved on to my more costly brass.
 
Last edited:
OP: I see a couple things in your post. You likely know all these except maybe #1 and a bunch was already said above. I've used an AGS for a while, lots of different brass and in the hundreds for most of those as I had many thousands of once fired brass from varminting in the 1990's.

1. after flame annealing, clean your brass as there likely will be carbon deposits on the neck (inside/outside). You don't want that on outside and certainly not in your resizing die. Clean that die well... Then put a little die wax on a swab and run it in the die, very little just to get it primed after cleaning.

2. use imperial die wax for resizing, very little on your finger and thumb is plenty, just wipe the brass off with a rag after sizing. When we say very little, it will seem like it's far too little but unless you hit the mark you'll find you likely used enough for three cases on that first one before it resizes a little harder and that's your hint for more. If so pretty soon you'll know how much is very little.

3. keep that dry lube for seating or expanding if desired, works great for that but certainly not for resizing(2). Don't forget to wipe loaded rounds off, don't want the chamber dry lubed. lol

on annealing, turn the lights way down initially and you should only get a good even full neck glow and not into the shoulder before it drops but no change in flame color as that's too much, as is orange, just want the red glow. I always use Tempilaq to figure out the timing for each size case before I do them. I use 650 in the neck and 400 shoulder/body junction down the body. This is more to train my eye what good looks like. Annealing brass starts at about 580F with 650-750 being the goal, so what 400 does is tell you exactly how far down the body 400 is, the idea being you want to know for sure you haven't annealed too far down the case body. You can put 400 on the outside because you're putting it where the flame isn't touching so the change is strictly temp. I have found 400 is right about the color change (+- 1/8") meaning the annealing likely stops in the neck/shoulder where you want it. The reason i use 650 on the neck is by the time it shows you're likely to reach 700-750 or more. In my experience this is the darkish red glow then drop.

Note: the speed will change for every case size and why testing each helps, mostly based on neck diameter, but really neck thickness. also true for each setup you do because of variations in how you mounted the nozzle in relation to the brass. 220 Swift necks are really thin so those take less time than 22-250 and far less than many other larger or thick necked brass. It also changes by brand. I keep all my brass for any given size sorted by brand but as I move from one to another I just compare necks and watch em in dim light and adjust as needed on the fly as it's usually within a second or so. Once I got it mostly figured out I moved on to my more costly brass.
Hmmm???

When you talk about a specific heat for annealing, one needs to include the amount of time. . .huh???

Proper annealing is a function of both heat AND time. Proper annealing can happen at 400°F or 1200°F depending on the amount of time the brass is at that temperature.

Here's a good article on cartridge annealing:
 
Last edited:
Hmmm???

When you talk about a specific heat for annealing, one needs to include the amount of time. . .huh???

Proper annealing is a function of both heat AND time. Proper annealing can happen at 400°F or 1200°F depending on the amount of time the brass is at that temperature.

Here's a good article on cartridge annealing:
Yes I'm well aware of that but the time is variable based on the temp reached for any given piece of brass and the goal is not to over or under anneal, although brass doesn't start annealing until about 580-590F. This is the reason there's a setting whether it be the time before drop on an AGS or the AMP setting which is doing the same thing, setting the correct time to run the induction so the temp is just right. Those of us that do flame don't have the luxury of finding and using a code like with the AMP, but we do have more cash in pocket. ;-)
 
It appears like I might have to have to make an adjustment to my annealing process??? ¯\_(ツ)_/¯

I recently bought a Webster Hardness Tester to test my various brass for the harness of their necks and to see how the results of my annealing compares to the likes of Lapua virgin brass. It's not a tool that's going to give you any kind of true Vickers harness result, but it can be use somewhat like a comparator.

First, upon getting he tool, I took a reading on the test strips to see if the tool gave me the reading I was supposed to get, and it did. Next, I tested some different virgin Lapua and Peterson brass that I've been hanging onto. The readings for my virgin Lapua readings were consistently at ~14.5 and the Petersons were just a hair over 15 (the higher the number, the harder the brass). Now I wanted to see what numbers I get with the cases I've annealed. I took reading from various various Lapua brass that has been fired a number of times and annealed after every firing and consistently got a reading @17; not as soft as I thought I was going to see. Then measuring my fired and annealed Peterson brass and my Federal brass and they too measured @17 (was expecting Federal brass to be different). Apparently, my use of the "glow method" was not getting my necks as "annealed" as I thought.

When I use the "glow method", in a darkened room I look for the necks to begin to glow and have the cases drop out of the flame at that moment. This has been working just fine in getting a good and consistent seating. But apparently, I'm going to have to let the necks stay in the flame a little longer after they start to glow if I want to get the hardness to the same level as Lapua virgin brass. :rolleyes: This is something I'll have to be testing for a while to see what the results might indicate.

Reaching back in my stash, I pulled a box of Lapua that I had just fired and annealed twice, before I really started using the "glow method". The method I used with them when annealing was to simply wait for that orangish-yellow flame to appear and then let the case drop when that happened. In testing the hardness of these, the reading was @ 18; not a surprise given my glow method was giving me something a little softer.

I've got a small tub of test brass (mostly Federal range brass that I've picked up) that I use when setting up the timing for annealing and I know some of those were well over heated. Sure enough, I was getting some readings from 11 to 12 and a few at 14. I didn't expect any consistency since adjustments were being made with them to get the timing where I wanted it.

I'll report back after making some adjustments to the timing of my annealing process about what I've observed in terms of the harness test as well as what I might see when seating and the shooting results.

BTW: According to the manual that came with the tool, a reading of 15 is ~99 on the Vickers HV scale and a reading of 18 is ~ 131.
View attachment 1605761

Thanks for posting your results. Sounds like you will solve some of the mysteries of over or under annealing.
 
If you size a case without the expander, you will have your answer. Die body or expander not set correctly.
Do as Coyotefurharvester suggests. I'm guessing you will not see that occurrence once the ball expander is removed. I have over-annealed a lot of brass (back when I was young and using a spark plug socket on a drill) to the point of REALLY being over-annealed. It still sized just fine, and I never encountered anything like that due to such horrendous early annealing practices of days past. An improperly adjusted ball expander WILL do that. Using good case lube on the neck might hide the symptoms of the problem. Better to fix the problem. Some folks don't take the time to blast out the thick rust preventative that comes on new dies with brake cleaner or spray gun cleaner. And spraying WD inside the die and wiping out what one can sometimes doesn't get into the neck of the die. If your brass looks like that after sizing - it is a sizing problem. If the brass looks fine after annealing and sizing and you don't see this until after it is fired in your chamber - I'd them be looking at the chamber. High odds this is a simple expander ball adjustment. Good luck.
 

Upgrades & Donations

This Forum's expenses are primarily paid by member contributions. You can upgrade your Forum membership in seconds. Gold and Silver members get unlimited FREE classifieds for one year. Gold members can upload custom avatars.


Click Upgrade Membership Button ABOVE to get Gold or Silver Status.

You can also donate any amount, large or small, with the button below. Include your Forum Name in the PayPal Notes field.


To DONATE by CHECK, or make a recurring donation, CLICK HERE to learn how.

Forum statistics

Threads
166,238
Messages
2,214,511
Members
79,485
Latest member
bhcapell
Back
Top