• This Forum is for adults 18 years of age or over. By continuing to use this Forum you are confirming that you are 18 or older. No content shall be viewed by any person under 18 in California.

Farley Rest Help Request

I will use it with my new rifle in .284 Tony at the F-class italian open 2024 at 800 yds.
I’m coming from .308w at 600yds using bipod.
It is another kind of shooting…completely different at the moment.
Enclosed last saturday group at 300m (5shots) with my old 308w using my new Farley rest.
 

Attachments

  • 6C3AE560-4714-4BDF-A5BF-65C4731B9234.jpeg
    6C3AE560-4714-4BDF-A5BF-65C4731B9234.jpeg
    558.3 KB · Views: 42
In the front, the big silver thing should be tight enough to support the weight of the handle arm.
When one wears it'll get sloppy. Or work was done that installed one too small.
I took mine out and cleaned the grease from the hole and the socket looking part. It stopped rotating on its own.

Maybe ... Put some super glue around outer edge , it'll cause some interference and it'll help with the rotating. May peening the hole the socket fits in. Gotta still be able to rotate by hand smoothly.
I see you're in Italy.... So USA work out of the deal.
 
Last edited:
In the front, the big silver thing should be tight enough to support the weight of the handle arm.
When one wears it'll get sloppy. Or work was done that installed one too small.
I took mine out and cleaned the grease from the hole and the socket looking part. It stopped rotating on its own.

Maybe ... Put some super glue around outer edge , it'll cause some interference and it'll help with the rotating. May peening the hole the socket fits in. Gotta still be able to rotate by hand smoothly.
I see you're in Italy.... So USA work is it of the deal.
Mark Johnson (AS member majohnson) rebuilt mine last season and it is now better than new. Highly recommended as I doubt I would have found the defect if I had simply cleaned and lubed myself.
 
The bearing holder needs to move, it what allows the bearings to go over center as you move the joystick from side to side. Without the bearing holder movement you will ruin one if not both bearing. Additionally you are going to have a tight spot in the joystick movement.
 
Last edited:
Dear all, I bought a used Farley rest coaxial II two weeks ago.
I try to clean it inside on the moving parts and adjust the tension screws.
The only issue seems to be the Joystick arm that tends to rotate itself when I operate it. Is it normal in your opinion?
Is it possible that something inside has loosened or it is ok for the joystick to rotate on itself?
thank you in advance for your help
Remo
It appears that no one is answering his question.
 
He's saying the weight of the curved Handel rotates on its on. Very irritating to have to hold it strong so it doesn't.
So yes, his question has been answered.
It's not irritating at all, that's how it's supposed to work. If it didn't rotate, that would be much worse and people would complain about that too. My advice is to take the rest function as it's supposed to be and get used to it. SEB joystick handles rotate in the same manner for a reason. It's a benefit if understood and used accordingly.
 
Last edited:
I get that same 'rotating handle' thing. Figured it was normal.
But, just in case we aren't getting a complete picture...I notice in the photo that the tension screws seem to be out a fair way.
Is the problem compounded for @Sereremo by the rifle weight pushing the handle down.
Would a tad more tension help?
Love my Farley, and have used the info from Butch to clean and grease it, plus add the UHMW tape.
So smooth and quick to use. Could never go back to my Bald Eagle style of rest.
 
the rest is very smooth to use and I’m not complaint about that.
I read the info in this forum in order to tighten the screws in the right way…I put the rifle on the rest and I set the screw until it supported the rifle weight.
I try to post a video…
Thanks

 
Your handle does seem a lot more easy to rotate than mine.
When I bought mine 3rd hand I had no knowledge of how the Farley worked.
Was pushing on the handle extension to fit it and the whole joystick assembly shot out the front of the unit (the target side).
So I stripped it down to clean, grease, etc and to figure out how the thing went back together.
I found that the internal bearing that sits in the front plate was loose (this is the plate that handles the up/down part...and the bag holder attaches to the top of it).
My bearing had just popped out of that plate...and it should be locked in. I could see the remnants of some sort of epoxy glue around that area so I cleaned it and glued that bearing back in again.
All sorted...nice and tight bearing now.
Maybe your bearing is worn and a bit sloppy, or it's loose in that front plate?
First photo is the bearing in the front plate. This is the view from the shooters side.
Next photo is the back view of that plate and shows where the bearing sits in a machined hole. If your bearing is spinning in that hole then it needs cleaning out and new epoxy or Loctite 660 to glue it tight again.
I am assuming epoxy is a normal Farley idea. I've seen 3 Farley's now and all had a light ring of epoxy showing around that bearing. Don't get epoxy inside that bearing though!
Bearing1.jpg
Joystick.jpg

Third photo...Don't glue this bearing...it needs to be free to allow some forward/back movement (about 1mm) for the overtravel as you traverse from side to side. This is the bearing that @majohnson was referring to. This bearing sits in the front (target side) of the main frame.
Bearing3.jpg
 
Last edited:
Here other pictures
it seems that the glue is missing….probably this is the issue!
 

Attachments

  • 2DF02C50-C7D3-4AFB-B6EA-1807A4D4AAD0.jpeg
    2DF02C50-C7D3-4AFB-B6EA-1807A4D4AAD0.jpeg
    440.2 KB · Views: 11
  • 704431F2-2D14-4BE6-A0DA-382F3FE53B56.jpeg
    704431F2-2D14-4BE6-A0DA-382F3FE53B56.jpeg
    374.8 KB · Views: 12
  • D20D84D1-A22D-4D9C-B110-82101B8E8985.jpeg
    D20D84D1-A22D-4D9C-B110-82101B8E8985.jpeg
    545.5 KB · Views: 12
  • 37801989-5087-48E5-BA33-AD8E33F3A045.jpeg
    37801989-5087-48E5-BA33-AD8E33F3A045.jpeg
    477 KB · Views: 10
  • A4ED2B5A-E050-400B-896F-6CCB7047E2F5.jpeg
    A4ED2B5A-E050-400B-896F-6CCB7047E2F5.jpeg
    476.2 KB · Views: 10
Last edited:
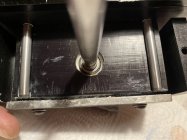
In this photo you posted...is that bearing loose in the plate? Or is the bearing sloppy? It should feel nice and smooth with no play in the bearing. Yours does look dry and dusty.
Your photo is only showing the shooters side of the plate (I think). Do you have a photo of the back side (the side of the plate that faces the target)? The epoxy is only on the back side, you won't see any on the area that faces the shooter.
Can you gently push on the shooters end of the joystick to see if the bearing moves out?
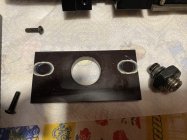
This needs the entire rear main bearing with shaft and inner ('up/down') plate to be removed first. That main bearing should be able to move in and out slightly when in use. Can you tap yours out all the way (towards the shooter) direction and remove the whole assembly from the main frame? Would like to see a photo of what's going on with the bearing and the inner plate.
Once out you don't need to hammer it! A good push will show if the inner bearing is loose in the plate (the 'up/down' plate).
If it is, then yes...push it right out, clean the outer race edges and the machined hole the bearing fits in.
Then a new epoxy or Loctite job. Not too much...just the outer edges where they contact the wall of the hole.
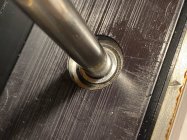
You will see in the 2nd photo where my bearing shaft also shows epoxy around the shaft where it passes through the bearing.
The red arrow points to where you need to place a 'thin' film of epoxy all the way around that surface. Don't go putting on too much and jamming up the inner bearing race.
Your 2nd photo (above) shows the main support bearing that fits in the main frame of the unit. Looks like someone has thumped that out with a metal punch. That may have messed up your main support bearing? Use a socket of correct size to fit the outer race of that bearing if you need to tap it out. It's driven out by knocking it back towards the shooter's side. Then driven in from the shooter's side towards the target area when fitting it back.
That main bearing may be tight from lack of maintenance, but when assembled it should be a nice sliding fit. Mine just pushes together with a wee bit of a push...no hammer needed!

D20D84D1-A22D-4D9C-B110-82101B8E8985.jpeg
Joystick.jpg
 
Last edited:

Upgrades & Donations

This Forum's expenses are primarily paid by member contributions. You can upgrade your Forum membership in seconds. Gold and Silver members get unlimited FREE classifieds for one year. Gold members can upload custom avatars.


Click Upgrade Membership Button ABOVE to get Gold or Silver Status.

You can also donate any amount, large or small, with the button below. Include your Forum Name in the PayPal Notes field.


To DONATE by CHECK, or make a recurring donation, CLICK HERE to learn how.

Forum statistics

Threads
166,275
Messages
2,215,669
Members
79,518
Latest member
DixieDog
Back
Top