• This Forum is for adults 18 years of age or over. By continuing to use this Forum you are confirming that you are 18 or older. No content shall be viewed by any person under 18 in California.

Do it yourself Stock making thread

Thanks for the pics! Looks like a good machine for the purpose. My system doesn't come close to that kind of accuracy but it's what I got.

Ok, guys. Last night, I transferred all my patterns onto one big sheet of paper. I'm going to Staples to make copies and then to the post office to mail them. I'll make some extras for stragglers. Any one who hasn't sent me thier address, do it now please!
Ps: Please include Zip Codes. I'm tired of looking them up.:mad:;):eek: Thanks, Josh

Update: The plans are in the mail to the guys that gave me addresses. I'll be waiting on the rest. Now, I have to make a few more blanks and get started. Don't grab your pattern and start cutting. One procedure builds off the last procedure. Don't get ahead of me unless you know what you're doing.;)
 
Last edited:
One thing you can get started on is your bottom metal template. I used some 3/16 aluminum plate 9" X10". 10X10 is better in retrospect, for a better surface for the router to ride on. 1/8 inch worked but 1/4" is better. It's what I had lying around. Here's what it looks like, finished.
image.jpeg

This takes about an hour and a half. Here's how I did it:
I cut a 10" by 9 1/2 inch piece of aluminum plate.
I sharpened an ice pick and used it to etch a fine line down the center of my plate with a straight edge.
I measured the centers of my action screws and etched them across my center line. (Notice the top of the template. You want to have the trigger guard end of your bottom metal about a 1/4" from the edge of the plate because it needs to snug up close to your grip.)
I then etched the outside edge of my bottom metal onto the plate. It's a little tricky because you have to remove some of the aluminum to get the bottom metal to sit flat on the plate. Leave the portion of the plate with your center marks until you have the bottom metal completely etched on the plate. Use the marks to site thru the holes in your bottom metal to keep it centered. You could also drill holes and use bolts to keep you centered.

Then, I drilled a hole near the edge of my cutout so I could use a jigsaw with a fine metal blade to cut close to my etched line. Readers and a good work light help.

Use some various flat and round files to fine tune the opening until your bottom metal can "just" slip thru. File square to the surface.
A slightly loose fit is OK if you file a little too much. When it's installed in the stock, you'll need a flashlight to see any gaps. If you're changing the stock design for an exposed magazine or flush, factory bottom metal you should take the extra time to make your template tight to your bottom metal.

The last step is to back your template up with 3/4 inch ply. I cut this piece 13" wide by 10". Center your aluminum template on the ply, drill and chamfer at least 4 holes and screw your template to the ply. Make sure your screws are flush or below flush so your router doesn't catch on them.

Drill a hole thru the ply and use a jigsaw to remove "most" of the wood in your cut out. Some jigsaws cut at a slight angle, especially in curves, so stay at least 1/4 inch away from the aluminum. Use a "flush cut" router bit in your router to remove that last 1/4 inch. Slow and careful so you have a smooth cut because your bearing is going to "ride" on that surface as you route deeper into your blank.

Use a square and a really sharp pencil to mark your center lines on the inside face of the plywood and you are done! Good job!

I traced the inside lines of all the templates I've made onto the pattern print I'm sending you to speed up your process.
These include:
PT&G AICS mag for Remington 700 and clones
Tikka 595
Tikka T3
Tikka CTR
If you don't have one, the small "laminate trimmer" router is helpful for this procedure. Add that to the tool list.
image.jpeg
 

Attachments

  • image.jpeg
    image.jpeg
    702.8 KB · Views: 54
Last edited:
Sir, please build me a stock.

I can't pay you, but the value in what you learn from making the stock is payment enough.

Sincerely, A Liberal.

:D

On a serious note, great job, and great write up. My dad makes custom furniture. I'm going to show him this thread.
 
But does he shoot?;) I have extra patterns ready to be mailed if he's interested in making you a stock.:eek:
 
I started getting some blanks ready. I have a lot of 2" thick boards(in the rough) so I'm going to use some. I run one side thru my jointer to make it flat and I use my planer on the other. These will finish at about 1 3/4" so I'll have to laminate a piece on the side. Thickness dependent on the action and configuration. I like a little more wood around the action/mag well than the original for bigger, harder recoiling cartridges. Your blanks should come finished 4 sides, so you avoid this step.
image.jpeg
You'll notice that some of the blanks are cut close to the profile of the stock. That's me conserving wood. I had some boards that were long enough to get 2 blanks out of. Cutting them this way will make it a little more difficult to set them up in my drill press to get good, perpendicular holes. If any one is using a drilling fixture, you'll be using the routing surface jigs. A full square blank is much easier to start with.
image.jpeg
When looking at your blank, look at the grain pattern on the end. I like to put the better grain figure in the butt and have the grain run like this:
image.jpeg
The top of my stock will be the right side of this blank.(above) I have one that has a split, so it has to be done the opposite from what I like. Oh well.
image.jpeg
For those that want to do a few of these, you can trace the pattern onto some 1/4 or 1/2 in. Plywood.
 
Last edited:
I haven't been reading the thread as I've been working out of town and the trip eats up my day. Just caught up and I ran to the mail box but no joy, the templates are not in Florida yet!. I was surprised to see that in my first few tries at stock making and alterations that we came up with a similar jig. I built almost the same two sides but attached them on the bottom and ends with some maple plywood scraps. Then went its time to rout the barrel channel or some other procedure, I screw some pieces to the jig to support the stock for height and shim tight off the ends. It never occurred to me to use a temple and a router to inlet the bottom metal I just used the drill press and some chisels and files. I don't know how to post pictures but next time one of the chilrens is over I'll see if they can teach me. This is a very good thing you are doing and I appreciate it very much. There are many on this forum that are benefitting from your help.
 
Don't worry. They're on the way. I didn't send them Air Mail, tho. Regular snail mail. Seems I missed the mail lady on Tuesday. I went down to put some more in the box yesterday morning and Tuesday's mail was still in the box. I think she hates me. She's complained about all the heavy Priority boxes I get.:p
After I finished my first one, I had a hope that I could start producing these in quantity and make a little extra "bullet money" so I tried to come up with ways to speed up the process. The bottom metal template was one of them. Josh
 
I talked to Gary about an hour ago and he says my original jig is at his house. I knew I didn't have it anymore and made a new one a few months ago. Senility must be closing in on me.
 
Just a heads up,and it is way more achievable than it sounds.Keep an eye out for a cheap,shop smith.Yeah,one of those things.I know there are owners group,fanboys who think they're the best thing since sliced bread.I've been in cabinet /fine furniture biz 40+ years,and going strong.Shop smiths are pretty ghetto to most snobby woodpeckers.But,they make great stock dupe machines.Keep it under the radar,which will keep prices low.Buy them....takes minutes to set'm up.

Great thread,the very best,BW
 
Thanks for the tip. Ggmac is suggesting I get a certain model of duplicator. An equipment purchase is on hold for now, unless the ITAR rules change. I can make a few more stocks for myself and friends the way I'm doing them. I have the time. My "new business venture" may have to remain a dream.:( 
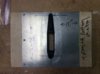
At least I get to thumb my nose at "them" by showing other people how to make these stocks. "Teach a man to fish...".:D By the way, I'm not uppity about tools. I've been using the same Craftsman radial arm saw for 30+ years. I bought a cheap Wen sander for these stocks, not the expensive brand and only because my 25 year old Wen sander's paper holding screw froze and I can't change the paper.:rolleyes:
 
Last edited:
Good to hear the mail still works.:) I'm out of town for a long weekend. I'll finish my blanks when I get back and then start the build. Every one should have the plans by then. Thanks, Josh.
 
Yes. Pretty much anything you want to do. The pistol stocks are just a regular stock without a butt.;) The one Savage I did was an old 110 with an internal mag. Not a lot of wood left around the action after that trigger relief.
image.jpeg
 
Yes. Pretty much anything you want to do. The pistol stocks are just a regular stock without a butt.;) The one Savage I did was an old 110 with an internal mag. Not a lot of wood left around the action after that trigger relief.
View attachment 1006597
Hi Josh-- Read through this thread again--Received my plans today Thanks-- Here is my blank I just tried to glue up. Ill let it sit 24 hours and see how it came out. I thought I had alot of clamps but i guess not I put some on the list Hope you had a good trip Thanks for all the help
003.JPG
 
Last edited:
Yeah Kim, it looks like you're a little shy in the clamp department. I'd suggest getting 4 of the little 4" bar clamps for the build, too. They're cheap and very handy. I just gave myself an upgrade in the router department. The Porter Cable trim routers I own have a base adjustment that's a real pain to set accurately. I perused the options and hit Home Depot for a 1 1/4 hp Makita compact router. It should work much better than what I have. Nothing but the best for you guys!;):):):)
Thanks Josh -It wouldnt be a good example to show us subpar equipment:D:D. I do have more clamps but they were at the house. Still need some more. So that print you sent me is full size and Im not going to cut it out but if I did I could trace it right on the wood? My router is a porter cable but I think a bigger one. Ill check today. Thanks
 
Yes. The patterns are full size. You can trace it on the stock, but( thinking long and hard about it) it's nice to have the plywood copy as a reference. I keep using it during the process. Mine has various action screw center lines drawn on it and other reference points, angles, etc. I like "hard copies". If you might do more than one stock, I'd make the plywood copy. Once you find out how easy it is, I think you'll be hooked. I made my first one and immediately started thinking about how I could make the next one "better". All of my factory stocked shooters suddenly needed an upgrade.:)

On the subject of equipment, when did you sneak in and borrow my old Delta job saw. I swear mine has white paint on the table at exactly the same spot!;)
That hackberry looks like it has potential. Pretty wood.
 
Last edited:
I should point out a few things about the patterns. They are all full size copies.
The butt plate profile is just what I use. It's slightly narrower than a small Pachmeyer recoil pad. I have made a couple narrower. They can be more V shaped on the lower half to get a thinner bottom on the stock. You need to maintain a certain width at the middle for the cheek piece hardware cross bolt. I included a tracing of a new, untouched recoil pad as a reference.
I make my pattern for this out of 1/4 inch thick aluminum, with the screw holes matching those on the recoil pad. It gets screwed onto the stock for the shaping procedure and then screwed onto the recoil pad for it's shaping. A piece of steel would be a better material as it does occasionally get hit with the sand paper. It's a "stop" as well as a pattern. I just have a lot of scrap aluminum lying around.
There is a pattern marked "palm area cut" or "grip area curve". (.I'm away from my plan and going from memory) This should be copied onto 1/4 inch ply for ease of use. You'll be drawing and redrawing that line during the shaping process. It's good to have a hard edge.

The other curved pattern is for the trigger finger groove on the side of the grip area. This should be copied onto 1/2 or 3/4 wood material. When we get to that step, I'll explain how that piece gets nailed onto a piece of 1 X 6 to make the router guide.
 
Last edited:

Upgrades & Donations

This Forum's expenses are primarily paid by member contributions. You can upgrade your Forum membership in seconds. Gold and Silver members get unlimited FREE classifieds for one year. Gold members can upload custom avatars.


Click Upgrade Membership Button ABOVE to get Gold or Silver Status.

You can also donate any amount, large or small, with the button below. Include your Forum Name in the PayPal Notes field.


To DONATE by CHECK, or make a recurring donation, CLICK HERE to learn how.

Forum statistics

Threads
164,705
Messages
2,183,087
Members
78,492
Latest member
Paulsen27
Back
Top