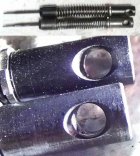
- Home
- Forums
- Q&A: Gear, Gun Projects, and Gunsmithing
- Gun Project Questions & Gunsmithing
- Advanced Gunsmithing & Engineering
You are using an out of date browser. It may not display this or other websites correctly.
You should upgrade or use an alternative browser.
You should upgrade or use an alternative browser.
Cocking cam questions
- Thread starter marazzi59
- Start date
Savage, Adjustable pin:
Cutting the whole profile of the Savage cocking cam is probably best left to a Savage Gun Smith.
If you are brave, maybe get a spare bolt body (GunShack about $42) and work on it.
If you screw it up, oh well
You need to FEEL where bolt lift is the worst.
Rough feel, smooth and blend,
Extracting a case, timing of primary extraction,
Cocking, spring force,
*Going over the notch.
*Getting the spring compressed enough to go over the hand off from cocking shelf, over the notch to sear hold, back and forth, is the first step.
Blending the point of the notch is probably the easiest and safest (damage wise) for a non-gunsmith.
Last edited:
Just curious what you are trying to accomplish?Can anyone explain how to measure or tell when its needed to recut the cocking cam on a savage 10 or a rem700? Any before and after pictures?
Paul
Speaking of Savages, your first step should be to install a bolt lift kit. Have you done that? On the 700s, you will get a little lighter lift near the top switching to one of Tubb's dual springs. Other than that, I do not see where recutting the cam would get you where you want to go. In the past I have mixed a little HBN into some Pro Shot gold and used that on the shroud threads and cam. After working the bolt some, the next time I took the rifle out of the safe, the lift definitely felt lighter. In addition to whatever else was going on, some of the grease had migrated so that it was lubing the bolt body in the rear bridge of the action.
Sounds expensive to do properly. I wouldn't trust the average gunsmith to do the job. Some are experts some not. Sounds like a lot of trouble to solve a problem you don't really have.Can anyone explain how to measure or tell when its needed to recut the cocking cam on a savage 10 or a rem700? Any before and after pictures?
If you want to experiment/learn buy a spare bolt body (Savage @ GunShack for about $42).
Things you can improve on are cocking force, pin fall, and total impact energy, even with a lighter spring.
STEP ONE:
When the cocking piece is moved over the notch in the bolt body (up handle rotation) and onto the full cock position (I'll call the Shelf) the spring must be compressed more than necessary. This is felt as an increase in cocking force near the top of handle lift. You can feel it, even without a fired case being extracted. This may or may not bother you or disrupt rifle position while cocking. Your call.
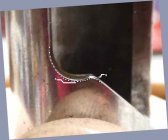
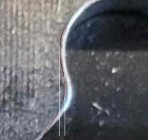
I would START by removing MOST of the upward bump. Then deepen the "Shelf" to put a LITTLE bump back in. Then smooth and blend your work. This area only impacts the lift onto the shelf, and moving off and onto the sear. Dropping the SHELF/Notch also removes some of the DeCocking going onto the sear, a waste of energy at the handle. It by itself does NOT do anything for Pin Fall or Impact energy. Just the force you feel at the Handle. This will also compress the spring to Full Cock a little earlier maybe even before the Primary Extraction @ the Rear Baffle starts adding felt force pulling the fired case.
I suggest going at this SLOWLY, in steps, and monitoring your progress with a in/lb torque wrench fit into the 1/4" hex in the BAS.
Things you can improve on are cocking force, pin fall, and total impact energy, even with a lighter spring.
STEP ONE:
When the cocking piece is moved over the notch in the bolt body (up handle rotation) and onto the full cock position (I'll call the Shelf) the spring must be compressed more than necessary. This is felt as an increase in cocking force near the top of handle lift. You can feel it, even without a fired case being extracted. This may or may not bother you or disrupt rifle position while cocking. Your call.


I would START by removing MOST of the upward bump. Then deepen the "Shelf" to put a LITTLE bump back in. Then smooth and blend your work. This area only impacts the lift onto the shelf, and moving off and onto the sear. Dropping the SHELF/Notch also removes some of the DeCocking going onto the sear, a waste of energy at the handle. It by itself does NOT do anything for Pin Fall or Impact energy. Just the force you feel at the Handle. This will also compress the spring to Full Cock a little earlier maybe even before the Primary Extraction @ the Rear Baffle starts adding felt force pulling the fired case.
I suggest going at this SLOWLY, in steps, and monitoring your progress with a in/lb torque wrench fit into the 1/4" hex in the BAS.
Last edited:
One Eye Pete
Gold $$ Contributor
The only time I messed with a cocking ramp was on a Bighorn action when I couldn’t get enough firing pin fall. I had to cut the ramp deeper to get the required 0.24 firing pin fall and be able to time the action to a Triggertech Diamond trigger. Savage actions are not lacking in firing pin fall. The bolt lift is a bit hard but normally they provide excellent ignition. If you want to improve the bolt lift force install a lift kit. The only way I would mess with the Savage cocking ramp is as described by Rocketvapor in the post above.
The Achilles heel of savage actions is the trigger. I have one savage that was reworked and an evolution trigger installed by Sharpshooter Supply. This is about as good as a savage trigger and bolt lift can get. I can get this trigger reliably down to about 4 oz or slightly less and the bolt lift is greatly improved but unfortunately they don’t make the evolution trigger anymore.
The Achilles heel of savage actions is the trigger. I have one savage that was reworked and an evolution trigger installed by Sharpshooter Supply. This is about as good as a savage trigger and bolt lift can get. I can get this trigger reliably down to about 4 oz or slightly less and the bolt lift is greatly improved but unfortunately they don’t make the evolution trigger anymore.
STEP TWO:
Increase Pin Fall over a stock Savage bolt. The internet seems to think at least 0.250" of pin fall is needed
The top position is fixed by the sear after the cocking pin has been dropped off the notch, by moving the handle down. The bottom position is fixed by where the pin ends up after firing. Excessive pin protrusion is a waste of Pin Fall. Most stock bolts will have close to 0.060" pin protrusion. While the primer is the bottom stop when firing you don't want the cocking pin hitting the bottom of the cocking slot before the pin hits the back of the bolt head. The internet (again) seems to think a 0.030" pin protrusion is plenty. About 25 for the primer dent, maybe a little for headspace/brass compression, maybe a little more for "just in case".
0.060" stock, 0.030" is enough, I shoot for 0.038"-0.040". The adjustment (28TPI 0.0357 per turn) allows 1/4 turn increments (0.00893" per 1/4 turn). Removing a couple thousandths from the contact end of the adjusting nut and juggling the 1/4 turn adjustments you can get within a couple thousandths of your target protrusion.
Once you have protrusion set you can start on increasing Pin Fall. With the upper location fixed by the sear, the bottom fixed by the Adjusting Nut hitting the back of the bolt head, you increase Pin Fall by SHORTENING the LENGTH of the pin from the Cocking pin hole to the end of the adjusting nut.
Just screw the cocking pin nut at the top of the pin in an extra turn or two. Won't go? work on the top nut.
There seems to me plenty of threads in that top nut so I use a 1/4" drill bit to countersink the hole a couple threads. Screw it down and check that the cocking pin DOES NOT contact the bottom of the slot before stopping on the bolt head.
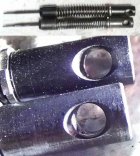
OH GREAT. We've just increased pin preload. With the internet saying the stock spring is OVERSPRUNG, and the Extra power springs sold making it worse it's time to REDUCE SPRING FORCE.
OH GREAT. We need pin force in addition to PIN FALL to get IMPACT ENERGY.
(see where this is heading?)
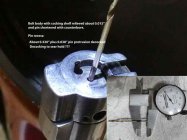
Whoops, now the Cocking PIN hits the bottom of the slot. Gotta fix that.
Increase Pin Fall over a stock Savage bolt. The internet seems to think at least 0.250" of pin fall is needed
The top position is fixed by the sear after the cocking pin has been dropped off the notch, by moving the handle down. The bottom position is fixed by where the pin ends up after firing. Excessive pin protrusion is a waste of Pin Fall. Most stock bolts will have close to 0.060" pin protrusion. While the primer is the bottom stop when firing you don't want the cocking pin hitting the bottom of the cocking slot before the pin hits the back of the bolt head. The internet (again) seems to think a 0.030" pin protrusion is plenty. About 25 for the primer dent, maybe a little for headspace/brass compression, maybe a little more for "just in case".
0.060" stock, 0.030" is enough, I shoot for 0.038"-0.040". The adjustment (28TPI 0.0357 per turn) allows 1/4 turn increments (0.00893" per 1/4 turn). Removing a couple thousandths from the contact end of the adjusting nut and juggling the 1/4 turn adjustments you can get within a couple thousandths of your target protrusion.
Once you have protrusion set you can start on increasing Pin Fall. With the upper location fixed by the sear, the bottom fixed by the Adjusting Nut hitting the back of the bolt head, you increase Pin Fall by SHORTENING the LENGTH of the pin from the Cocking pin hole to the end of the adjusting nut.
Just screw the cocking pin nut at the top of the pin in an extra turn or two. Won't go? work on the top nut.
There seems to me plenty of threads in that top nut so I use a 1/4" drill bit to countersink the hole a couple threads. Screw it down and check that the cocking pin DOES NOT contact the bottom of the slot before stopping on the bolt head.

OH GREAT. We've just increased pin preload. With the internet saying the stock spring is OVERSPRUNG, and the Extra power springs sold making it worse it's time to REDUCE SPRING FORCE.
OH GREAT. We need pin force in addition to PIN FALL to get IMPACT ENERGY.
(see where this is heading?)

Whoops, now the Cocking PIN hits the bottom of the slot. Gotta fix that.
Attachments
Last edited:
( saw your post Pete and Frank)
I'll cover MY bolt lift kit later (INFO only, not trying to sell).
Yes the bump is needed. Just not as much as Savages team of lawyers put there.
The ONLY time the cocking pin is on the SHELF is when the handle is (almost) full up.
Moving the handle down rotates the cocking pin, dropping it on purpose to the SEAR.
Hopefully you have an Accurtrigger with the blade installed
You can check the bump by removing the bolt (handle up, cocking pin on the SHELF) and pushing the pin out of the notch with your thumb. Work the Notch a little, check with your thumb, work the notch a little more.
You can keep going until you destroy a $42 bolt body
Last edited:
Work the pin length down by screwing the adjusting nut down a 1/4 turn at a time into this extra space created by counterboring until you ALMOST contact the bottom of the ramp. If you want MORE you will have to drop the bottom of the ramp.
Now things gets scary. Not really from a SAFETY standpoint, just messing up your SPARE bolt body.
Oh well, buy 2 spare bolt bodies
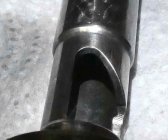
The ramp has Length and slope. The width at the bottom also effects the little bit of free rotation at the bottom, and with some triggers, TIMING.
Dropping the bottom, and BLENDING the start of the ramp is the risky part of ramp modification.
No need to reduce that big bump at the top if you create one at the bottom.
Go slow, check often. Coat the ramp with DyChem or black marker and cycle 1/4 zillion times
Taking a break as the Forum Lawyers look over this thread.
Just kidding.
While we wait for a decision here is a short video made today of the wife and her Savage at the Bogalusa range, 600yd F-Open match
Earlier this week at a practice session.
Now things gets scary. Not really from a SAFETY standpoint, just messing up your SPARE bolt body.
Oh well, buy 2 spare bolt bodies
The ramp has Length and slope. The width at the bottom also effects the little bit of free rotation at the bottom, and with some triggers, TIMING.
Dropping the bottom, and BLENDING the start of the ramp is the risky part of ramp modification.
No need to reduce that big bump at the top if you create one at the bottom.
Go slow, check often. Coat the ramp with DyChem or black marker and cycle 1/4 zillion times

Taking a break as the Forum Lawyers look over this thread.
Just kidding.
While we wait for a decision here is a short video made today of the wife and her Savage at the Bogalusa range, 600yd F-Open match
Earlier this week at a practice session.
Last edited:
Yes, sort of a more detailed REPEAT of the previous discussion.
Some of those guys are EXPERTS, I am NOT.
Sorry about the RERUN Video, added one shot today
Some of those guys are EXPERTS, I am NOT.
Sorry about the RERUN Video, added one shot today
Ok, hope I helped a little.
This is about as far as I can go with cocking cam profiling.
The EXPERTS with their secret methods use a jig to work their magic.
While Savage bolt mods don't pay their rent, it is probably their expertise that justifies the cost of having them do the work. What I do for the wife's Savage (the only one we own) is more of a Cheap Trick.
I will say that my Bolt Lift Mod (with the carbide mic tip and Ceramic ball) is pretty good as far as reducing friction rotating the bolt.
This is about as far as I can go with cocking cam profiling.
The EXPERTS with their secret methods
While Savage bolt mods don't pay their rent, it is probably their expertise that justifies the cost of having them do the work. What I do for the wife's Savage (the only one we own) is more of a Cheap Trick.
I will say that my Bolt Lift Mod (with the carbide mic tip and Ceramic ball) is pretty good as far as reducing friction rotating the bolt.
Last edited:
Speaking of 700s have you measured your FP fall? What is it? What is your FP protrusion? What is the weight of your FP spring when cocked? How much cock on close do you have? If you want to learn about these actions, you need to learn how to make all of these measurements. Changing the cocking cam really has nothing to do with what you are trying to achieve. The ony reason that that is done is to increase FP fall and most 700s have plenty. Lowering the bottom of the cam notch actually makes the cam more verticle which increases bolt lift because more work is being done wiht the same amount of bolt rotation. Do you understand how this works?I'm a self proclaimed thinker. Only wanting to learn and grow my abilities. I will only be doing this on my own gear and fully understand the risk vs reward
Similar threads
- Replies
- 6
- Views
- 880
- Replies
- 11
- Views
- 748
- Replies
- 3
- Views
- 1,193
Upgrades & Donations
This Forum's expenses are primarily paid by member contributions. You can upgrade your Forum membership in seconds. Gold and Silver members get unlimited FREE classifieds for one year. Gold members can upload custom avatars.

Click Upgrade Membership Button ABOVE to get Gold or Silver Status.
You can also donate any amount, large or small, with the button below. Include your Forum Name in the PayPal Notes field.
To DONATE by CHECK, or make a recurring donation, CLICK HERE to learn how.

Click Upgrade Membership Button ABOVE to get Gold or Silver Status.
You can also donate any amount, large or small, with the button below. Include your Forum Name in the PayPal Notes field.
To DONATE by CHECK, or make a recurring donation, CLICK HERE to learn how.


