For those who are just getting into reloading, I took a picture of a 243 Winchester case I sectioned to show what happens to a case right before a case head seperation do to pushing the shoulder back to much every time you reload it. This case has only three firings on it and is just about ready for a catostrofic case failure. I believe most who post here that have alot of experience will agree that setting the shoulder back some where around .002 is normal. ( benchresters a little less at times). This case was subjected to a set back of .009 or more every time and shot with warm loads.
I thought a I would break out the dremel tool and section a case so that I could show you what it looks inside the case right before a case failure.
As they say a picture is worth a thousand words. Do you know how much your shoulder is being set back every time????
Enjoy
RussT
-

243, case seperation.JPG
21.4 KB
· Views: 939
Good photo, Russ, and a good explanation of what usually causes it. I believe if more reloaders were introduced to using something like the Stoney Pt. (now Hornady) headspace gauge to set up their FL sizing die(s), we'd have a lot less of this sort of thing happening.
Dennis
You hit the nail on the head. Having the right tools for the job is very important. The Hornady tool is priceless once you consider the life of your new Lapua, Norma brass after you destroyed it in three firings as compared to ten.
RussT
Re: Case head separation
I still refer to it as the Stony Point tool, even though its now owned and sold by Hornady. Most reloaders I know, will know what your talking about when you say, "S.P.reading".
This tool is always out on my bench, and I couldn't and wouldn't reload with out it.
Its probably the most used item in the room, other than the chair.
With out it, I would feel as if I were blind, you cant be serious about reloading for accuracy with out this tool or one that does the same thing, if another exists.
You should still look at all cases about 3/8" to 1/2" up from the case head, looking for a shinny line around the case, a precursor of head separation, as well as looking at the primer.
Remember not all brass is the same, some lasts longer than others, and this tool is part of a good reloading practice.
Good safety post, Russ.
Mike.
The line on the case about 3/8" to 1/2" up is not always an indicator of pending case head seperation. Ask Mikem about his Lapua cases with that line. He swore it was the case starting to seperate until I convinced him that the line was a mark from his die that I removed with steel wool.
Know ahead of time how much you're bumping the shoulder back and what you're looking for.
And, a "broken case extractor" is a tool you never go shooting without!
Only takes one stuck case in the chamber and the chance to gouge your chamber with the wrong tool trying to get it out to mess up your whole day.
")
OK Mikie I give, I did have some lines around the case body on some 6BR Lapua brass, at about that location. But as it turned out, they were left by my Redding body die, after a partial body sizing.
However, don't assume anything, check it out.
Mike.
I found an old case that was in my scrap bin with a good defined line at the base like the one I sectioned and posted above. This will give readers a look at the outside. I hope the picture shows it well enough.
Also I would like to say that not all rifles are created equel when it comes to handling escaping gases after a case head failure. 99% of the time you may be fine with no issues. Its that 1% that can hurt you. I had an experience with what I call the perfect storm of cercumstances that lead to debris in my eyebrow and cheek.
Kinda like winning the Lotto but difrent, Luck of a difrent color you might say.
RussT
-
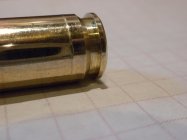
case gage 2_009.JPG
84.2 KB
· Views: 734
Russ:
Is it just me or does that line looks to be rather low on the case to be separation, when comparing it to your first picture?
And compared to the 308s I have tossed for cracking.
Mike.
Many times a line will be left by the sizing die you use. The most important thing to know about case head seperation is how to set up your dies. Use a stoney tool with a bushing that slips over the case neck and bump back .001-.002" You cannot set up your dies by lowering the handle with light shell holder bump like the manuals suggest. This tells you nothing. The slight errors on head spacing at the factory sheel holder manufacturing, improperly reamed die that is improperly set up can easily result in .010" shoulder set back and will eventually cause head seperation. Be Carefull
Lance
Mike
Yes this is a 308 Lapua case from another project. ( Tubb2000) so the way the Tubb holds a case is difrent from the 243 Win case above shot in a Remington style action. Good eye. It's hard to see the line in the picture as it actually is in person. There is a definate start of a seperation on this case.
Lance
You are very correct that without the gage you are blind. It makes it so much easier to see what your doing with the headspace gage. And it makes your brass last longer and safer to shoot. Sooner or later the case will give up and it will be time to get new brass. Knowing when that is, might be important. So I posted a couple of pics to help some folks out.
All
Russ:
Thanks for the pictures, and the explanation. On my 6BR, I keep a close fit with the chamber, and only bump the shoulder .0015, and body size the minimum when necessary. And the Lapua brass last for many re loadings, my first indication its time to toss it, is when the primer pockets start to get loose.
But my 308 is a different story, it doesnt get all the attention it should, and Ive cracked a few.
Mike.
i always remove the stricker from the bolt and resize untill the bolt will just close with a clean chamber and case with a slight feel. is that as good as measuring?
JB feel is not an accurate way to ensure proper chamber to cartridge fit . This was a great post to explain what i have found over the years with the proper tools would take to long . But looking back at my loading before i was enlightened and did everything by feel, I wonder how my handloads even went bang. Buy a tool to check headspace on your cartridge it is a great investment .
The dies that intrigue me, haven't tried one yet, are the Forster bushing bump dies. Could be wrong but, the way I understand these is they neck size the case and bump the shoulder a bit, leaving the rest of the case fireformed so to say. Is this right? Would there be a need for full length sizing eventually using this type of die? Just curious. Good thread by the way!
Mike
The Forster Precision Bushing Bump Die will bump the shoulder as much or as little as you want while resizing the neck with the size bushing you select. It doesn't do anything to the body of the brass. That's where a "body only" die comes in. Just a tube with no moving parts. Might be 4 or 5 firings before it's needed. I've got BR brass that's been resized maybe 10 to 15 times (At least) by bumping the shoulder, sizing the neck and a body die thrown in every once in a while. The Primer pockets are still snug and I can see a bunch more reloads before I'll have any problems.
Don't move that brass any more than you need to and you'll get long case life.
jb said:
i always remove the stricker from the bolt and resize untill the bolt will just close with a clean chamber and case with a slight feel. is that as good as measuring?
jb:
If the die you're using adequately sizes the shoulder of the case, that method works fine. However, if the case shoulder isn't being sized enough, you end up pushing the shoulder back more than you need to to get the 'feel' you're looking for. -Al
What Al says and, the best method is to "measure" how much bump you're putting on the brass. Get the tools to do the job so you'll know what you're doing.
And if you "ever" have a case head seperation, how do you plan on getting the broken case out of the chamber? Use a rod or oversize brush of some kind? Take a chance on gouging the chamber with the improper tool?
Use one of these and you'll never have to worry about "that" problem. Put one (or more) in your range bag/box and don't leave home without it. Saved my bacon on more that one occasion.
And that little short piece of brass case on the right? That's the back end of a .308 case that got ripped off out of my M1A. (the front part hit the trash can
) The M1A is "rough" on brass.
-
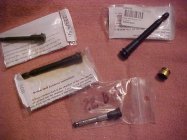
MVC-041F.JPG
61.6 KB
· Views: 590
I have a tool that I use to get cases out of my break open guns when I have the extractor removed. Just a small screwdriver with the blade bent 90 degrees and sharpened. You can feel the crack in the inside of the case and decide if it is a die mark or the start of case head separation.
Good thread, all Encore and Contender guys should be aware of the cause of case head separation and how to eliminate it.
I recently purchased a digital headspace tool from Larry Willis / Innovative Technologies www.larrywillis.com it made my Stonet Point tool obsolete. It's much more easier to use and all but eliminates the chance of cocking the brass in the calipers giving you much more consistant reading if you'll deprime your cases before measuring them the case stands up on the case head setting on a solid flat base plate. I found that several of my dies that were set up using my Stoney Point tools had .003 to .005 headspace. If you get a chance to use one of these tools you'll never go back as it aways set up and there is no inserts to look for or change out just a thumb set screw adjustment to adjust for different size cartridges. Take a look on his web suite I think you'll like what you see.
Regards
RJ
RJ
Great link. Looks like more and moretools out there to help us define good headspace for our reloads.
Thanks
Russ


