Follow along with the video below to see how to install our site as a web app on your home screen.
Note: This feature may not be available in some browsers.
This Forum is for adults 18 years of age or over. By continuing to use this Forum you are confirming that you are 18 or older. No content shall be viewed by any person under 18 in California.
OK, so I installed, gaged,and torqued my 30” Criterion barrel onto my new Savage Precision Target Action. Not real happy with the operation of the bolt. Too stiff, clunky compared to my Remington.
I ordered a 3.75” replacement handle, looking at getting a bolt lift kit, and will deburr/polish the cocking ramp.
Can anything else be done? Sear spring replacement? Firing pin spring replacement? I had similar issues with my Remington but now the thing is as smooth as silk. This is my first Savage build. Thanks!
Looking at ordering this one but there’s a question about the bolt assembly screw. Is the new screw the same length as the old one? If it is, how is the addition length of the little disk (1/8”?) taken up? I ordered a new bolt handle from Everglades this morning. I have one on my Savage 10 and it’s great!
On my Savages I remove the rear firing pin retainer and run a 1/4-28 tap all the way through. The firing pin is screwed into this piece and it is easy to chase the threads all the way through. I then use a set screw to hold the cocking piece. This takes out the slop in the cocking piece. I find it makes my trigger pull more consistent.
I also use the Lambeth lift kit. It really does improve bolt lift along with the Glades handle.
Two notes about the video.
1.) Use a crescent wrench and a patch or small cloth to decock the bolt before disassembly. Just open the jaws and turn the button. To recock just turn the opposite way. I carry a 4” crescent in my shooting bag just in case I manage to set the bolt off accidentally when not in the gun.
2.) If the bolt assembly screw is tight put the bolt on the floor(carpeted) put in the Allen key up slightly and use your foot to apply pressure to the key. Works every time and doesn’t mar the bolt handle.
Hand tighten when putting back in..
You can also get it Bushed. By downsizing the size of the firing pin you can shorten the spring a little and that makes bolt lift easier. Plus you will never get primer flow and you can have the bolt trued and hole centered up.
On my Savages I remove the rear firing pin retainer and run a 1/4-28 tap all the way through. The firing pin is screwed into this piece and it is easy to chase the threads all the way through. I then use a set screw to hold the cocking piece. This takes out the slop in the cocking piece. I find it makes my trigger pull more consistent.
I also use the Lambeth lift kit. It really does improve bolt lift along with the Glades handle.
Two notes about the video.
1.) Use a crescent wrench and a patch or small cloth to decock the bolt before disassembly. Just open the jaws and turn the button. To recock just turn the opposite way. I carry a 4” crescent in my shooting bag just in case I manage to set the bolt off accidentally when not in the gun.
2.) If the bolt assembly screw is tight put the bolt on the floor(carpeted) put in the Allen key up slightly and use your foot to apply pressure to the key. Works every time and doesn’t mar the bolt handle.
Hand tighten when putting back in..
Where is the set screw located? The Lambeth kit comes with a set screw to set the firing pin travel. Same thing?
Good info on the crescent wrench. I’ll give it a try.
Already removed the BAS. Took a little effort but it came off. Dabbed a little grease on the threads after cleaning and will give it 30 inch pounds during assembly. Thanks!
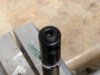
This picture will help. There is a set screw in the Lambeth BAS. It engages and centers the firing pin. It allows you to take unnecessary pressure off the cocking piece and give a clean trigger break. My modification involves the firing pin and makes no contact with the BAS. It locks the cocking piece and there is no movement when it comes in contact with the sear.
I make my own lift kit. Take a 38 case & cut it so there is about 1/8" of case past rim, epoxy ball bearing in primer pocket. Shorten BAS to make up for added length or shorten cocking sleeve.
I did this yesterday with a Dremel tool and polishing compound. I did this the same time that I deburred and polished the cocking ramp. It’s getting better.
I’ll look at the mod on the cocking piece. It looks to be within my capabilities. Drill press and a 8-32 or 6-32 set screw? Just enough pressure to take any play out, correct?
If you remove the cocking piece from the firing pin you will find it is held in place by the threaded end of the firing pin. The thread is 1/4-28. If you run a tap from the firing pin side you can just finish running the tap all the way through. All you need is the tap and some cutting oil. No drill press needed. Then put in a short 1/4-28 set screw. I tighten it by hand pretty tight. If I ventured a guess it would be about 25 inlbs..
More deburring and polishing today. Definitely going with a lift kit. Took the bolt without the handle, started tightening the BAS while working the cocking pin and felt a lot of resistance once the BAS made contact with the cocking sleeve. I can see where the kit will do some good.
More deburring and polishing today. Definitely going with a lift kit. Took the bolt without the handle, started tightening the BAS while working the cocking pin and felt a lot of resistance once the BAS made contact with the cocking sleeve. I can see where the kit will do some good.
I think the resistance you’re feeling is the cocking sleeve compressing the firing pin spring. If you put the bolt together in the uncocked position it will go together with less resistance. Then just cock the bolt after it is together.
I think the resistance you’re feeling is the cocking sleeve compressing the firing pin spring. If you put the bolt together in the uncocked position it will go together with less resistance. Then just cock the bolt after it is together.
Wasn’t in the assembly stage but you can feel the parts tightening up as you barely tighten down the BAS. I believe there would be a lot less drag with the lift kit installed.
I think the resistance you’re feeling is the cocking sleeve compressing the firing pin spring. If you put the bolt together in the uncocked position it will go together with less resistance. Then just cock the bolt after it is together.
Called Custom Guns and Ammunition twice and left messages and emailed. Still no response. Just asking if the stainless kits are in stock. I saw a kit on Stockades web site. Does anyone else make a kit similar? I’d prefer to have the BAS cut on a lathe rather than making my own.
You can also get it Bushed. By downsizing the size of the firing pin you can shorten the spring a little and that makes bolt lift easier. Plus you will never get primer flow and you can have the bolt trued and hole centered up.
Tried the crescent wrench last night and it worked perfectly! Couldn’t believe how simple it was. I was using a wood dowel rod to do this before. Thanks for the advice!
This Forum's expenses are primarily paid by member contributions. You can upgrade your Forum membership in seconds. Gold and Silver members get unlimited FREE classifieds for one year. Gold members can upload custom avatars.
This site uses cookies to help personalise content, tailor your experience and to keep you logged in if you register.
By continuing to use this site, you are consenting to our use of cookies.