Amazing work
You are using an out of date browser. It may not display this or other websites correctly.
You should upgrade or use an alternative browser.
You should upgrade or use an alternative browser.
Bolt action pistol build
- Thread starter scasa
- Start date
scasa
Silver $$ Contributor
Well progress has slowed a bit seems my boss wanted me to go back to work but I only work 3 days a week so that's ok.
I glued the bolts to a piece of 3/4 inch aluminum angle, the flat on the front of the bolt is in the up position . That will allow me to get to all sides that need work. First is to open up the bottom so the firing pin hole is open and the slot goes far enough back for the trigger sear to reach the firing pin where the catch will be.
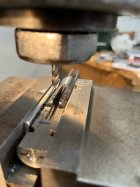
Next is the slot in the back of the bolt for the cocking cams
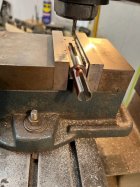
Next up is the slot for the bolt stop/release
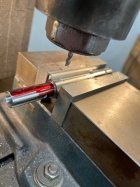
and last one is a slot in the bottom of the bolt for the ejector

I needed to get the trigger location sorted out so I whittled out an idea of what I kinda have planned.
I glued the bolts to a piece of 3/4 inch aluminum angle, the flat on the front of the bolt is in the up position . That will allow me to get to all sides that need work. First is to open up the bottom so the firing pin hole is open and the slot goes far enough back for the trigger sear to reach the firing pin where the catch will be.

Next is the slot in the back of the bolt for the cocking cams

Next up is the slot for the bolt stop/release

and last one is a slot in the bottom of the bolt for the ejector

I needed to get the trigger location sorted out so I whittled out an idea of what I kinda have planned.

scasa
Silver $$ Contributor
While I was at it I cut out a couple of walnut slabs for stocks.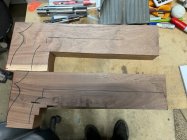
I cut out the firing pins from grade 5 bolts, got two that match pretty close. I do have all my parts numbered 1 and 2.
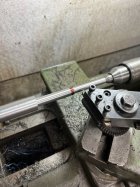
Once I had a good fit on both of them I cut off the excess and trimmed the lug area to 1/4 inch wide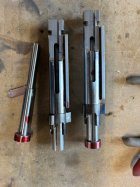
I made a fixture to hold the firing pins while milling off the extra material from between the cocking cams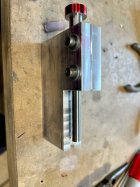
Once one is done you put the firing pin in the other side and the cam goes in the slot to orientate it to do the other one
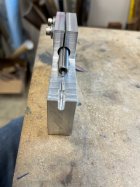
and that pretty much wraps up this weekends progress .

I cut out the firing pins from grade 5 bolts, got two that match pretty close. I do have all my parts numbered 1 and 2.

Once I had a good fit on both of them I cut off the excess and trimmed the lug area to 1/4 inch wide

I made a fixture to hold the firing pins while milling off the extra material from between the cocking cams

Once one is done you put the firing pin in the other side and the cam goes in the slot to orientate it to do the other one

and that pretty much wraps up this weekends progress .
scasa
Silver $$ Contributor
Got a little time to work on firing pins yesterday the new fixture worked pretty good after I made the slot longer. I've made a few of these and I've never got as good a fit as I did with these two . By the time I filed the tool marks off there was very little fitting required.

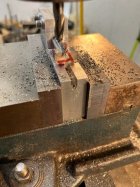
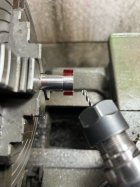
I have a 90 to 1 rt. angle gear box that attaches to the spindle of my lathe so I can mill and rotate the firing pin as I mill away the extra material. I dont know how many passes I made but it was 1 degree per pass with a 1/8 inch ball mill. The new milling head works good I've never had then turn out with so little clean up required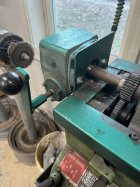
I started working on mating op the cocking ramps, this is all hand filing and sanding to get them to work together. once I get them really close they get lapped until their working right then polished up greased and worked some more till there wore in.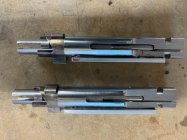
probably have more tomorrow


I have a 90 to 1 rt. angle gear box that attaches to the spindle of my lathe so I can mill and rotate the firing pin as I mill away the extra material. I dont know how many passes I made but it was 1 degree per pass with a 1/8 inch ball mill. The new milling head works good I've never had then turn out with so little clean up required


I started working on mating op the cocking ramps, this is all hand filing and sanding to get them to work together. once I get them really close they get lapped until their working right then polished up greased and worked some more till there wore in.

probably have more tomorrow
I love the reasoning behind it. My brain works the same way!
scasa
Silver $$ Contributor
I started making bolt handles today, their just hot rolled steel nothing exotic. I don't have a taper attachment so these were done with the etch-a-sketch method. Once roughed out they were filed into shape .

Then lots of sand paper on a paint stick to clean up the file marks
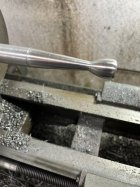
I cut a couple passes down each of 4 sides to square them up before going to the mill

I cut them off extra long so they would be easier to hold onto while sanding out the tool marks
Then they went to the mill and got cut down to the final size
I'll sand out all of the tool marks and get them polished up then cut the angle on the root end to match up to the locking lug part I usually drill and tap for a 6-32 machine screw and then solder them on with the screw for a back up.

Then lots of sand paper on a paint stick to clean up the file marks

I cut a couple passes down each of 4 sides to square them up before going to the mill

I cut them off extra long so they would be easier to hold onto while sanding out the tool marks

Then they went to the mill and got cut down to the final size

I'll sand out all of the tool marks and get them polished up then cut the angle on the root end to match up to the locking lug part I usually drill and tap for a 6-32 machine screw and then solder them on with the screw for a back up.
scasa
Silver $$ Contributor
These two are .22 LR and will be sporting Green Mountain barrels. If I find a .22 hornet reamer and dies I'd make one of thoseI might have overlooked it, but what caliber & barrel are you going to use?
as a Canadian song writer said " carful when bending the law "Free men don’t ask.
scasa
Silver $$ Contributor
Well today was the day to cut the recess inside the receiver for the second bolt lug. that's always a stressful operation cause for part of it your standing on your head with a flashlight trying to see inside but it went good only about 10 min once everything is set up.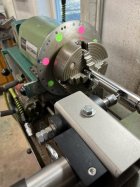
That's an extra long 3/16 carbide end mill stuck out about 1 1/4 inches. I made several passes each one about .030 deep and overlapping .050 each pass. The last pass lighty kisses the main lug mating surface ,it ensure even contact and I'll lap them in.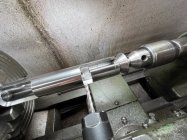
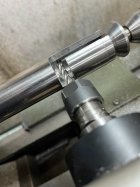
Hard to get a decent pic but they look pretty good. I did a little fitting work to get the bolt lug cocking cam piece to do all the way in and turn 90* it has to rotate as it's going down. After that I started on the bolt handles, sanded out all the tool marks and cut them off again.. I made a 35* angle guide to get them to the right angle then cut them off again and milled them off at 35*. Their glued to the locking lugs now and I'll drill and tap the hole for the little screw tomorrow
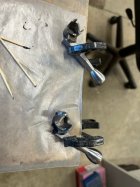 once the screw holds them together I'll trim the top off.

That's an extra long 3/16 carbide end mill stuck out about 1 1/4 inches. I made several passes each one about .030 deep and overlapping .050 each pass. The last pass lighty kisses the main lug mating surface ,it ensure even contact and I'll lap them in.


Hard to get a decent pic but they look pretty good. I did a little fitting work to get the bolt lug cocking cam piece to do all the way in and turn 90* it has to rotate as it's going down. After that I started on the bolt handles, sanded out all the tool marks and cut them off again.. I made a 35* angle guide to get them to the right angle then cut them off again and milled them off at 35*. Their glued to the locking lugs now and I'll drill and tap the hole for the little screw tomorrow
 once the screw holds them together I'll trim the top off.
scasa
Silver $$ Contributor
I've got a few more things done. The screws to hold the bolt handles on are done. I made a sacrificial arbor and glued them to that with some JB kwik. The bolt handles were milled of at 35* so I set the handles up at 55* to do a tap drill, a body drill and a counterbore.

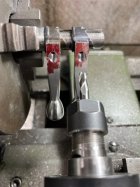
Some 8-32 socket head screws shortened and were there , ready to trim off the tops
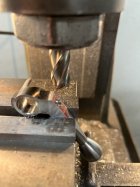
So now I have 2 bolts almost finished.
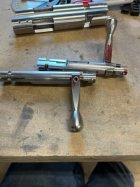


Some 8-32 socket head screws shortened and were there , ready to trim off the tops

So now I have 2 bolts almost finished.

scasa
Silver $$ Contributor
There is an 1/8 diameter pin that that holds it all together and a cap that covers the pin . A 6-32 screw holds the cap on and the two slots in the cap orientates in in the right position. the caps will follow the curve of the receiver in the back similar to a CZ 457 which will also follow the curve of the pistol grip. (I hope ) To disassemble the bolts unscrew the screw that holds the cap on pull it off and use the Allen wrench to push the pin out then compress the spring retainer and pull out the Allen wrench and it all comes apart.
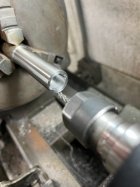

That's about all I've got done . I have the firing pins mated to the cocking cams and they work pretty good with light springs for now. I'm about ready to get the triggers in and trimmed up. I've got another 5 days off I should be able to get something done.


That's about all I've got done . I have the firing pins mated to the cocking cams and they work pretty good with light springs for now. I'm about ready to get the triggers in and trimmed up. I've got another 5 days off I should be able to get something done.
Are you moving your equipment? I found that to be one of the hardest parts of moving. You can't just pick up a 3500 lb milling machine and throw it in the back of your vehicle....
The scrap metal pile was a nightmare, too.
The scrap metal pile was a nightmare, too.
scasa
Silver $$ Contributor
Yea I'm taking the equipment, I'll have to take it apart to be able to move it but that's how it got from texas to here. fortunately my mill only weighs about 800 pounds same for the lathe . There both really top heavy though. Scrap metal has been pretty easy with my friends. Save metal is a different story though.Are you moving your equipment? I found that to be one of the hardest parts of moving. You can't just pick up a 3500 lb milling machine and throw it in the back of your vehicle....
The scrap metal pile was a nightmare, too.
Similar threads
- Replies
- 1
- Views
- 785
- Replies
- 3
- Views
- 619
- Replies
- 2
- Views
- 866
Upgrades & Donations
This Forum's expenses are primarily paid by member contributions. You can upgrade your Forum membership in seconds. Gold and Silver members get unlimited FREE classifieds for one year. Gold members can upload custom avatars.

Click Upgrade Membership Button ABOVE to get Gold or Silver Status.
You can also donate any amount, large or small, with the button below. Include your Forum Name in the PayPal Notes field.
To DONATE by CHECK, or make a recurring donation, CLICK HERE to learn how.

Click Upgrade Membership Button ABOVE to get Gold or Silver Status.
You can also donate any amount, large or small, with the button below. Include your Forum Name in the PayPal Notes field.
To DONATE by CHECK, or make a recurring donation, CLICK HERE to learn how.


