It baffles me that something as simple as a break-in procedure could even become a controversial subject. It's a product of the internet and everyone going tribal.
It shouldn't matter if it's a truck gun or benchrest rifle because if it was worth a new barrel it's worth a few patches and bullets to do it right.
In the front of the
Gunsmiths Book of Chamber Prints there is a very good section about break-in and cleaning. This information has been passed on from the world's best barrel makers and reamer manufacturers. The original source was the barrel makers guild. Serious shooters and gunsmiths should all take the time to read it.
Barrel break-in is not the correct terminology... it should be called
Throat Break-in for a properly lapped barrel.
With any premium lapped barrel the lay of the finish is in the direction of the bullet travel, very little is done to the bore during break-in but the
throat is another story. When your barrel is chambered, there will be some amount of reamer marks left in the throat that are perpendicular to the lands ,i.e. across the direction of the bullet travel. When the bullet is forced into the throat, copper dust is released into the gas, which at this temperature and pressure is actually plasma. The copper dust is vaporized in this gas and is carried down the barrel. As the gas expands and cools, the copper comes out of suspension and is deposited in the bore usually toward the muzzle. This makes it appear as if the source of the fouling is the bore and subsequent bullets and deposits are fired over it. Copper, which adheres well to itself, will build up quickly and may be difficult to remove later.
So when we break in a barrel, our goal is to get the throat deburred and polished without allowing copper to build up in the bore. This is the reasoning for the "fire-one-shot-and-clean" procedure.
Barrels will vary slightly in how many rounds they take to break in because of things like slightly different machinability of the steel, or the condition of the chambering reamer, ect... For example a chrome moly barrel may take longer to break in than stainless steel because it is more abrasion resistant even though it is the same hardness. Also chrome moly has a little more of an affinity for copper than stainless steel so it will usually show a little more "color" if you are using a chemical cleaner. Rim Fire barrels can take an extremely long time to break in - - - sometimes requiring several hundred rounds or more. But cleaning can be lengthened to every 25-50 rounds. The break-in procedure and the clearing procedure are really the same except for the frequency. Remember the goal is to get or keep the barrel clean while polishing out the throat.
The best way to break-in the barrel is to observe when the barrel is broken in: i.e when the fouling is reduced. This is better than some set number of cycles of "shoot and clean" as many owners report practically no fouling after the first few shots, and more break-in would be pointless. Conversely, if more is required, a set number would not address that either. Besides, cleaning is not a completely benign procedure so it should be done carefully and no more than necessary.
It is a good idea to just observe what the barrel is telling you with its fouling pattern. But once it is broken in, there is no need to continue breaking it in.
Initially you should perform the shoot-one-shot-and-clean cycle for five cycles. If fouling hasn't reduced, fire five more cycles and so on until fouling begins to drop off. At that point shoot three shots before cleaning and observe. If fouling is reduced, fire five shots before cleaning. It is interesting to shoot groups during the three and five shot cycles.
For the folks that don't believe what is written above... here's how you can verify it.
1. Take one of your old chamber reamers and file a few notches in the throat area of the reamer.
2. Use this modified reamer to rechamber a used barrel that didn't previously didn't show signs of copper.
3. Shoot this modified barrel and now watch it make a crapload of copper toward the muzzle. This effect is even more profound in longer Fclass length barrels.
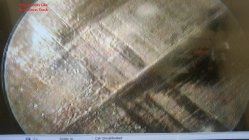
See attached photo of a test chamber throat that looks like a motocross track.

This test throat will never stop making copper and will never break-in.
The copper will show in the last 8-12 inches of the muzzle end but it was caused by the throat.
If your gunsmith handed you something like this and you decided to just start shooting it then you would load the barrel up with so much copper that the barrel would never clean and never show the full accuracy potential. However, if you were doing a break-in process then you would probably realize that something is wrong without filling the barrel up with copper and the throat could be corrected.
The amount of burr or tool marks will vary from chamber reamer to chamber reamer and from gunsmith to gunsmith because technique and tooling determines throat quality. The best gunsmiths normally check their own chamber work with a borecope before pulling the barrel out of the lathe.


