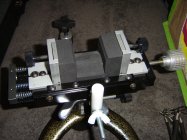
I have a Bald Eagle alloy slingshot rest for my rimfire benchrest shooting.
I did all the usual windage mods. Threw away that cable, made a ball bearing tipped adjuster rod, made a new end plate to take more return springs, etc.
Still wasn't happy, so thought about what I needed to do (yeah...buy a SEB, but I'm retired and can't afford that sort of luxury).
I would like a Shadetree joystick top for it's ease of use and that is a plan for next year...but some of you might like this mod for your Bald Eagle. It's easy to do, and only a basic set of tools needed.
First attempt I made a new end plate that allowed the return springs to sit straight and I could add extra springs too.
Just a piece of 12mm square key steel (it's used for making 'keys' for keyways). Here it is on the left side showing just 1 extra spring. This did help take up a lot of that dead feeling when fine tuning between left/right. This could be the only mod you may need depending on your situation.

Next thought was "I can get full travel across the windage by throwing out those spings as they compress and bottom out with lots of windage plate travel area left unused".
So I turned my thoughts to that and decided on a threaded rod system instead.
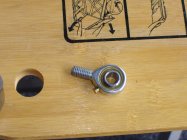
Made up 2 new end pieces (those windage plate 'stops'), and threaded the end to take a small 'rod end'. My rod ends are 8mm threaded. In the US about 5/16". Just remember to buy a rod end with correct eye diameter to accept your choice of threaded rod diameter.
Bought a length of 8mm threaded rod, and a connector nut (barrel nut?).
I'll just bang up the photos and you should be able to follow along easily.


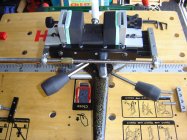
The above photo shows the basic concept. Make up a wee plate to attach to the back of the windage slide, and to attach the connector nut (that long gold coloured nut in the photo) to the attachment plate.
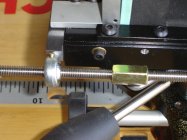
Here's a closeup . I cut back the length of the 2 side pieces as here you see that the shiny side piece protrudes out a bit too far and I wanted to make the connector nut sit closer to the windage slide.

And...done. I added a small packing piece between the mounting plate that attaches to the back of the windage slide (I made that plate from a wee piece of flat steel). I used JB Weld to attach the packing piece and the connector nut (you can see the 2 'glue bumps'). JB Weld works fine, but for sure you could weld it all together.
I'm just a 75 year old man kneeling on a garage floor in front of my 40 year old Grizzly drill press. No other tools needed apart from a hacksaw, a flat file, and a set of 8mm threading taps.

I cut down the original knob to a smaller size and rethreaded it to match my 8mm rod.
The attachment plate can be moved out with a wee piece of tape behind it to take up any wear/backlash as it develops.
Note that the threaded rod does not spin inside the 'rod ends'. I have used a locknut (that skinny wee nut) at each end so that the rod is locked on to the wee free spinning bush that is in the rod end.
Total cost about $NZ30 so it's not an expensive job to do.
Full story and more photos on RFC. My input starts a #14 onwards.
https://www.rimfirecentral.com/threads/good-shooting’s-fat-bag-as-a-front-rest.1262098/
Hope this is helpful to some of you.
EDIT: Once you make it, and figure out where the attachment plate will go then fit it up and bolt to the windage slide. Assemble all the other bits (threaded rod, connector nut, rod ends, etc), and get everything lined up how you want it.
Only then do you weld (or JB Weld) the wee attachment plate to the connector nut, as this keeps everything in alignment. If you weld, then cover the threads of the rod to avoid weld spatter jamming up your threads.
You are only doing this to keep things lined up properly. It will all still be able to be removed fully at a future time if you need too.
I did all the usual windage mods. Threw away that cable, made a ball bearing tipped adjuster rod, made a new end plate to take more return springs, etc.
Still wasn't happy, so thought about what I needed to do (yeah...buy a SEB, but I'm retired and can't afford that sort of luxury).
I would like a Shadetree joystick top for it's ease of use and that is a plan for next year...but some of you might like this mod for your Bald Eagle. It's easy to do, and only a basic set of tools needed.
First attempt I made a new end plate that allowed the return springs to sit straight and I could add extra springs too.
Just a piece of 12mm square key steel (it's used for making 'keys' for keyways). Here it is on the left side showing just 1 extra spring. This did help take up a lot of that dead feeling when fine tuning between left/right. This could be the only mod you may need depending on your situation.

Next thought was "I can get full travel across the windage by throwing out those spings as they compress and bottom out with lots of windage plate travel area left unused".
So I turned my thoughts to that and decided on a threaded rod system instead.
Made up 2 new end pieces (those windage plate 'stops'), and threaded the end to take a small 'rod end'. My rod ends are 8mm threaded. In the US about 5/16". Just remember to buy a rod end with correct eye diameter to accept your choice of threaded rod diameter.
Bought a length of 8mm threaded rod, and a connector nut (barrel nut?).
I'll just bang up the photos and you should be able to follow along easily.


The above photo shows the basic concept. Make up a wee plate to attach to the back of the windage slide, and to attach the connector nut (that long gold coloured nut in the photo) to the attachment plate.
Here's a closeup . I cut back the length of the 2 side pieces as here you see that the shiny side piece protrudes out a bit too far and I wanted to make the connector nut sit closer to the windage slide.

And...done. I added a small packing piece between the mounting plate that attaches to the back of the windage slide (I made that plate from a wee piece of flat steel). I used JB Weld to attach the packing piece and the connector nut (you can see the 2 'glue bumps'). JB Weld works fine, but for sure you could weld it all together.
I'm just a 75 year old man kneeling on a garage floor in front of my 40 year old Grizzly drill press. No other tools needed apart from a hacksaw, a flat file, and a set of 8mm threading taps.

I cut down the original knob to a smaller size and rethreaded it to match my 8mm rod.
The attachment plate can be moved out with a wee piece of tape behind it to take up any wear/backlash as it develops.
Note that the threaded rod does not spin inside the 'rod ends'. I have used a locknut (that skinny wee nut) at each end so that the rod is locked on to the wee free spinning bush that is in the rod end.
Total cost about $NZ30 so it's not an expensive job to do.
Full story and more photos on RFC. My input starts a #14 onwards.
https://www.rimfirecentral.com/threads/good-shooting’s-fat-bag-as-a-front-rest.1262098/
Hope this is helpful to some of you.
EDIT: Once you make it, and figure out where the attachment plate will go then fit it up and bolt to the windage slide. Assemble all the other bits (threaded rod, connector nut, rod ends, etc), and get everything lined up how you want it.
Only then do you weld (or JB Weld) the wee attachment plate to the connector nut, as this keeps everything in alignment. If you weld, then cover the threads of the rod to avoid weld spatter jamming up your threads.
You are only doing this to keep things lined up properly. It will all still be able to be removed fully at a future time if you need too.
Last edited:


