• This Forum is for adults 18 years of age or over. By continuing to use this Forum you are confirming that you are 18 or older. No content shall be viewed by any person under 18 in California.

Adjustable Reamer Stop

Here are the instructions for the adjustable reamer stop, I’ve sent them to those who have received theirs, but I’ll post the instructions here as well. Thanks!
I realized I need to make an edit to my original instructions on setting up the reamer stop. The instructions say to start out with the Reamer Stop adjusted so the headspace gauge shoulder/belt is roughly .050 above the shoulder/belt on the reamer. This will work for actions that have a recessed bolt head like a Remington or cone bolt noses, but this will cause the reamer to go too deep on actions with flat bolt faces and no counterbore in the back of the barrel. I apologize for this mistake, and I will fix it ASAP and re-upload the new instructions in my previous post and remove the previous set of instructions. Thank you all
 
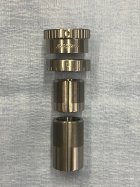
A couple updates on these. I made some design changes on Gen II of my adjustable reamer stop.

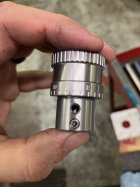
-The first change is there will no longer be a set screw that tightens down on the threads. There’s now an 1/8” hole in the Adjustment Sleeve that you can use a piece of 1/8” drill rod, the back end of a drill bit, etc to further tighten or loosen the Adjustment Sleeve down if you choose.

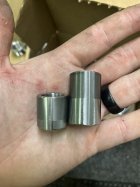
- I shortened the length of the reamer stop body and now will include a longer reamer stop body with the setup. This allows the reamer stop to have ~0.175 more rearward travel using the short body and ~0.150 more forward travel with the longer body. The shortest adjustment on the long body, is the longest adjustment on the short body. This makes the tool even more versatile than the original model. The longer body also has a 0.140” hole in the bottom to act as a vent in a flush system.

- The set screw, that tightens onto the reamer, is no longer going through the OD threads so it’s a cleaner look and less likely to have burrs in the threads.

-With the added reamer stop body, the new price will be $149.95


The final update is these will now be available and sold by Manson Precision Reamers! They have some in-stock now on their website. Thank you!

EDIT: I can still take orders, Manson will be carrying them and stocking these. They’re not the only way to buy them, but it’s easier and more convenient for me and the customer to go through them at this time. Thank you!

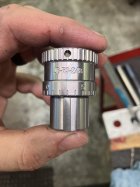
IMG_9303.jpeg74398316900__01A90E55-2F52-4B37-9980-D837587378E9.jpeg74398315307__70260661-74D1-450E-B6D8-4B6E2FCFE6F7.jpeg74398330415__993CDB16-5D64-4DAB-9AD1-58587ADDCC44.jpeg
 
Last edited:
So, the design is 3 pcs? It appears the collar that is graduated is the locking collar? How is that supposed to work? Seems to me that creeping up on a last thou or two and you unlock the two, repeatability may be an issue? Not sure I'm keen on the jamb nut revision. Unless I'm missing something?
 
So, the design is 3 pcs? It appears the collar that is graduated is the locking collar? How is that supposed to work? Seems to me that creeping up on a last thou or two and you unlock the two, repeatability may be an issue? Not sure I'm keen on the jamb nut revision. Unless I'm missing something?
The face of the “Adjustment Sleeve” stops against the back of the barrel. The “Lock Nut” is graduated and there’s a reference line milled into the Reamer Stop body that doesn’t move during use. You loosen the Adjustment Sleeve, move the Lock Nut (that’s graduated in .001 increment) the desired amount, then jam the Adjustment Sleeve against the Lock Nut. The way I use it, is you hold the Lock Nut on the desired number with one hand, and tighten the Adjustment Sleeve against it with the other hand. The reference line on the body never moves, and you just move the Lock Nut the amount you want to move. Every .005 is labeled and each .001 has a mark. It’s very repeatable. I could rename the parts if that would make it easier for others.

The only functional difference in this version vs the original is there’s no set screw that gets tightened against the threads. Finger tightening the two together is generally sufficient, but you can really tighten it down with a rod/back end of a drill bit stuck through the 1/8” hole that’s in the front of the Adjustment Sleeve.
 
Last edited:
Thanks to this thread inspired me design and fab my own unique micro adjust reamer stop! I set out to make just a simple collar that just set screw in one place, but got carried away...haha
 

Upgrades & Donations

This Forum's expenses are primarily paid by member contributions. You can upgrade your Forum membership in seconds. Gold and Silver members get unlimited FREE classifieds for one year. Gold members can upload custom avatars.


Click Upgrade Membership Button ABOVE to get Gold or Silver Status.

You can also donate any amount, large or small, with the button below. Include your Forum Name in the PayPal Notes field.


To DONATE by CHECK, or make a recurring donation, CLICK HERE to learn how.

Forum statistics

Threads
165,810
Messages
2,203,094
Members
79,110
Latest member
miles813
Back
Top