• This Forum is for adults 18 years of age or over. By continuing to use this Forum you are confirming that you are 18 or older. No content shall be viewed by any person under 18 in California.

Tactical/Target Rifle w/WOOD (Rnd 5/6)

AMG04

Gold $$ Contributor
ROUND 1 - Target / Bench Rifle

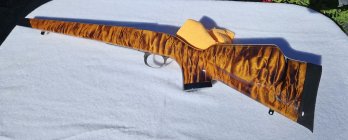
After 10-12 years of shooting aluminum chassis and stocks made with some sort of composite, I felt it was time to get back to wood.

Maintaining the form, fit, function of more modern stocks was important, but I wanted to gain the warmth, feel and beauty of wood.

I looked around and didn't see what I wanted, so I decided to make it myself.

The Process:
- Source curly maple blank
- Carve (rough pass) with router
- Contour and smooth (fine pass) with router
- Cut the inletting (action, bottom metal & barrel channel)
20240813_165930.jpg

20240814_095020.jpg

20240814_222222.jpg

20240814_222236.jpg

20240814_222258.jpg

- Sand... there was a lot of sanding!
20240822_063112.jpg

- Fit recoil pad with belt sander
- Add picatinney rail for bipod (drill and counter sink t-nuts)
- Drop in pillars (checking action/bm fit, alignment & feeding from magazine)
- Epoxy bed action & bottom metal
20240828_183130.jpg

20240829_125147.jpg

- Apply tung oil finish (2 coats cut 1:1 with mineral spirits for deeper penetration, 4 full coats)
20240829_081650.jpg


The Results:
20240830_071943.jpg
 
Last edited:
Nice work! I have the same machine. You should do some research on analine dies. They can make a maple stock pop. Here’s a couple I did in different colors:
View attachment 1586204View attachment 1586205
Beautiful!

I actually picked up black and coffee brown Transtint. I used them on some off cuts to test.

What color did you use for the mannlicker in the top picture?

What application process did you go with?
 
I used a CUSTOM mix of red, yellow, light brown and dark brown! I was experimenting. After more experimentation with different colors layered in application, I decided it didn’t matter. If I put a coat of red on, it completely disappeared when I put a coat of brown over it. No red hues could be seen. Maybe Bc’z can help as he’s the expert. I found it frustrating, trying to get a reddish brown hue.
For the black stock, I sanded the stock down to 600 before I stained it, then sanded lightly with 600 to remove the raised grain. Then I wiped it down with a rag soaked with plain alcohol . Tip: Use alcohol instead of water as your medium. It won’t raise the grain much and it dries really fast.
 
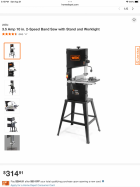
I’ll also suggest you get a small bandsaw to cut the excess wood off the blank before the duplication process. You’ll save a lot of time and router bits.
Have you looked at the “Do it yourself stockmaking “ thread? Worth a look.
 
After 10-12 years of shooting aluminum chassis and stocks made with some sort of composite, I felt it was time to get back to wood.

Maintaining the form, fit, function of more modern stocks was important, but I wanted to gain the warmth, feel and beauty of wood.

I looked around and didn't see what I wanted, so I decided to make it myself.

The Process:
- Source curly maple blank
- Carve (rough pass) with router
- Contour and smooth (fine pass) with router
- Cut the inletting (action, bottom metal & barrel channel)
20240813_165930.jpg

20240814_095020.jpg

20240814_222222.jpg

20240814_222236.jpg

20240814_222258.jpg

- Sand... there was a lot of sanding!
20240822_063112.jpg

- Fit recoil pad with belt sander
- Add picatinney rail for bipod (drill and counter sink t-nuts)
- Drop in pillars (checking action/bm fit, alignment & feeding from magazine)
- Epoxy bed action & bottom metal
20240828_183130.jpg

20240829_125147.jpg

- Apply tung oil finish (2 coats cut 1:1 with mineral spirits for deeper penetration, 4 full coats)
20240829_081650.jpg

- Protect with final coat of beeswax


The Results:
20240830_071943.jpg


I have several more blanks on hand, now what to do with them?...

This intimidating piece of maple might become home to a Zermatt Rim X, but need to find an action first.
View attachment 1586048
I love wood stocks. The only one I have left is a first year Rem 1100 with checkering and engraving.
 
I used a CUSTOM mix of red, yellow, light brown and dark brown! I was experimenting. After more experimentation with different colors layered in application, I decided it didn’t matter. If I put a coat of red on, it completely disappeared when I put a coat of brown over it. No red hues could be seen. Maybe Bc’z can help as he’s the expert. I found it frustrating, trying to get a reddish brown hue.
For the black stock, I sanded the stock down to 600 before I stained it, then sanded lightly with 600 to remove the raised grain. Then I wiped it down with a rag soaked with plain alcohol . Tip: Use alcohol instead of water as your medium. It won’t raise the grain much and it dries really fast.
Mix medium brown and cherry red drop for drop to create copper.
Remember when your using multiple colors start with darkest and work lighter in applications. When you sand between coats your exposing the hard gran and the dye is feathering into the soft grain, if I start to lose some of my foundation color at times I'll reapply a diluted solution of that color.
Last coat or 2 will be applied in wash/diluted coats and not sanded.
Brown, copper, orange, vintage amber dyes on this 120240730_095844.jpg
 
Mix medium brown and cherry red drop for drop to create copper.
Remember when your using multiple colors start with darkest and work lighter in applications. When you sand between coats your exposing the hard gran and the dye is feathering into the soft grain, if I start to lose some of my foundation color at times I'll reapply a diluted solution of that color.
Last coat or 2 will be applied in wash/diluted coats and not sanded.
Brown, copper, orange, vintage amber dyes on this 1View attachment 1586347
That's incredible! ...and proof that I have so much to learn from this group.

I've been researching and watching videos, mostly of guitar makers, for dying tips & techniques.

I'll get creative on the next blank.
 
I’ll also suggest you get a small bandsaw to cut the excess wood off the blank before the duplication process. You’ll save a lot of time and router bits.
Have you looked at the “Do it yourself stockmaking “ thread? Worth a look.
I have access to a bandsaw, but it's a 30 minute drive. I was too excited to start carving, so I skipped that step. NEVER again!

I'll be taking each blank to the bandsaw before carving. I wasted a LOT of time and some good small pieces of wood that could have been used in later projects.
 
Made it out to do some quick pressure testing. I wanted to see what lighter bullets and faster powder could do from the 14.5.

Ten rounds per bullet/powder combo loaded in 0.4gr increments, shot at 100 yards, same POA.

Start and finish loads of AR-Comp represented below.

125 Speer TNT (cheap paper puncher)
44.4gr @ 2621fps
48.0gr @ 2858fps
20240906_101043.jpg


130 Barnes TTSX (deer & hogs)
41.8gr @ 2574fps
45.4gr @ 2746fps
20240906_102013.jpg


I did not observe pressure signs at the highest charges, but don't see any reason to climb higher.
 

Upgrades & Donations

This Forum's expenses are primarily paid by member contributions. You can upgrade your Forum membership in seconds. Gold and Silver members get unlimited FREE classifieds for one year. Gold members can upload custom avatars.


Click Upgrade Membership Button ABOVE to get Gold or Silver Status.

You can also donate any amount, large or small, with the button below. Include your Forum Name in the PayPal Notes field.


To DONATE by CHECK, or make a recurring donation, CLICK HERE to learn how.

Forum statistics

Threads
165,773
Messages
2,201,969
Members
79,079
Latest member
mark.urban
Back
Top