• This Forum is for adults 18 years of age or over. By continuing to use this Forum you are confirming that you are 18 or older. No content shall be viewed by any person under 18 in California.

A test of Shotmarker accuracy for long range BR.

I want to present the analysis I performed on the accuracy of my Shotmarker setup. I wanted to evaluate, with good due diligence on target preparation, how much error was observed across the area of the target during normal outdoor shooting conditions. A little groundwork first: I have a frame that is 44 inches square, built with 1x2 pine and choroplast backer. Everything is glued together and squared up. I have 550-cord guylines attached to the top corners of the frame so that I can anchor it in place with stakes. This whole design was meant to be light, but square and rigid when fully anchored. I've been using it for about a year now and it has been holding up well!
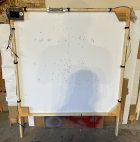
Back_of_Frame.JPG

The Pawnee Grasslands where I shoot do not allow any motorized vehicles off of the established roads, so the target must be carried into position on foot. This area also gets significant wind and has been a challenging but instructive place to load develop and practice. Mirage is commonplace, and apart from distorting the aim point, I have come to appreciate it for helping me understand what the conditions are doing.

I prepped a large piece of butcher paper with meticulously drawn lines on 5 inch spacing, creating a 30” by 30” grid and 49 nodes, or aim-points. The goal was to shoot at each node and get a regular array of bullet holes to measure and compare to the Shotmarker recorded positions. All lines were checked multiple times for square with different size 3-4-5 triangle measurements as well as measuring relative to each other in x and y. 6” calipers and a 14” engineer’s scale were used for all measuring, both now and for bullet holes later. No line measured more than 0.005” out of position. These lines will be used to check bullet position from multiple directions to help reduce the error. Trying to measure a position some 22 inches from the origin is not trivial. The Shotmarker defines the origin at the center of the 4 sensor towers and I inked the x-y axis to make them more visible and permanent. 1” dots were stuck to each intersection for high-visibility aim points.
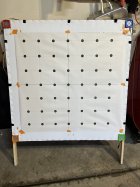
Front_of_Frame.JPG
Note the hash marks on the choroplast to help me align the target. I wasn’t unduly concerned about absolute true center, because we will use all the shots to find an x and y calibration value that minimizes the average error.
 
Last edited:
Sunday (Feb 18th) looked to be the first decent day to go shoot in weeks. I loaded up 57 rounds of my 20 Vartarg (55gn Bergers, 17.6gn H4198, https://forum.accurateshooter.com/threads/my-20-vartarg-custom.3969176/ for those interested to read more). It was low 30s but sunny, low wind peaking at 11mph predicted.

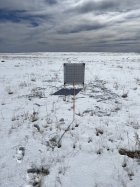
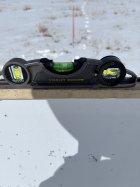
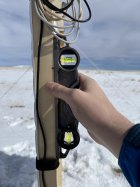
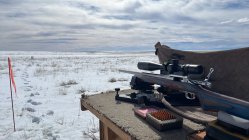
I set up the target at 200yds. Why, you might ask? Because 100 yards feels silly in such a wide open space. A bubble level is used, as best I can, to make sure the target is plumb and level and I squared up the bench to the target (although eagle-eyed readers who scrutinize the raw data will see that I was ~5 degrees off of square).
Frame_Installed.JPG
Horizontal_Bubble.JPG
Vert_Bubble.JPG
View_from_Bench.JPG
Don’t worry. That dead calm condition during setup promptly vanished and I dealt with a light, flickering wind in the 5mph range for the 45 minutes or so it took to shoot all 57 shots. The Vartarg barrel doesn’t really get hot in this weather.
 
Alrighty! Results. I measured every bullet hole no less than three times in both x and y and averaged the measurements. I then assessed an error. Measurements performed within ~6” of the x or y axis with calipers have a +\- 0.005 tolerance. Measurements further away, requiring intermediate reference lines and the use of the scale to locate them have a +\- 0.010 tolerance.

I used “Export CSV” to pull the data for the 57 shots and then amalgamated the measured locations with their paired Shotmarker location. The difference between the two was calculated for x and y separately and the average difference across all shots is used to define the calibration values. X= -0.0265 and Y=0.2243.

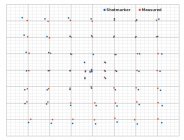
A simple X-Y plot with 1” minor grid and 5” major grid shows how the calibrated Shotmarker compares with the measured positions on the “target face”
Shotmarker_V_Measured.jpg
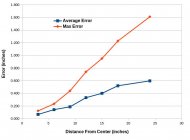
Not awesome at the edges! In general, the further you get from an axis, the worse the error is in that direction. Let’s try to put some values to this. To portray the Shotmarker in the most flattering light, I used the error tolerances on my measurements to minimize the difference between the measured and Shotmarker values. For example: If the measured x-position was 14.795” and the calibrated Shotmarker position was 15.324”, then I would add my 0.010” error tolerance and “correct” the measured value to 14.805”. You might say this is unfair, but it changed the average errors very little due to how small the adjustment was compared to the observed differences as we moved away from the center of the target. If we sort the differences by radial distance from the center of the target, we can then plot how the average and maximum differences, or observed error, were distributed across the target.
Error_v_Radius.jpg
Inside the 10-ring on a 1k BR target, the average error I observed was 0.084” with a maximum of 0.180”. Way out at the 5-ring, it has climbed to a 0.557” average and 1.232” maximum. While it is good news that the best accuracy is observed in the center of the target, the errors are still not great. Please note that this is a test performed with my target frame and my setup. I’d encourage anyone who is interested to test their setup. If you do, please post your results so that we can begin to collate them to better understand what the Shotmarker can do and, perhaps, what variables in the setup are most prone to affect the observed errors.
 

Attachments

Alrighty! Results. I measured every bullet hole no less than three times in both x and y and averaged the measurements. I then assessed an error. Measurements performed within ~6” of the x or y axis with calipers have a +\- 0.005 tolerance. Measurements further away, requiring intermediate reference lines and the use of the scale to locate them have a +\- 0.010 tolerance.

I used “Export CSV” to pull the data for the 57 shots and then amalgamated the measured locations with their paired Shotmarker location. The difference between the two was calculated for x and y separately and the average difference across all shots is used to define the calibration values. X= -0.0265 and Y=0.2243.

A simple X-Y plot with 1” minor grid and 5” major grid shows how the calibrated Shotmarker compares with the measured positions on the “target face”
View attachment 1526123
Not awesome at the edges! In general, the further you get from an axis, the worse the error is in that direction. Let’s try to put some values to this. To portray the Shotmarker in the most flattering light, I used the error tolerances on my measurements to minimize the difference between the measured and Shotmarker values. For example: If the measured x-position was 14.795” and the calibrated Shotmarker position was 15.324”, then I would add my 0.010” error tolerance and “correct” the measured value to 14.805”. You might say this is unfair, but it changed the average errors very little due to how small the adjustment was compared to the observed differences as we moved away from the center of the target. If we sort the differences by radial distance from the center of the target, we can then plot how the average and maximum differences, or observed error, were distributed across the target.
View attachment 1526124
Inside the 10-ring on a 1k BR target, the average error I observed was 0.084” with a maximum of 0.180”. Way out at the 5-ring, it has climbed to a 0.557” average and 1.232” maximum. While it is good news that the best accuracy is observed in the center of the target, the errors are still not great. Please note that this is a test performed with my target frame and my setup. I’d encourage anyone who is interested to test their setup. If you do, please post your results so that we can begin to collate them to better understand what the Shotmarker can do and, perhaps, what variables in the setup are most prone to affect the observed errors.
Very good!!!!
Evan, thanks for posting this. Good analysis and good methodology.

I went out on Saturday with the intention of testing, however I never even set up the system. The winds were too persnickety.

Great job Evan!!!

CW
 
Your target stand looks awful flimsy I'd build a sturdy one and try it again one key to a SM accuracy is a very rigid frame. Ours are welded steel and have very little error in shot on target vs SM plot.

Did you shoot in a grid pattern like the OP did though, or just a string once you were centered up?

The accuracy was not too bad in the center of the frame, but a little disturbing out towards the edges.

@Evan it'd be interesting to see if 'groups' at the edge markers all tracked together (same group size as in the center, just offset) or if the group sizes change to a noticeable level as well.
 
Some suggestions based on my testing:

Reduce your impact velocity. If you can get your loads to pass through the target at, say, 1600 fps or less, and come in with some angle (like from the apogee of a long-range shot), it will show you more about the limitations of open-mic systems at long range.

What you are doing right now is nearly the ideal situation for the target to show accuracy (high-velocity impact). As the mach number of the projectile reduces, the shock wave the target is hearing is released farther and farther from the target, which gives the wind more time to shift the sound toward the downwind side and slight computational errors to become measurable.
 
Alrighty! Results. I measured every bullet hole no less than three times in both x and y and averaged the measurements. I then assessed an error. Measurements performed within ~6” of the x or y axis with calipers have a +\- 0.005 tolerance. Measurements further away, requiring intermediate reference lines and the use of the scale to locate them have a +\- 0.010 tolerance.

I used “Export CSV” to pull the data for the 57 shots and then amalgamated the measured locations with their paired Shotmarker location. The difference between the two was calculated for x and y separately and the average difference across all shots is used to define the calibration values. X= -0.0265 and Y=0.2243.

A simple X-Y plot with 1” minor grid and 5” major grid shows how the calibrated Shotmarker compares with the measured positions on the “target face”
View attachment 1526123
Not awesome at the edges! In general, the further you get from an axis, the worse the error is in that direction. Let’s try to put some values to this. To portray the Shotmarker in the most flattering light, I used the error tolerances on my measurements to minimize the difference between the measured and Shotmarker values. For example: If the measured x-position was 14.795” and the calibrated Shotmarker position was 15.324”, then I would add my 0.010” error tolerance and “correct” the measured value to 14.805”. You might say this is unfair, but it changed the average errors very little due to how small the adjustment was compared to the observed differences as we moved away from the center of the target. If we sort the differences by radial distance from the center of the target, we can then plot how the average and maximum differences, or observed error, were distributed across the target.
View attachment 1526124
Inside the 10-ring on a 1k BR target, the average error I observed was 0.084” with a maximum of 0.180”. Way out at the 5-ring, it has climbed to a 0.557” average and 1.232” maximum. While it is good news that the best accuracy is observed in the center of the target, the errors are still not great. Please note that this is a test performed with my target frame and my setup. I’d encourage anyone who is interested to test their setup. If you do, please post your results so that we can begin to collate them to better understand what the Shotmarker can do and, perhaps, what variables in the setup are most prone to affect the observed errors.
Thanks for the test. But your title says "for long range br" So now off to long range testing to see if errors multiply. Not sure why you are worried about wind. That is a real world condition.
You did show they are not accurate enough for short range br. Their groups are often smaller than the error.
 
@Evan
I am actually considering testing at 50’ to test the system and eliminate environmental issues as much as I can. I will also be using a smaller cartridge like a PPC, Waldog, or Talldog for the initial testing. Doing all we can do to display true accuracy potential of the system is the first step.
You are on the right course.
CW
 
Did you account for the delta x and delta y offsets from your calibration procedure?

When you do the ShotMarker "calibration" procedure you are aligning the shot location displayed on the ShotMarker virtual target with the shot location on the paper target. The ShotMarker displays this offset and you can minimize it with a careful calibration but you can not eliminate it. I am asking how you accounted for this offset in your error calculations.
 
Some suggestions based on my testing:

Reduce your impact velocity. If you can get your loads to pass through the target at, say, 1600 fps or less, and come in with some angle (like from the apogee of a long-range shot), it will show you more about the limitations of open-mic systems at long range.

What you are doing right now is nearly the ideal situation for the target to show accuracy (high-velocity impact). As the mach number of the projectile reduces, the shock wave the target is hearing is released farther and farther from the target, which gives the wind more time to shift the sound toward the downwind side and slight computational errors to become measurable.
I agree. My goal was to give the Shotmarker the best, reasonable conditions that would give me an idea of what it is capable of. I think I would download my 20 Vartarg to get them across the target closer to 1600-1800fps and repeat, maybe only 25 nodes and put 3 shots on each node. I could also bump the target out. I would be comfortable at 600yds, but 1000yards is a big ask at my skill level not to risk the sensors when trying to shoot the corners of the target.
 
Did you account for the delta x and delta y offsets from your calibration procedure?

When you do the ShotMarker "calibration" procedure you are aligning the shot location displayed on the ShotMarker virtual target with the shot location on the paper target. The ShotMarker displays this offset and you can minimize it with a careful calibration but you can not eliminate it. I am asking how you accounted for this offset in your error calculations.
I calculated the average difference in x and y directions across all 57 shots and then subtracted those 2 values from every shot.
 
I calculated the average difference in x and y directions across all 57 shots and then subtracted those 2 values from every shot.
That seems like a good way to account for the off set. It would be good to hear if anyone has a better method of accounting for this offset.
Best wishes
 
Wow, that's a huge effort you did Evan. Thanks for sharing this, and explaining everything so a caveman can understand it....well, I still need to read it out loud a couple more times lol.

I agree with Keith that eventually we would want to see target velocities in the actual ballpark of 600 and 1000 yard real world numbers. Probably also attack angles that match as well. But to get started, I would think your approach, and what clay has planned, should be fine to find out what the limitations are in favorable conditions first, if for any other reason, to reduce the effort per range trip. Plus you will be able to shoot groups that would represent average size groups, at different locations without having a train wreck lol.

Tom
 
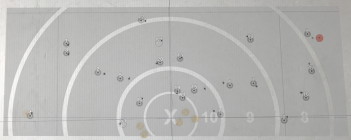
Below is a screenshot of a physical target laid over the shotmaker virtual target, this was shot at 1,000 yards in winds from 6-12MPH. If you were to test this out at distance I would imagine you would find similar results, my frame is 4 foot square and made with kiln dried 2x4's with glued and screws half-lapped joints that had very little flex in the wind. Below is the "explanation" directly from Adam......

image.png


"Short answer is yes - wind causes error with open sensor e-targets. Half an inch is not surprising on a windy day.

The long answer is that e-target accuracy is a complicated subject. There are small errors, large errors, random errors, offsets, stretch, skew, rotation... there’s a lot that goes into making them perfect. The bottom line is what matters from a practical perspective is error that affects how the system is used.

Just for example 0.25 inches of error matters a lot more at 100 yards then it does at 1000 yards. If you measure error in terms of moa then you get a completely different perspective of which errors are significant.

Wind causes error when the wind is strong enough that this error would be obscured. It’s not relevant in a practical sense because all it does it move the bullet a little further in the direction of the wind. You can and should completely ignore it, and you can’t really test to verify everything else is working perfectly on a windy day.

The wind can flex the target frame more than you would think. Your frame is pretty solid at 4x4 but most ranges have 6x6 frames mounted in carriers and instability causes ELEVATION errors which are way more problematic.

It’s a matter of perspective. I’m not saying error means nothing, I’m just trying to make the point that when you are shooting on an e-target you are shooting on a virtual target and not all errors are created equal.

This is a difficult subject to debate, especially in forums, because there is not a lot of fundamental technical knowledge out there about e-targets yet but there are still no shortage of opinions. I just ask that you keep an open mind about it for now. Your frame is excellent and once you have shot on the system in a variety of conditions you will develop some confidence. Measuring bullet holes and comparing to paper leads you down a rabbit hole of understanding how e-targets work, and we can go there if you want, but it will take time.

Doubling up your coreplast won’t help. The problem is the air 3 feet in front of the target is moving."

Adam
 
Below is a screenshot of a physical target laid over the shotmaker virtual target, this was shot at 1,000 yards in winds from 6-12MPH. If you were to test this out at distance I would imagine you would find similar results, my frame is 4 foot square and made with kiln dried 2x4's with glued and screws half-lapped joints that had very little flex in the wind. Below is the "explanation" directly from Adam......

View attachment 1526229


"Short answer is yes - wind causes error with open sensor e-targets. Half an inch is not surprising on a windy day.

The long answer is that e-target accuracy is a complicated subject. There are small errors, large errors, random errors, offsets, stretch, skew, rotation... there’s a lot that goes into making them perfect. The bottom line is what matters from a practical perspective is error that affects how the system is used.

Just for example 0.25 inches of error matters a lot more at 100 yards then it does at 1000 yards. If you measure error in terms of moa then you get a completely different perspective of which errors are significant.

Wind causes error when the wind is strong enough that this error would be obscured. It’s not relevant in a practical sense because all it does it move the bullet a little further in the direction of the wind. You can and should completely ignore it, and you can’t really test to verify everything else is working perfectly on a windy day.

The wind can flex the target frame more than you would think. Your frame is pretty solid at 4x4 but most ranges have 6x6 frames mounted in carriers and instability causes ELEVATION errors which are way more problematic.

It’s a matter of perspective. I’m not saying error means nothing, I’m just trying to make the point that when you are shooting on an e-target you are shooting on a virtual target and not all errors are created equal.

This is a difficult subject to debate, especially in forums, because there is not a lot of fundamental technical knowledge out there about e-targets yet but there are still no shortage of opinions. I just ask that you keep an open mind about it for now. Your frame is excellent and once you have shot on the system in a variety of conditions you will develop some confidence. Measuring bullet holes and comparing to paper leads you down a rabbit hole of understanding how e-targets work, and we can go there if you want, but it will take time.

Doubling up your coreplast won’t help. The problem is the air 3 feet in front of the target is moving."

Adam
This is good,
Thanks for sharing

CW
 
A bit of levity: I think we all know what we need to do here. If you just shoot the center of the target, you'll not only have the best score, but it will be the most accurate too! :p

I think an important takeaway for me is that the worst error occurs in non-scoring parts of the target and the errors grow organically with distance, just like they do when measuring on paper. Focusing on those areas does not seem productive to me - this is perhaps one thing Adam was elluding to in his reply to @ballisticdaddy above. I think the variables I want to get a handle on are approach angle (how square to the target you are), and bullet velocity (basically impossible to isolate from the other variables in a small batch of tests). Defining how those affect error will help me understand how square our ranges need to be and what false advantage someone might be getting from a faster bullet.

The expense, time, and low relative joy of performing these tests mean that I'm not rushing to go repeat it a bunch of times with different variations. Assessing groups can be an ongoing thing, because I love my Shotmarker and use it every single trip with paper. I just need to start measuring and logging the paper vs. Shotmarker results which isn't such a burden.

For matches, I think I will be asking the CRC shooters if they want to go full virtual or use the Shotmarker for sighters and a separate frame with paper for record. We don't have so many shooters that we couldn't shoot every other bench at CRC- i.e. Bench 10 shoots sighters on Target 9 and record on Target 10 (if approach angle is a really bad error, flip it so sighters are square to the bench). This would mean pit service could be equally fast for everyone, and we would not need many people in the pits - just enough to replace record targets and fix Shotmarker snafus. This reduces the mental and physical burden of pit duty and would still speed up matches for us. I would love to shoot 6 or 8 targets a day instead of 4, particularly if the match runs smooth and easy.
If you notice shots 11 & 15 are both within the 10 ring which last time I checked is the scoring area, while shots 1, 3 & 4 are wide 8's but are much closer to the actual POI, so much for just shooting the center of the target huh ;)
 

Upgrades & Donations

This Forum's expenses are primarily paid by member contributions. You can upgrade your Forum membership in seconds. Gold and Silver members get unlimited FREE classifieds for one year. Gold members can upload custom avatars.


Click Upgrade Membership Button ABOVE to get Gold or Silver Status.

You can also donate any amount, large or small, with the button below. Include your Forum Name in the PayPal Notes field.


To DONATE by CHECK, or make a recurring donation, CLICK HERE to learn how.

Forum statistics

Threads
165,793
Messages
2,203,230
Members
79,110
Latest member
miles813
Back
Top