• This Forum is for adults 18 years of age or over. By continuing to use this Forum you are confirming that you are 18 or older. No content shall be viewed by any person under 18 in California.

Rifle Bedding

archerforkids

Gold $$ Contributor
I'm in the process of my first bedding job. This is a Revolution stock with aluminum bedding block.
I have applied Prussion Blue to the action( and me, and my workbench and everything within 5 feet) and pressed it into the receiver. After many trips in and out with me sanding marked areas back I have about got it sitting very even in the receiver. I am getting die marks on the lug pocket as it slide in. Is that good? Should it be left alone or should I relieve it to accept the Marine Tex when I actually drop the action into the mix?
Any help appreciated.
 
If there are any threads on bedding I missed, I will be surprised. Reading the guidance on this website is like getting a sip of water from a fire hose. And I have definitely read Als input. Blatantly obvious he is no novice.
I have been building my nerve up for this for several months. All I have left now is mixing and applying the pookie and sticking the action. I'll do that tomorrow where I will have access to a climate controlled room away from anybody. I'm pretty sure if I mix this concoction up in my home office/gun room I will be sleeping in the truck along with my rifle. My wife has a nose like a bird dog.
Thanks folks
 
Tape the stock to keep excess bedding compound off the outside of stock and plug holes in action where bedding can get into and make pulling the action out difficult
 
Things nobody says enough....

1. Don't forget the release agent :)
2. Put some tape on your action just below the stock line...
Exactly.... and put the release agent everywhere, even very far away and on all the placed you taped up.

I've done my first 3 beddings in the past 3 months, and here are the things that helped me the most.

Use the barrel balance point method. It works great. If you have not already done the balance point method while you did your prussian blue, you should do that and re check the contact points. Unless I'm not understanding your type of action, you don't want any contact points. Making the balance point will help with that.

After you get all that settled, and if you are doing pillars, bed the pillars, let them set and dry, before doing the receiver bedding. You will want to leave some space at the top of the pillars. This will allow you to finalize that bedding when you bed the action. Either use a spacer when pillar bedding or Dremel back the dried bedding after the pillar bedding is setup.

For your first bedding job. Use double the bedding compound that you think you will need. So with the 2oz marine tex, I'd use 25% of the jar for pillars, and the rest of the jar for bedding.

Use plumbers putty to plug as much as you can. Makes everything much easier.

Use straws for cleanup. It's an absolutely excellent way to clean up. Huge thanks to whom ever came up with that trick. I keep a pair of scissors handy while cleaning up. I follow the stock line as I scoop up the excess bedding with the straw, clip of the 3/4 inches of the straw that gathered compound, and then repeat the process with the shortened straw. I do this right after I place the action and then again after 15 minutes

Clean up the set bedding with files. It files really easy. Dremmel always looks bad, at least my skills male it look bad.
 
Aluminum backed hvac type tape works great. Sticks to anything. Especially cover up any engraved parts of the action. Glue likes to stick in there.
 
Well, this time tomorrow the truth will show itself. I think I got it right in spite of getting snake bit half way through. Of all the things to happen one of my .01 spacers went AWOL half way though applying the pookie. Never did find the darn thing. I had some squares of card stock there cut into 2" squares to use for cleaning. I knew these to be .01 thick also. Via hole punch and scissors i whipped up another spacer and went with it. We will see I reckon.
I can't imagine working with that stuff without some prior experience with various knife grade and free flowing epoxies from work. Dang Marine Tex was stiff as hell starting off. We warmed it up a little and went to adding hardener as was appropriate. That is also my first time to use a hardner that wasn't a paste consistency. Definitely different.
 
I will be going to get my rifle in a little. Hopefully it will be painless popping the barrel out.
I'm probably overthinking this....should the hold down bolts for the action be done passing through a full 5/16" hole in the stock/auminum block? Or should it be a tighter fit?
 
Last edited:
I'm probably overthinking this....should the hold down bolts for the action be done passing through a full 5/16" hole in the stock/auminum block?
Yes...through the 5/6" hole. You don't want any part of the action screws in contact with the I.D. of the pillar.
Or should it be a tighter fit?
As above....no. You only want one recoil surface and that's the back of the recoil lug.
 
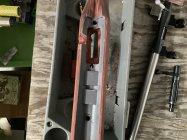
I'll slow down and post pics and share what I learned with this project.
I will say this....if a gunsmith says he will do this for 500 or less, kiss him on the lips and hand him the dang money. I bet I tied up 8 or 10 hours with this project.
I will say after only having time to shoot 50 rounds or so, it seems to have eliminated the flyers.
 
So here is how it went.
Built a plug/blank out of PVC pipe to fill in the magazine cutout in the bottom of the receiver. This went pretty quick and turned out better than i thought it would. I put 4 drops of superglue in place and stuck that bad boy right where i wanted it. One part about 3/4" long had a very small slight gap. Ill just pack it with plumbers putty. No problem. Right? Yeah. We will come back to this later.
I bought some 1/4 × 32 all thread to use in action for studs and 2 5/16 × 1/4 × 3/4" bushings to stabilize action screws in the stock when i dropped it in. Actually worked very well. Better than i expected. Those bushings slid in with a little tap and were very stable.
Very carefully taped everything off as i felt appropriate. Filled all holes nooks and cracks with plumbers putty. Then waxxed everything twice. Including threaded studs and the inside of the bushings they were dropping in. I couldn't find any clear, so brown shoe polish it is.
Dropped action back in stock with the 3" long threaded studs i cut and all is quite stable to my surpise.
So here we go.
Epoxy was very stiff even after keeping it at room temperature for a couple of days. I warmed it up in front of a heater enough i could get it out of the small container it came in. Started adding hardner and mixxing and it evolved into a very workable consistency. Went to buttering all areas as needed and realized my 2 - .01 spacers were in the way. Set them on the bench and kept applying epoxy while staying away from the 5/16" holes for the studs. I grabbed one of spacers and carefully buttered it around the outer edges and set it in place. Reached for the other one and that darn thing has gone AWOL. And never did find it. My saving grace was some cut up card stock i had that i knew was the same thickness as the actual metal shims. Cut it into the shape of a washer and stuck it the same way as the metal one and went ahead and dropped the action in. Applied some electrical tape just to make me feel better on holding it down.
I wont bore you with clean up, but WD40 is your friend for sure. Had it all cleaned up pretty quick. Many ways to skin that cat, but for me the small squares of card stock for bulk removal worked good. Then probably 20 - 3" square gun cleaning patches with WD40 on them finished the job quite well.
Now for the final show. 48 hours later.
Barreled action popped right out. Had to grab threaded studs and back them out with plyers. Very little effort needed. Then reached in and pulled the bushings out. Once again very little effort needed.
In the bottom of the action pocket i Had one small little "ridge" of epoxy right where that gap was i told you about earlier at the PVC plug. Very bottom of the radius of course. Wrapped some 220 grit around a 1 1/4" socket and very carefully smoothed it out. We are good.
Took a dremel tool and cleaned up at the 5/16" holes. Cleaned up the area where the stock has a relief for a safety. Cleaned up a little around the tang area.
It seemed like too tight of a fit in front of the recoil lug so i opened it up another 1/8" in front of the lug.
The one thing i think i did wrong. The aluminum bedding block leaves about 1/16" gap on each side of the receiver all the way to the top of the stock. Although i taped and waxxed this area i had hell making it look good and removing excess epoxy. I finally gave in and took it to my shop. Built a pattern out of plywood to set on top of the stock and with a guided mortising bit routed the epoxy out on both sides. Turned out like i wanted.
All done and dropped action in. Fit feels great. Applied 45# torque on front screw and 30# on back. Go to slide bolt in and encounter quite a surprise. That small gap i plugged with plumbers putty gave way. Epoxy managed to come though and leave a vertical sliver. So. Take it all apart. Nock out the pvc plug and go to work removing epoxy. Actually popped out pretty easy. That was a relief for sure. So put it all back together and head to the gun range a day or two later.
Here was a surprise i didn't expect. After all that disassembly and reassembly, POI was 1/4 high at 100 yards. Nice. Shot 1st string of 5 with no flyers. Adjusted the scope down a ¼ and shot 5 more. No flyers. Then I shot 2 - 20 shot strings pushing a little hard with no flyers again. I’m a happy camper. Kept everything at about ½ MOA or smaller to my surprise. I didn’t stretch out any further due to time constraints and crappy weather. I just got out of there ahead of a shower.
Now I need to learn how to check this with a dial indicator.
Thanks for the help gentlemen. I’m open to criticism. Pics to come.
 
If it eliminated the fliers you were getting before, I'd have to say your job was a success. :)

A couple things will make your next one easier. Instead of threaded rod, buy a couple of long bolts with plenty of unthreaded shank length. Cut the heads off and shorten the threaded length to just have enough thread length to go into the action....no threaded area in the pillars. For the action screw spacers, grab some of the flanged style and Super Glue them in from the bottom so the flange is up against the bottom of the pillar. Taper on the leading edge of your guide pins so they find their way into the flanges.

Once you learn how to make them functionally good, the 'looking good' part just kind of comes along as you do more. Do yourself a favor and on the next one you do, grab some Pro Bed 2000....your life will get a lot easier. If you have any Marine Tex left over, there's always some rusty shovel you can use it on. :eek:
 

Upgrades & Donations

This Forum's expenses are primarily paid by member contributions. You can upgrade your Forum membership in seconds. Gold and Silver members get unlimited FREE classifieds for one year. Gold members can upload custom avatars.


Click Upgrade Membership Button ABOVE to get Gold or Silver Status.

You can also donate any amount, large or small, with the button below. Include your Forum Name in the PayPal Notes field.


To DONATE by CHECK, or make a recurring donation, CLICK HERE to learn how.

Forum statistics

Threads
165,806
Messages
2,203,761
Members
79,130
Latest member
Jsawyer09
Back
Top