Follow along with the video below to see how to install our site as a web app on your home screen.
Note: This feature may not be available in some browsers.
This Forum is for adults 18 years of age or over. By continuing to use this Forum you are confirming that you are 18 or older. No content shall be viewed by any person under 18 in California.
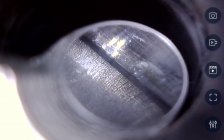
Correct. I inserted a empty case in the chamber and then looked at the area next to the empty case (red area).
The borescope is inserted from the muzzle. From the right.
My opinion is the fire cracking is from cases a bit short for that chamber cut. The intense heat of ignition has cracked the chamber in front of the rifling. This rifle has had a quantity of rounds through it.
Now on the left of that picture starts the rifling. It looks like serious carbon fouling that has been shot over repeatedly and not cleaned It is like a ceramic coating. Getting it clean will be tough.
I say to go "postal" on the issue. Make a short cleaning rod and put it into a portable drill. Insert a brush with maybe a patch over it coated with JB or Iosso. Turn that brush in the first couple inches of that barrel with the drill. Back and forth, time after time. Refresh the Iosso or JB. Even try some soaking in CLR IF IT IS A STAINLESS barrel and action. Never use CLR on anything blued as it immediately takes bluing off.
Wear the brush out as you go back and forth until that carbon is literally ground out with the help of the paste and solvents.
Now sit back and watch many here attack me for telling you what I think it is and how to get rid of it at this stage of development. Just giving you my thoughts based on experience and taking the time and effort to be informative. I have brought back barrels "from the dead" using this method. After done always make an effort to use carbon solvents and remove that carbon after each shooting.
Correct. I inserted a empty case in the chamber and then looked at the area next to the empty case (red area).
The borescope is inserted from the muzzle. From the right.
OK, so as others have stated what you are seeing is the beginning of some errosion/fire cracking at the beginning of the freebore. It happens to every barrel sooner or later and will slowly grow and get longer. I don't know if there is any way to mitigate that apart from pausing longer between shots which may or may not be possible depending upon what you use the rifle for.
To inspect for a carbon ring, inspect the same area with your borescope but with an empty chamber. If you have a carbon ring it will be right at the end of where the case mouth is in your photos, underneath and at the end of your brass.
That's a hard carbon 'ring' that's formed between the end of the case neck and the end of the chamber. In this instance, having the case in the chamber gives an exact visual of what's going on. The alligator appearing texture is simply normal heat checking in the proximal part of the throat.
My recommendation is to get a bronze bristle brush one caliber larger than the bore size (7MM in the case of a 6.5). On a short cleaning rod like a pistol rod, load the end of the brush with some JB Bore Paste and gently insert it until you feel it stop at the end of the neck area of the chamber. Initially, give it 10-12 complete turns by hand. Then remove it, clean the neck area with some solvent on a bore mop and check it again. Repeat until its gone. It may take some time if there a lot of rounds on it. Post your follow up pics, if you would.
Once it's clean, get yourself a Sinclair Chamber Length Gauge and determine how long the necks on your cases can be. Once you know this, let the cases grow and trim to .010 under what the gauge shows the max. length to be.
Today, I'm going to use the exact method I described on this chamber. You can see the dark carbon 'ring' at the end of the chamber. The bright clean area ahead of it is the 45 degree chamfer between the end of the chamber and the throat.
OK spudgun, in Al's photo above to the upper center and moving up toward the upper left the parallel lines are the end of the freebore and beginning of the throat. The lands taper from the freebore diameter to full height as determined by the reamer grind. Those should always look even all around the circumference of the throat. If they are uneven, that indicates a chamber that was cut off center/non-concentric.
To the bottom right there is a slightly curved line. That is where the end of the neck sits and the beginning of the freebore. That line is gray because it's carbon that is beginning to accumulate in that transition area and that's what causes problems. Sometimes the carbon will appear very dark/black. That is what the carbon ring is and what needs to be monitored and removed. Eventually it can build up enough that it causes several problems including scraping on the bullet and in a severe case preventing the case mouth from expanding during firing and causing overpressure problems. That is why you need to inspect your chamber without a case. Otherwise the area in question can't be seen.
You might already understand all this but I thought I'd try to explain it in case there was some confusion.
My opinion is the fire cracking is from cases a bit short for that chamber cut. The intense heat of ignition has cracked the chamber in front of the rifling. This rifle has had a quantity of rounds through it.
Now on the left of that picture starts the rifling. It looks like serious carbon fouling that has been shot over repeatedly and not cleaned It is like a ceramic coating. Getting it clean will be tough.
I say to go "postal" on the issue. Make a short cleaning rod and put it into a portable drill. Insert a brush with maybe a patch over it coated with JB or Iosso. Turn that brush in the first couple inches of that barrel with the drill. Back and forth, time after time. Refresh the Iosso or JB. Even try some soaking in CLR IF IT IS A STAINLESS barrel and action. Never use CLR on anything blued as it immediately takes bluing off.
Wear the brush out as you go back and forth until that carbon is literally ground out with the help of the paste and solvents.
Now sit back and watch many here attack me for telling you what I think it is and how to get rid of it at this stage of development. Just giving you my thoughts based on experience and taking the time and effort to be informative. I have brought back barrels "from the dead" using this method. After done always make an effort to use carbon solvents and remove that carbon after each shooting.
This is how I do it also and it works I include this regiment every time I clean.
the more you let it build up the harder it is to clean out the cleaner you keep it the easier it is to get out.
I use an over sized VFG pellet and clr on a short cleaning rod let it soak for a bit, then take an iosso brush with just a dab of iosso work it over with the rod in a drill.
OK, so all I see is a bit of wear/firecracking at the very start of the freebore and perhaps a very little bit of carbon at the end of the chamber where the case neck lies. I think you're good to go, just keep an eye on it for accumulation. As others have said, it's a whole lot easier to keep it cleaned out than remove it after it builds up. If you want to establish a baseline, clean it with JB or Losso as described before and then you'll know what it looks like completely clean.
This is after 12 full brush roatations with a .338 bronze brush with JB on the leading edge of it. The carbon ring at the end of the chambers neck area is about half gone. -Al
1st picture below is with a piece of brass in the chamber, showing the end of the case mouth, the end of the chamber, and beginning of the free-bore, before cleaning/removing the carbon build up/ring:
This next picture below is after some cleaning of the area, again with the case in place:
This 3rd picture is the same, but with the case removed.
At this point the chamber-end is clean & carbon free, with a square transition up to the free-bore, no longer a rounded transition formed from carbon layer. The area is like 85% cleaned & carbon free.
What is left to be cleaned (carbon to be removed) in the picture is the remaining heavily carbon layered beginning of the free-bore, where the cracking of the carbon layer itself still remains, that can be easily seen in the photo (and of course the rest of the free-bore/throat and bore not in the picture).
This Forum's expenses are primarily paid by member contributions. You can upgrade your Forum membership in seconds. Gold and Silver members get unlimited FREE classifieds for one year. Gold members can upload custom avatars.
This site uses cookies to help personalise content, tailor your experience and to keep you logged in if you register.
By continuing to use this site, you are consenting to our use of cookies.