• This Forum is for adults 18 years of age or over. By continuing to use this Forum you are confirming that you are 18 or older. No content shall be viewed by any person under 18 in California.

Chamber flush system build log.

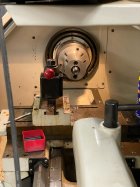
How are you managing that? I've got an air nozzle tip inside a screw clamp on coupler. Looks just like the gretan version but I made it out of aluminum
PXL_20230103_201132725.jpg
My rubber nozzle is on the end of a spring loaded plunger that is sealed to the inside of a piece of pipe with a 3/8 od O-ring.

A .375" OD plunger has .110 sq" of surface area and exerts 6.6 pounds of force when 60psi is applied to it.

On the other end, the nozzle is sealed into the bore at a diameter of .224", for .038 sq" of surface area and exerts an opposing force of 2.28 pounds.

The result is 4.32 pounds of force
(6.6-2.28=4.32) added to the initial spring pressure once oil pressure builds.

I didn't do the math, but you can see that a larger bore size will cancel more of the plungers force and reduce the force developed to make the seal.

You could easily incorporate the design into a clamp on system, just remember that whatever size you make your plunger will determine the force trying to push the whole thing off the end.
 
The way real machinists vs self taught guys like me do things will probably drive how you chamber with your flush.

Without a flush, it took me a long time to chamber a barrel. I would go about .030", back it out, clean chips off the reamer, clean chips out the chamber, and repeat.

With the flush, I still go in and back out. I go in .100" at a time until I get the shoulder in, then around .050" a pass until I am close. Because I am paranoid about scratching a chamber I don't make one long pass.

The nice thing about the flush is when I have the reamer backed out so the shoulder area is clear of the barrel, the flush usually washes off all the chips. So this process is much faster.

Now I don't have my reamer screws cut for coolant--I am crappy at precision freehand stuff. I am also not drilling and free boring. I think most guys do both, but I am very happy with the final results I am getting doing it my way--occasionally shooting IBS screamer groups at 1000 yds.

It usually takes me 10-15 minutes to get most of the chamber cut this way. The whole chambering process usually takes me 45 min to an hour, because of all the checking I do. I stop after the shoulder starts cutting, remove the flush, run a patch on a rod 2-3 times to push out the fluid, then look with a borescope. If everything looks good I'll go to within .250" of final and look again. Once I get within .030" I check with a feeler gage against the shoulder of the action. If I don't have an action I measure with a depth gauge for the final cut.

The reason for my non-production approach is I have never had and machinist training, and I am very slow to trust cutting to measurements, am concerned about scratching a chamber, etc., and I am not willing to sacrifice precision for speed. Real machinists can be both fast and precise.
Better taking your time and doing it right instead of rushing and doing it wrong..it's not so easy to put the metal back once removed.
 
Let your feel of how the reamer is cutting tell you. Are your reamers setup for through barrel coolant?
They will be after seeing the file notch in screw to match flutes procedure.

Without a flush, it took me a long time to chamber a barrel. I would go about .030", back it out, clean chips off the reamer, clean chips out the chamber, and repeat.
OH Yeah that's what I hated. I felt it was doing a great job but I just don't have that king of time to kill.
Make damn sure your connection to the barrel is tight and watch your pressure.
My Headstock is so wide that the barrel does not stick out. I will make an extension that screws on the Muzzle threads and o-ring it and use the jack screws on the spindle tube to steady it. Your cart set up is what got me convinced to finish the system. I spend way to much time making medical devices so the flush system was always on the back burner
 

Attachments

  • chamber1.jpg
    chamber1.jpg
    410.5 KB · Views: 68
  • chamber2.jpg
    chamber2.jpg
    378.2 KB · Views: 67
  • chamber3.jpg
    chamber3.jpg
    518.8 KB · Views: 69
Last edited:
My Headstock is so wide that the barrel does not stick out.
That was the reason I put mine on the end of 1/4 pipe. I have a bushing/adapter screwed into my spindle that the pipe slides through. Once the tip makes contact, I tighten the pipe in place with a set screw.
Gre-tan version is spring loaded.
I've never seen one, but I bet it works on the same principle as what I described.
 
Mainly to show @DSMWerks, here is a video short of me cutting a chamber today at work. I don't have the reamer screw modified in anyway and this is a full cut with the reamer--no prebore. This is my .050" in and back out process. The pump is turned down to 80 PSI, but I am bypassing 3/4 of the flow. I think this leaves what, 20 psi through the barrel?

The bulk of the chamber was cut in about 10 minutes (.308 Win). The total chamber job, from tweaking the dial-in with an Interapid to polishing the chamber, took 45 minutes. That included pulling the flush four times, patching out the oil, bore scoping the chamber three times, and measuring headspace with a depth gauge a few times. My spec was gauge protrusion of .135 to .136. I got this one to .1354-.1356 on my final .016" cut.

I am by no means suggesting this is the best way to do things, but I am able to hit the numbers with my approach. I think @DaveTooley probably has the fastest process of anyone, and I expect many more here are faster than I am.

 
Last edited:
I'm so looking forward to using the flush system. Can't believe I've waited this long. I've always used the finish reamer from start to finish. So about .050" pecks and full retract for chip clearing. That is so much better and the chips look better too. I'm thinking of programing a roughing operation to remove the bulk of the case profile.
 
Am I the only one being overly cautious by momentarily stopping the lathe, before withdrawing the reamer to allow the flush to clear the chips?
Obviously born of concern of a chip scoring the chamber before there's enough clearance from the reamer being withdrawn to allow them to pass.
 
Am I the only one being overly cautious by momentarily stopping the lathe, before withdrawing the reamer to allow the flush to clear the chips?
Obviously born of concern of a chip scoring the chamber before there's enough clearance from the reamer being withdrawn to allow them to pass.
I let it run for a few seconds after I reach my cutting depth to flush chips, then back off to get the full flush force. I've never had a chip roll with any method; my main problem before through-barrel flush was fine -grained swarf packing onto the cutting edge, mainly at the shoulder, leaving striations at the shoulder. I had to periodically break that debris off by scraping the cutting edge of the flutes with a penny. Those days are thankfully long gone.
 
Am I the only one being overly cautious by momentarily stopping the lathe, before withdrawing the reamer to allow the flush to clear the chips?
Obviously born of concern of a chip scoring the chamber before there's enough clearance from the reamer being withdrawn to allow them to pass.
I think the only danger of scoring would be on the return trip back into the chamber.
As soon as I decide to withdraw the reamer it's a steady crank on the hand wheel.
 
I use the internal relief with a different spring and it doesn't make all that racket that an external PRV does.

Same here. 1/8 HP carbonator pump with a weaker spring in the internal relief. I posted this in reply to another thread subject, but works here too. You can hear the difference when I shut off the pump then the lathe.

Edit: it's actually the lathe shutoff first, then the pump.

 
I use the internal relief with a different spring and it doesn't make all that racket that an external PRV does.

That's why I went with a 1/4 AMT immersion pump for my home system. It's very quiet.

What spring did you get for your carbonator pump? I don't have a relief valve at all on the work pump, just a valve body.
 

Upgrades & Donations

This Forum's expenses are primarily paid by member contributions. You can upgrade your Forum membership in seconds. Gold and Silver members get unlimited FREE classifieds for one year. Gold members can upload custom avatars.


Click Upgrade Membership Button ABOVE to get Gold or Silver Status.

You can also donate any amount, large or small, with the button below. Include your Forum Name in the PayPal Notes field.


To DONATE by CHECK, or make a recurring donation, CLICK HERE to learn how.

Forum statistics

Threads
165,788
Messages
2,203,391
Members
79,110
Latest member
miles813
Back
Top