Follow along with the video below to see how to install our site as a web app on your home screen.
Note: This feature may not be available in some browsers.
This Forum is for adults 18 years of age or over. By continuing to use this Forum you are confirming that you are 18 or older. No content shall be viewed by any person under 18 in California.
Sound like your "flyers" could be from the bullet getting marred going into the chamber. I would look very, very closely at the Stock/DBM/Magazine height adjustments. If everything is lined up and the bullet does not contact anything going into the chamber and comes out unmolested, I would look into the ammo and try different types/shapes.
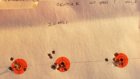
Had some wind at my back today, perhaps 6-8mph. I made no effort to dope the wind. SK Biathlon Sport was the best today and all groups were at 100 yards. I'm neither impressed nor depressed but here are the groups.
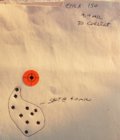
Took my Shilen barreled EPS Chambered RimX out again today to try Midas, CenterX, Pistol King, 10x and SK Rifle March at 50 yards. First fired 5 rounds first in W/U target then 5 rounds on target. Two shot groups each. Temp was 90+ and light variable tail wind. The Lapua ammo was most consistent as tested before in my rifle and same in my two Anschutz rifles, CZ 455 Scout, and 1948 Winchester 52B. Pistol King for the price seems best and in only one test @ 100yds. was also better. Will try again at 100yds. All of my rifles like Lapua better than anything else including various lots. The center dot is 1/4” and was aim point and no scope change or wind compensation used. Simply load and shoot. Scope is not the best, a Mueller 8-32 and a lot of gnats getting in my eyes when shooting. Typical South Texas day.
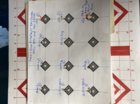
Made it to the range tonight with some center X. Shot 50, 100, 200 and a single 150nyard group. Winds 5mph or less and I made no attempt to adjust for the wind. Also all shot off bipod and rear bag with the 50 yard shot off a picnic table all the rest off a bench. Target dots are 1".
All 10 round groups except the center group at 50 which was 9 because I ejected one on the ground on accident.
My gut tells me the gun will still shoot better than I did as I felt some gun movement while shooting groups which I did not like. A better set up would do me good however I now have zero complaints.
Hindsight 20/20 I would have went straight to ctrX.
Took my Shilen barreled EPS Chambered RimX out again today to try Midas, CenterX, Pistol King, 10x and SK Rifle March at 50 yards. First fired 5 rounds first in W/U target then 5 rounds on target. Two shot groups each. Temp was 90+ and light variable tail wind. The Lapua ammo was most consistent as tested before in my rifle and same in my two Anschutz rifles, CZ 455 Scout, and 1948 Winchester 52B. Pistol King for the price seems best and in only one test @ 100yds. was also better. Will try again at 100yds. All of my rifles like Lapua better than anything else including various lots. The center dot is 1/4” and was aim point and no scope change or wind compensation used. Simply load and shoot. Scope is not the best, a Mueller 8-32 and a lot of gnats getting in my eyes when shooting. Typical South Texas day.
Lapua Pistol King. I use in my Hammerli 208 and Smith 41 and decided to try in my rifles several years ago and shot surprisingly well and on the crono was good, just a little slower than Midas+.
Lapua Pistol King. I use in my Hammerli 208 and Smith 41 and decided to try in my rifles several years ago and shot surprisingly well and on the crono was good, just a little slower than Midas+.
Gotcha. I had success at least equal to what the SK rifle match was giving but I never got far enough to give it a good testing. 2 bricks coming so I will have that chance now or will shoot in my High Standard
I use shilen ratchet twist with all my shops rimx builds Lapua center x and midas have always been the clear winners for accuracy. I like the SK long range match aslo
SK Pistol match was very respectable for my rifle especially at 50 yrds. At 100 it would not win a paper match but would win the PRS style steel matches I shoot. I shoot 10.shot groups and usually 3 groups of 10nto decide whats working. The SK pistol match (green box) will shoot many in the same cluster with the fliers being under 1.5" with this particular lot. I did not chrony but its faster so depending on bbl length it may not fit the harmonics well. It shoots higher than centerX.
Have you had any feeding issues? I think I have mine about as good as it gets and have not had a round get in front of the extractor in about 350 rounds. I have had 2 empties drop in the action and cause feed issues. In addition I can get the mags to feed rounds ahead of the static extract reliably if I go slow.
2 of us here have them and 2 more coming soon so I should get a really good feel for things before long. I did play with 2 vudoos and a bergara bolt gun and the RimX was much smoother on the cam over. I for sure would not say they were bad nor fault either, just an observation after a cpl thousand rounds through my RimX.
Just did 2 Shilen barrels for my son.Nevius, 52D. He already had a JGS match. All for RimX setup for PRS. The Nevis most difficult for about .030” engraving on Lapua Midas. Will see how they shoot. All 26”.
Think my feed issues with the bullet jumping the static extractor are all but gone. I have had another couple empty ejects flip in the action on me but that's it.
Think my feed issues with the bullet jumping the static extractor are all but gone. I have had another couple empty ejects flip in the action on me but that's it.
Have run over 500 rounds thru mine and had only one feed issue where round went in the chamber and not secured by the extractor. Had to remove round from chamber with brass rod. My fault on the bench for not operating bolt movement correctly. Zero issues since, if I operate it as it should be. I am no expert, but the RimX is one smooth repeater action. Skeetlee did my barrel and I fitted to my action after slight adjustment to tenon length by .001" and as he said on the forum it really likes Midas and Center X. Shilen Ratchet @ 21". Looking for best tuner option now.
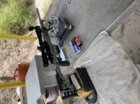
My RimX that I just installed Ezell PD tuner on Ran over 100 RDS of Midas+ thru it yesterday to test tuning. Got this rifle shooting in the ones at 50 yds. with my ammo. Shot in the twos to threes before. Skeetlee did the barrel and I modified slightly to headspace on my action. Also turned a straight section on muzzle end for tuner. Rig weighs 11 lbs 7 oz with the IOR-Valdada 36x42 scope.
My Anschutz 1907 never could do this. Skeetlee did great job on barrel and I got the scope from him too.
Have you had any feeding issues? I think I have mine about as good as it gets and have not had a round get in front of the extractor in about 350 rounds. I have had 2 empties drop in the action and cause feed issues. In addition I can get the mags to feed rounds ahead of the static extract reliably if I go slow.
2 of us here have them and 2 more coming soon so I should get a really good feel for things before long. I did play with 2 vudoos and a bergara bolt gun and the RimX was much smoother on the cam over. I for sure would not say they were bad nor fault either, just an observation after a cpl thousand rounds through my RimX.
i hate to admit this as i like the rimx very much but yes, i have had some dropped cases on extraction. I find if i work my bolt hard with authority all is well. im not sure what causes this as it doesnt happen enough for me to see a pattern. ive always have my eye out for it though so ill figure it out before long i am sure... Lee
When I read the OP's description of using the supplied headspace gauge as a go gauge, it immediately reminded me of my own recent RimX project. I fitted & chambered a Bartlein bbl for my RimX, and initial results on target were more than a little disappointing - plus I had several failures to eject. A call to Aaron at Zermatt Arms resulted in him stopping me short right after I told him I set headspace using their gauge so the bolt would just close on it. That gauge is intended to be used as a no-go gauge, which is why the rim of the gauge is .052" thick. Using it as a go gauge will result in at least .010" excess headspace, which will produce inconsistent ignition to say the least. After our conversation, I pulled the Bartlein & set it back .010", which resulted in a big improvement in groups - although I was still having issues with failure to eject. I couldn't see anything wrong with the ejector, and sent a close-up photo of it taken with a macro lens to Zermatt. Aaron & Ray concurred, so I went after the tensioner with a set of white ceramic stones, putting a radius on the bottom inside corner of the tensioner's hook, as well as a very slight radius in the back inside corner of the hook, thinking that would allow case rims to slip up fully into the ejector & tensioner. What I believe was happening was that the edge of the hook of the tensioner was protruding far enough to be hitting the case body, and stoning the radius in the hook itself & in the inside/back corner of the hook alleviated that contact and promoted better interaction between the case & the tensioner. So now, not only was the rifle shooting more accurately, it was also suffering far fewer failures to eject. I went a bit further with the radius on the tensioner hook than I intended; it's working great right now, but I'll watch for issues as the round count builds. Ray sent me two new tensioners - one with no extra work done on it, and one with a slight radius stoned, similar to what you see in the attached photo. If my tensioner eventually fails, I'll blame it on my exuberance with the stone, and simply replace it with the modified tensioner that Ray sent me. The good thing about stoning the tensioner is that it's easy to remove, and just as easy to replace back into the boltface.
After doing the .010" set-back, I wasn't seeing any engraving of the front driving band of the bullets after chambering & extracting a loaded round, so I pulled the bbl again, and this time, set it back .070", then running my EPS reamer in to the point where the rim portion of the reamer (which features a .010'-.015" radius ground at the body/rim junction) was just starting to cut the breech at the chamber. I now have a good deal of engraving by the lands in the leade on the front driving band, and accuracy improved significantly.
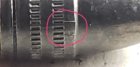
This is my modified Anschutz reamer and the bullet engagement with it.
I do agree that going forward I will be chambering slightly different Without the supplied gauge.
This Forum's expenses are primarily paid by member contributions. You can upgrade your Forum membership in seconds. Gold and Silver members get unlimited FREE classifieds for one year. Gold members can upload custom avatars.