• This Forum is for adults 18 years of age or over. By continuing to use this Forum you are confirming that you are 18 or older. No content shall be viewed by any person under 18 in California.

Shot Marker (Review)

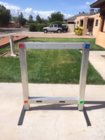
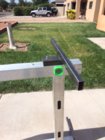
I was given 2 eight foot sticks of 3.5" x 3.5" x .125" wall aluminum tubing which was promptly welded up for my ShotMarker frame. 36" x 36" opening. I'll put a pair of detachable feet on it for stand alone practice and hangers for the target hangers in the pits at my club.

View attachment 1118464

A question for all of you who are building frames from metals or putting hardened steel plates on your frames, Do you not have range rules about metal in targets above the pits?
I understand if these frames are being used on private ranges or ranges without pits, but i would not like to be pulling targets in the pits next to some of these frames. The ricochet and fragmentation risk is huge.
I know we have very strict range regs with NO metal to be above the mantlet.
 
In my case, the frame is aluminum, a bullet will pass right through the frame. I'll probably be using mine for practice only with nobody down range unless the rangemaster calls for a cold range and cease fire.
Oddly enough, the up/down apparatus we hang wooden target frames is made of angle iron.
 
Target lifters are normally made of iron, well all the ones i have seen, but they dont extend above the mantlet. So in those cases where you have serviced pits, there should be no metal above the target mantlet in the line of fire. If you put a bisaloy /ar500 plate above the mantlet and a stray shot hits it (you put it there expecting a syray shot and to protect the electronics from being hit) then you are going to spray the pit area with copper jackets and lead....
 
If there are humans in the pits, nothing metal should be above the wall. If the pits are unoccupied, aluminum tubing seems ideal.
 
Target lifters are normally made of iron, well all the ones i have seen, but they dont extend above the mantlet. So in those cases where you have serviced pits, there should be no metal above the target mantlet in the line of fire. If you put a bisaloy /ar500 plate above the mantlet and a stray shot hits it (you put it there expecting a syray shot and to protect the electronics from being hit) then you are going to spray the pit area with copper jackets and lead....

I'll have to take a closer look at what is visible above the berm at my range this Sunday. You gents are probably correct and I haven't been paying attention (nothing new there). I'll order up another set of magnetic bases from Adam and put together a wooden frame.
 
We've just recently implemented the Shotmarker system at our 600 yd range. I'm looking forward to collaborating ideas as this system while unique and functions good, is presenting some "teething" problems. We constructed our SM frames out of AA marine .75" plywood to 1.5 x 3.5" . We will be using the SM's in conjunction with traditional manned "paper" targets so metal was not an option for us. Were using Coroplast sheets as the backing material. I'm not looking to hijack this thread but i'll just outline a few main issues with the system that were experiencing so maybe be of some help so you don't make the same mistakes we have.

1) Varying signal strength. Seems the sensor hub and access point need a clear line of sight to communicate consistently. A tip is to mount the access point unit up high (we have our mounted about 12' high) on a PVC pole at your firing line. This is still an issue and work in progress for us. Even if you get a "low signal" warning the shots will still register, but it is very slow to appear on your tablet (up to 45 seconds to register on the tablet)

2) bright sunlight. It's a royal PIA to work the system when you can barely see anything on the tablets ! We are thinking quality sun shade systems for all the tablets.

3) Magnetic sensors falling off. The magnetic grip for the sensors is poor. It takes only a slight bump to cause the sensors to fall off and potentially smack off the ground (which in our case is a concrete catwalk in our pits).

4) Accurate target center placement repeat-ability. We need to switch between 200 / 300 /600 yd centers and initially we have masking taped target centers on a 36X36 piece of Coroplast , then we affix that sheet to the main target carrier using velcro. Seems to work very good, but the problem is if you have a perfect calibration for your 200 yd target , then you swap centers to a different 300 yd target now your calibration is lost. This is also work in progress we are working on a method to more precisely affix the target centers on the main carrier.
 
Our target frames also use corroplast. We have scribe lines on the frame edges for horizontal and vertical line alignment. Thus we are always centered. E target is calibrated to a numbered frame.
 
We've just recently implemented the Shotmarker system at our 600 yd range. I'm looking forward to collaborating ideas as this system while unique and functions good, is presenting some "teething" problems. We constructed our SM frames out of AA marine .75" plywood to 1.5 x 3.5" . We will be using the SM's in conjunction with traditional manned "paper" targets so metal was not an option for us. Were using Coroplast sheets as the backing material. I'm not looking to hijack this thread but i'll just outline a few main issues with the system that were experiencing so maybe be of some help so you don't make the same mistakes we have.

1) Varying signal strength. Seems the sensor hub and access point need a clear line of sight to communicate consistently. A tip is to mount the access point unit up high (we have our mounted about 12' high) on a PVC pole at your firing line. This is still an issue and work in progress for us. Even if you get a "low signal" warning the shots will still register, but it is very slow to appear on your tablet (up to 45 seconds to register on the tablet)

2) bright sunlight. It's a royal PIA to work the system when you can barely see anything on the tablets ! We are thinking quality sun shade systems for all the tablets.

3) Magnetic sensors falling off. The magnetic grip for the sensors is poor. It takes only a slight bump to cause the sensors to fall off and potentially smack off the ground (which in our case is a concrete catwalk in our pits).

4) Accurate target center placement repeat-ability. We need to switch between 200 / 300 /600 yd centers and initially we have masking taped target centers on a 36X36 piece of Coroplast , then we affix that sheet to the main target carrier using velcro. Seems to work very good, but the problem is if you have a perfect calibration for your 200 yd target , then you swap centers to a different 300 yd target now your calibration is lost. This is also work in progress we are working on a method to more precisely affix the target centers on the main carrier.

Interesting that you are having these problems.

Signal strength.
I shoot my SM at 600 yards also with clear line of sight from target/Sensor Hub to Access Point. My antenna is mounted at the top of my 4' tall frame with the sensor hub in a steel pocket on the left foot/support. My signal strength is always strong, -100 or better, never a problem.

Bright sunlight.
Bright sunlight is a problem with every device, phone or tablet. Yes a shade is necessary, that was a given before I even ordered my SM.

Magnetic sensors falling off.
No problem whatsoever here. My sensors take a good tug downwards/sideways to get the off the magnetic bases. Are you mounting screws seated deep enough so they don't stop the sensor from seating completely in the magnetic base?

Accurate target centering.
I mounted my coroplast semi-permanently to my frame under pieces of aluminum strip that are screwed into the frame on all four sides. When the time comes to replace the coroplast I just have to remove the aluminum strips to release/replace the coroplast. My frame is marked on the X and Y axis so marking the new coroplast is easily done with a long straight edge and a marking pen. Then new targets can be taped on accurately.

Couldn't be happier with mine.
 
Again we have to figure out SM target affix methods using NO METAL as our pits will be both SM and traditional paper pulled / scored . We are initially thinking of gluing a double stacked "shelf" made of the Coroplast to accurately rest and position our 36" center boards. As for the signal strength our range is set up so were shooting down a very slight incline, maybe this has something to do with the signal , again we are testing different methods it's still early in our learning curve, we've only had our SM system for the past month. We are going to try using the sensor hub antenna extensions next (thus far we were affixing the stubby antenna directly to the unit) Lastly the issue with the sensors being bumped and knocked off is the fact we have a narrow catwalk and the sensors easily get bumped by people trying to walk by (in particular our pit RSO who's a tad "large"). We will get things sorted out. We are working with a few other local ranges whom already have more experience with the system, and seems they had the same issues but by the end of the year we hope to have all the quirks ironed out. Other clubs have commented that a stiff wind pushing your target at full mast also causes missed shot reads.
 
Last edited:
Again we have to figure out SM target affix methods using NO METAL as our pits will be both SM and traditional paper pulled / scored .

This is my personal SM which will never be set up over the pits at my club. For that I will be using a wooden subframe that will hang in the clubs wooden frame. I'll just staple the coroplast on the subframe.
 
Today I had my first opportunity to shoot on the new Shot Marker electronic scoring system at Pascagoula. I was really impressed but also a tad concerned after being admonished that shooting a sensor would cost me $100 and shooting the transmitter was $500. Glad that my first round was in the black. The only two glitches were 1) a sensor cable had to be reconnected on one target and 2) the old Android tablet I was using had to be manually reconnected to the WiFi signal occasionally. This didn't affect the other displays, just mine.

Hopefully, this will speed up F-Class shooting, make it easier to shoot in the summer and get the 1000 yd targets operating again.
Someone is putting a markup on the sensor ($40. cost). The sensor hub should be mounted out of harms way using the antenna extension.
 
OOB:
You mentioned you have done some work on "baffling" which I assume deals with rapid fire issues. I am about to do some experiments in this area and would dearly love to hear what you tried and what results you got.

--jim hahn

Reading Rifle member but spend most of the year in Phoenix AZ at Ben Avery.
 
  • Like
Reactions: GSS
Someone is putting a markup on the sensor ($40. cost). The sensor hub should be mounted out of harms way using the antenna extension.
We use a piece of coroplast that is attached to the bottom of the target frame. It extends below the berm. The Sensor Hub is then attached to the coroplast with velcro. You do NOT need line of site between the target line and firing line, so we do NOT use the antenna extensions. The Access Point does need to be mounted higher to ensure good sensor hub to AP comms, and we mount ours about 8 feet off the ground. I've had my ShotMarker over 18 months, and our club (Burbank Rifle and Revolver) has had them for about a year. I routinely take my ShotMarker to another local club where we outfitted the frames with a set of sensor bases.
Mark
 
  • Like
Reactions: GSS
Sure beats sitting in the pit and using a long stick with an orange disc to mark the shots. This is what we did in 1963 at the 600 meter range in Putnamville Indiana.
 
Question from a shooter.
Sort of new to F-Class and my first time with a Shot Marker @ 600.
(Pascagoula)
Cool beans after I got help with my smart phone.

My .224" diameter rounds (22 Nosler 88ELD) went across the sensors at 1900+, SM worked fine.
Another shooter's .224" rounds went across at 1600+, worked fine.
I notice little rounds don't make as much noise behind the berm when pulling targets.
Once I graduate to 1000yds :) I will be a little above 1400fps.

How well does the Shot Marker work with little bullets like mine?
 

Upgrades & Donations

This Forum's expenses are primarily paid by member contributions. You can upgrade your Forum membership in seconds. Gold and Silver members get unlimited FREE classifieds for one year. Gold members can upload custom avatars.


Click Upgrade Membership Button ABOVE to get Gold or Silver Status.

You can also donate any amount, large or small, with the button below. Include your Forum Name in the PayPal Notes field.


To DONATE by CHECK, or make a recurring donation, CLICK HERE to learn how.

Forum statistics

Threads
165,901
Messages
2,206,062
Members
79,207
Latest member
bbkersch
Back
Top