Follow along with the video below to see how to install our site as a web app on your home screen.
Note: This feature may not be available in some browsers.
This Forum is for adults 18 years of age or over. By continuing to use this Forum you are confirming that you are 18 or older. No content shall be viewed by any person under 18 in California.
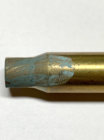
One of the cases with tempilaq, the bottom one is, actually from a previous test - It's fried. The one in the top is from one specific interval test - and it melted 1/4" below the shoulder - lower than I'm comfortable with. (It's 650F tempilaq btw). Only the first fried/scrap case doesn't pass the fingernail test (easier to dent with a fingernail on the edge of the neck than squeezing betwin thumb and forefinger)- I can't dent the necks on any of the rest. It's an experiment - didn't say they are all good or properly annealed
@Standardelg I took a look at your video. Notice how the case mouth is the first to turn red and then thicker portions of the case heat rapidly to glow after that. Try placing the case in the work coil such that the case wall near the shoulder is centered in the 'coil'.
Drawing 5A? That seems very low to me. Mine has a peak draw of 15 amps at 47.3V (710W) annealing 308 brass (4.8s). And you are well below your PSU capability. Could be because your gapped air coil is more efficient but the current draw, absent a limiter, is determined by the load and we're both using 308 brass. Color doesn't mean much at all.
Yes - it's unbelievable low - I'm stoked - and happy I can run a unit without water cooling (for my needs at least - 223, 6.5x47 and 308). Didn't say color means much or anything at all. Somehow the 308 (Norma) cases get really hot like red hot in not that many seconds with a peak draw of 5 amps (using a 36V 400W PSU from Bangood - cost me less than 25$)
One of the cases with tempilaq, the bottom one is, actually from a previous test - It's fried. The one in the top is from one specific interval test - and it melted 1/4" below the shoulder - lower than I'm comfortable with. (It's 650F tempilaq btw). Only the first fried/scrap case doesn't pass the fingernail test (easier to dent with a fingernail on the edge of the neck than squeezing betwin thumb and forefinger)- I can't dent the necks on any of the rest. It's an experiment - didn't say they are all good or properly annealed
The one on the top is the one I was referring to. That Tempilaq is fried in my view. I don't think it is meant to be burnt like that. You are looking for a change in colour - a relatively subtle one, from green to a grey/green. Again, in my view, you shouldn't be able to deform the necks merely by squeezing them. Have a test with much shorter times. Keep the Tempilaq to a very thin application.
I found a case to illustrate my point. Unfortunately some of the Tempilaq has rubbed off but you can still see how the Tempilaq on the case neck and shoulder is a different colour from that on the side wall which didn't come to temp. Happy to be proven wrong but I believe that colour change indicates the Tempilaq hit 750F. In this example, the case needed a slightly longer anneal time but I was reluctant to zap it again. Instead I upped the time slightly for the rest of the cases in the batch of 50 I was doing.
The biggest problem with the GinaErick or any other form of annealing (apart from the AMP) is that at the end of the day we are still guessing as to whether we've achieved what we set out to accomplish.
Running some really non scientific tests with my annealer seems that if you stop the annealer at the point the the tempilaq 750 changes color the cases are still hard or very little change.
Seems that the cases have to reach a red glow in order to achieve a soft brass state.
Has anyone with a annealing made perfect machine pulled the cover and took a video of the process?
Are the cases reaching a glowing state?
I am using a dental instrument to push on the edge of the case to see how much pressure it takes to dent the edge of the case neck.
I ran 5.5, 6.0, 6.5, 7.0, and 7.5 seconds on some hornady 6.5 creed cases and you can feel the difference as you increase the anneal time.
The one on the top is the one I was referring to. That Tempilaq is fried in my view. I don't think it is meant to be burnt like that. You are looking for a change in colour - a relatively subtle one, from green to a grey/green. Again, in my view, you shouldn't be able to deform the necks merely by squeezing them. Have a test with much shorter times. Keep the Tempilaq to a very thin application.
I found a case to illustrate my point. Unfortunately some of the Tempilaq has rubbed off but you can still see how the Tempilaq on the case neck and shoulder is a different colour from that on the side wall which didn't come to temp. Happy to be proven wrong but I believe that colour change indicates the Tempilaq hit 750F. In this example, the case needed a slightly longer anneal time but I was reluctant to zap it again. Instead I upped the time slightly for the rest of the cases in the batch of 50 I was doing.
The biggest problem with the GinaErick or any other form of annealing (apart from the AMP) is that at the end of the day we are still guessing as to whether we've achieved what we set out to accomplish.
Well, the AMP guys have stated that 750F is not enough to make a proper annealing - would be interesting to see what a case with tempilaq on the side looks like after being annealed in an AMP. I'm not overly concerned about getting above 750F in the neck - I'm still just experimenting and testing, and I think the guessing and testing part is fun - I use the tempilaq to get an idea (based on anecdotal evidence? Similar to the "Don't get above 750F on the neck"?) of how the body is affected - trying to stay safe while guessing - and I'm using the 650F version. I kindly disagree about guessing as to whether we achieve what we set out to accomplish. My goal is consistency - if I get consistent low SD and ES by annealing after every firing, then I know I have achieved.
If the area approximately one shoulder width below the wall-shoulder junction hits 750F you can be well assured that the area above it (shoulder and neck) gets much hotter. A faint dark red glow (in a dark room) is about 950F, a brighter glow even hotter and you will note that changes in color happen very rapidly (fractions of a second). (Google incandescence for more information.) But the bottom line is that without metallurgical analysis of the brass before and after annealing we are all just guessing. That's ok, but we should be honest. There have been countless questions here and in other threads about what constitutes proper cartridge brass annealing let alone what indicators we can use to see if it has happened. Few answers have been provided.
As a precautionary matter, I would suggest that you take some fired cases, anneal them at your test times, run them through a bushing die and then check their concentricity before reaching conclusions. (Check concentricity beforehand so you have something to compare against.) There's nothing in a die to support the shoulder from 'buckling' inwards as a result of the bushing forming the neck if the brass is too soft. I binned 100 Lapua cases because I over annealed them (much less than what your pics would indicate), the brass was too soft and the resizing process knocked the necks out of alignment. "Easy does it" is a mantra worth keeping in mind.
I did a little time experiment on some 308 cases today. This is RWS brass that had been partially neck turned (high-side skimmed). I decided to run 6 cases through at increasing times from 4.9s to 5.9s (0.2s increments). Each case was marked with 750F Tempilaq. In all cases I could clearly see the Tempilaq near the case mouth change colour first and this change shoot down the case in the last few tenths of a second. I originally just used cases as they came out of the ammo box. I decided after this first run that it was going to be hard to show in an iPhone photo the subtle differences between each case and so I redid the test with 6 new pieces which I gave a quick clean with Brasso.
Some pics - click on each to enlarge.
The clean cases:
Brushed lightly with 750F Tempilaq:
The annealed cases. 4.9s on left and 5.9s on the right. The top row is the set that were not cleaned prior to annealing (with same times). (I thinned my Tempilaq before doing the clean brass run.)
Same layout but with the first two cases on the lower (cleaned) row rotated slightly so you can better see the change in colour of the sidewall:
A few observations.
- if you are looking for colour change on the sidewall of the case, the cleanliness of the case is important. Rubbing the cases with Brasso highlighted this colour change better than I'd seen before.
- you're not, in my view, looking for a charring of the Tempilaq - just that subtle change from a light green to a moderately darker grey/green.
- my gut guess tells me something between 4.9s and 5.1s is about right for this brass in my annealer. I wouldn't push it much further. But maybe I'm too conservative.
EDIT one last pic with the cases rotated to show the deepest colour change on the sidewall. Pushing the time to 5.3s leads to a 'neater' changeline but I wonder if the neck has become too soft. Who knows.
For the final part of this test I had to wait until dark. I turned all the lights off and shielded with my hands as best I could the light emitted from the timer and ammeter. I ran the cases, as above, from 4.9s to 5.9s with an increment of 0.2s. Only 5.7s and 5.9s came to a glow - very faintly in the case of the former and more positively in the case of the latter.
I should add that case positioning is important. In these tests, the point one roughly shoulder width below the shoulder-sidewall junction is in the centre of the work coil.
Your tempilaq sez they weren't hitting 750 until the last two.
You could move the case a few mm lower to hit just the neck and avoid the shoulder, keep in mind anneal times will go lower as well. Consistent case placement is as important as consistent anneal times.
Experiment with coil shapes- suggest one that looks like a nuke cooling tower (classic venturi shape) this will concentrate the flux field where its needed, and bend it away from the workpiece in the areas you don't want heat.
Same colour change on the first one as the last - just closer to the shoulder junction. (Light for the photos was coming from the left so the first is a bit washed out.)
EDIT: added photo marked to show approx extent down case wall where Tempilaq changed colour
I settled on this height to avoid overheating the neck. If the case is too low, the case mouth lights up and that glow shoots down the neck. Basically you are heating the thinnest part to heat the thickest, so-to-speak. Placing the thickest part of interest in the centre of the coil avoids this.
I do feel more confident going to 5.1 or even 5.3 seconds. But would do the resizing/concentricity test before proceeding.
sorry guys it was pointed out that i had a ground connected wrong in the fritzing diagram so here is the updated diagram which now includes the panel meter and shunt. the wrong ground connection was between the 48v power supply and Arduino, there actually is no connection when i looked at the physical connections .
Hello. The Nextion library is made for arduino 2560. which library do you use for arduino due? Your program is super well done, all my congratulations for this remarkable work. Have a good day.
you need to be a little more specific if you would like an answer. what is the spec of the coil you have made? Do you want the current with no case in the coil. what case in the coil and how is it positioned in the coil. All those things will make a difference as to the current being drawn by the coil.
You could use a clamp meter that is suitable for high frequency. You can get them for oscilloscopes. The other way is just to use V=I*R measure the resistance of the coil although that will be a DC measurement and perhaps not exactly correct. You can measure the Voltage and then do the sums.
The other way to think of it is more about power you know the DC Voltage and Current being provided to the board. This is nearly all going into the coil other than a little in the way of heat.
How much current is circulating in the coil? The short answer is: a lot. This is why the thick copper conductor gets hot. The high current and frequency also means it is not trivial to measure. Tesla coil builders have ways to measure the current on their primaries, but it is tricky. Trying to calculate it with the V=IR approach is also tricky, because R is difficult to determine. Skin effect and proximity effect are significant in this situation. If you want to calculate it, I think using the capacitor reactance is a better approach. For this parallel resonant circuit the capacitor current is roughly:
Ic = 14 * Vin * f * C
So for example at 48v input, 100kHz, and 2uF, the RMS capacitor current is ~135A. The coil current would just be this plus losses/load. If the "no load" current draw of the circuit is say 10A, then you could estimate the coil current at 145A. This has some assumptions built into it of course, but it should get you close. Why do you want to know what the current is?
How much current do you suppose is flowing in a 308 case neck?
This Forum's expenses are primarily paid by member contributions. You can upgrade your Forum membership in seconds. Gold and Silver members get unlimited FREE classifieds for one year. Gold members can upload custom avatars.
This site uses cookies to help personalise content, tailor your experience and to keep you logged in if you register.
By continuing to use this site, you are consenting to our use of cookies.


")
")


 .
.
