• This Forum is for adults 18 years of age or over. By continuing to use this Forum you are confirming that you are 18 or older. No content shall be viewed by any person under 18 in California.

Remington bolt timing

Bataction

Gold $$ Contributor
Need step by step replacement of Remington 700 bolt knob for proper timing/ extraction. I have watched allot of videos and read allot of articles and I guess I need the bolt replacement for dummies version. I understand how to remove and install a bolt handle but the extraction/ timing I want to make sure I am getting right.
Thank you in advance

P.S. To the great record setting gunsmiths of this forum that only care to give negative comments but not actual knowledge please (I know it’s hard) but refrain from letting me know how good you are and how stupid I am!!!!
 
is the bolt complete right now? if so you need to measure the gap in front of the handle to the action then see how far it needs to rotate to engage the cam correctly. you need to build a fixture that will locate the handle in addition to holding the lug bottoms on the same plane (think ball milled slot where the bottom of each lug will lay flat on the plate, long enough that the handle can be on the same plane) lay a complete bolt on a plate edge where you can see how the handle and left front lug bottom are on the same line
 
Love the PS, sometimes there are those that I would like to buy for what they are worth and sell them for what they think they are worth! One thing to note if you are soldering the handle there is not worry about the heat however, if you are brazing it could reach temperatures that could soften the material. I like the Heat Control Paste that Brownell's carries for wrapping around the bolt head up to around an inch or so of the handle for this purpose. You can get similar pastes from a local welding supply store as well.
 
I used to use the paste, but with silver-brazing, the heat never makes it more than an inch or so up the tube.

n156rrrcJ_AlgGkcWeAg72OA8GvBqOlj8XYZvS7LH2HkbEUCeonK4qDO6BT2GBO_yQ7JnvztEJ1YofnPoahZt7Av-vNtMsfnCy8GCEVJc5BrzC3_0OjT5-yDEP5RwgTN4UnmEMbUGuNTi6kQajZngjUpM7j2p-VLjggw1U5z02jzJo6bHaZnmllmNkQSYHqKAJF6ST7Qqaj_xo0JPVT5stfes_sZDn1Fhl7o7-rmSorzuekjFr8xhWVPc60bCtiDUfXhTO_WLnVBaUttl2YIEE8C9EEVQszmIUQyIjmmJ8ypaxVpleog50VcwdXyYly3kChEJh4IylpKbi3JC2YGkOTGq0VF2K0au3Mqt7S-xIv2IVeBoP9pLg9R5f5qq4l7yOy7_NFFWKhxUN1lvR4uq_oSb4TCowJEF1xTWL6X_NgJDcf0sIsxt6J5uejSVkTXrnoYloxnsBRAphk3e2TZnBryiDP6hzTaGIOgY9v1FZEPc5cBqindEfWNBmyfvVgi0geBzDtEi6EbMZ8sslwSZTUUjVMoyXjdv9FpXxEfext9kuodfkLnvtCsK2XRfq2AknmhDp6k8WdF_zLGiH0PlGOZ4b6yinPb1pt1zV6f99GcCWvzFNvui1Xu5cUu-RtHTsJLSxisLOeYbN6WJGSnN7GFZMW2gaYpL11vohP30jJiL32aD5KiIaC5-cB413hxkFnj2tGH_2ILh_y1h0d_diUlPA=w1024


zXipS15n5xUx3zcyK9Ysolsdbitt-_ekQSbbyr0eAlLzSjc2Jqj1I3IUYq6mZKJv-8tryMuNzyiXQqdXO-FH7F3jkpvnkML9LqneV4GhVd8GhFzGQPx2znAO8EdwZZe0R75rDDuycsUcqPUarWpPu0KzJQ94jzWn8-djMMNpbLjJODDLO2Fvjt5SCM_TnatZ8IxYVPyEh1y5rizinov3VTQl302E9C-wJxPsGHcGtv0U4y4q1QF1flH0qgKF7Am-MVPHIsCESRIexim6Q5TgWY5CscXA90l3jWXsFycY4-4-MH30iiGhdVAySHN1m5dY4VNfdPRmOcju9G6EBbAEhFMJd8oyoFaWnUotyX744oWDFJWYa8fZCCBJ_zgn3xfrnckrkDZgytP9sen_5GNwTxzMafJJjQcKZyETliyolM0mPqYPx1nAK5FN-2FDw939JmUFOprhnXE5hbpHpRtip8yVQdl_jowLuSN5sVHy11s_3ivfqGh00kYutPbbtR3iD8G9FlXqUGLk4x9_3yAvPhuWmfQ1jyMttCOUrcfWmzb_I5lRq7lvMG5h6r5ZNfTf6AxQtEpo2r8apZa8CW_WuZ1q5vSFQYbdd5cqOaX-AOarfSIHSDgwrhFOJ63PEp38yPZlX_3tnZzqwAXdabURqXn1PUCPTsHrrIAbDenezSe2Ob55VP_9dMzkPx2L8NQAShcoTY_HgO10D1eMbvUbo5yBdQ=w1024


vIFicUA5ceZ-ATlvaxpUl2inemWlwzT8Eg-3Q-iiTIIvgIWftZhmJvx1OWWEMtHFlv4X1eN_kGcxDA9Sq0b5EZBhkak6JYavN6uXf5Q5plM74ZVf7uqqDnPGRdgjG9FkM2T9Q8cmNd3C3byC0oRJcQJCiNjZwAbB7bnI_ZclghzR7YihL1dqYRCQDvXTVXVWX4xjmK7nAzt0dWZYM33Jyu1rOqaLaUISXpgZRICjayEYa23xA7l5zf7oSXF_TfegZRkJUDLeC30w3ir0ecZZCElj0-0w6AgykdeGvvpOZIPoItnlV_QIpIRWLNE9BRruiWRXvuBI2GvraALO_ps--JTryH3mXq-Ijb_uBs7GdhOpo38q8DrtkNk7SMI922EO5-vLL_yNl7UsYckZbcUEbhOJe6xenW5q9gM_QzAIP6Kttdpqo6E1JxtG3NX-kjO2mLHpO47XQraOBEjqO1RmUY52ej9YWeI7NS6g0PJzWw_pO6ARmKNISYClURSp1CNUZ9fffILmhCocpcO6YZbh2ymiCH94oe1y03yAdbkqJTHojQy5Tslewqx9bzzGE1pWm3MgAR5CKyom1536_4nqgWPz3TeObhKQa0PJYDhWyI-3deh2-NEG5W_uxvdGfehl86yUTZxOo2mAG3IqFcRviPYIL-AyDR_QPupc8GsYMNxFb57w07auEckjpR27at0DoE6JRuYpMwo3hKgLmT_dXN4kKw=w1024
 
is the bolt complete right now? if so you need to measure the gap in front of the handle to the action then see how far it needs to rotate to engage the cam correctly. you need to build a fixture that will locate the handle in addition to holding the lug bottoms on the same plane (think ball milled slot where the bottom of each lug will lay flat on the plate, long enough that the handle can be on the same plane) lay a complete bolt on a plate edge where you can see how the handle and left front lug bottom are on the same
The bolt is complete and the gap is around .036-.037 came that way from the factory I trued up the action and it got a little worse. So the bolt needs to be completely removed.
 
I used to use the paste, but with silver-brazing, the heat never makes it more than an inch or so up the tube.

n156rrrcJ_AlgGkcWeAg72OA8GvBqOlj8XYZvS7LH2HkbEUCeonK4qDO6BT2GBO_yQ7JnvztEJ1YofnPoahZt7Av-vNtMsfnCy8GCEVJc5BrzC3_0OjT5-yDEP5RwgTN4UnmEMbUGuNTi6kQajZngjUpM7j2p-VLjggw1U5z02jzJo6bHaZnmllmNkQSYHqKAJF6ST7Qqaj_xo0JPVT5stfes_sZDn1Fhl7o7-rmSorzuekjFr8xhWVPc60bCtiDUfXhTO_WLnVBaUttl2YIEE8C9EEVQszmIUQyIjmmJ8ypaxVpleog50VcwdXyYly3kChEJh4IylpKbi3JC2YGkOTGq0VF2K0au3Mqt7S-xIv2IVeBoP9pLg9R5f5qq4l7yOy7_NFFWKhxUN1lvR4uq_oSb4TCowJEF1xTWL6X_NgJDcf0sIsxt6J5uejSVkTXrnoYloxnsBRAphk3e2TZnBryiDP6hzTaGIOgY9v1FZEPc5cBqindEfWNBmyfvVgi0geBzDtEi6EbMZ8sslwSZTUUjVMoyXjdv9FpXxEfext9kuodfkLnvtCsK2XRfq2AknmhDp6k8WdF_zLGiH0PlGOZ4b6yinPb1pt1zV6f99GcCWvzFNvui1Xu5cUu-RtHTsJLSxisLOeYbN6WJGSnN7GFZMW2gaYpL11vohP30jJiL32aD5KiIaC5-cB413hxkFnj2tGH_2ILh_y1h0d_diUlPA=w1024


zXipS15n5xUx3zcyK9Ysolsdbitt-_ekQSbbyr0eAlLzSjc2Jqj1I3IUYq6mZKJv-8tryMuNzyiXQqdXO-FH7F3jkpvnkML9LqneV4GhVd8GhFzGQPx2znAO8EdwZZe0R75rDDuycsUcqPUarWpPu0KzJQ94jzWn8-djMMNpbLjJODDLO2Fvjt5SCM_TnatZ8IxYVPyEh1y5rizinov3VTQl302E9C-wJxPsGHcGtv0U4y4q1QF1flH0qgKF7Am-MVPHIsCESRIexim6Q5TgWY5CscXA90l3jWXsFycY4-4-MH30iiGhdVAySHN1m5dY4VNfdPRmOcju9G6EBbAEhFMJd8oyoFaWnUotyX744oWDFJWYa8fZCCBJ_zgn3xfrnckrkDZgytP9sen_5GNwTxzMafJJjQcKZyETliyolM0mPqYPx1nAK5FN-2FDw939JmUFOprhnXE5hbpHpRtip8yVQdl_jowLuSN5sVHy11s_3ivfqGh00kYutPbbtR3iD8G9FlXqUGLk4x9_3yAvPhuWmfQ1jyMttCOUrcfWmzb_I5lRq7lvMG5h6r5ZNfTf6AxQtEpo2r8apZa8CW_WuZ1q5vSFQYbdd5cqOaX-AOarfSIHSDgwrhFOJ63PEp38yPZlX_3tnZzqwAXdabURqXn1PUCPTsHrrIAbDenezSe2Ob55VP_9dMzkPx2L8NQAShcoTY_HgO10D1eMbvUbo5yBdQ=w1024


vIFicUA5ceZ-ATlvaxpUl2inemWlwzT8Eg-3Q-iiTIIvgIWftZhmJvx1OWWEMtHFlv4X1eN_kGcxDA9Sq0b5EZBhkak6JYavN6uXf5Q5plM74ZVf7uqqDnPGRdgjG9FkM2T9Q8cmNd3C3byC0oRJcQJCiNjZwAbB7bnI_ZclghzR7YihL1dqYRCQDvXTVXVWX4xjmK7nAzt0dWZYM33Jyu1rOqaLaUISXpgZRICjayEYa23xA7l5zf7oSXF_TfegZRkJUDLeC30w3ir0ecZZCElj0-0w6AgykdeGvvpOZIPoItnlV_QIpIRWLNE9BRruiWRXvuBI2GvraALO_ps--JTryH3mXq-Ijb_uBs7GdhOpo38q8DrtkNk7SMI922EO5-vLL_yNl7UsYckZbcUEbhOJe6xenW5q9gM_QzAIP6Kttdpqo6E1JxtG3NX-kjO2mLHpO47XQraOBEjqO1RmUY52ej9YWeI7NS6g0PJzWw_pO6ARmKNISYClURSp1CNUZ9fffILmhCocpcO6YZbh2ymiCH94oe1y03yAdbkqJTHojQy5Tslewqx9bzzGE1pWm3MgAR5CKyom1536_4nqgWPz3TeObhKQa0PJYDhWyI-3deh2-NEG5W_uxvdGfehl86yUTZxOo2mAG3IqFcRviPYIL-AyDR_QPupc8GsYMNxFb57w07auEckjpR27at0DoE6JRuYpMwo3hKgLmT_dXN4kKw=w1024
Thanks for the pictures.
Are you locating the handle on the bolt with the bolt in the open or closed position?
How do you know the bare bolt body is in the correct position before locating the handle?
Pictures would be great. Like I said I need bolt handle instillation for dummies.
 
Need step by step replacement of Remington 700 bolt knob for proper timing/ extraction. I have watched allot of videos and read allot of articles and I guess I need the bolt replacement for dummies version. I understand how to remove and install a bolt handle but the extraction/ timing I want to make sure I am getting right.
Thank you in advance

P.S. To the great record setting gunsmiths of this forum that only care to give negative comments but not actual knowledge please (I know it’s hard) but refrain from letting me know how good you are and how stupid I am!!!!
Don't feel like the only idiot in town, I can do math, algebra, and a little trig. I I can figure valve timing, port timing, cam timing, ignition timing, can time the sprockets on a twelve roe planter to place different size seed from 1/2" to 5" apart or even drop 5 in one hill. I can time a haybaler knotter to try string and the needles to clear the plunger perfectly. BUT I have asked at least 15 different gun smiths to describe how to time a bolt or tell me how to know if it needs to be timed and I have gotten 15 different answers. AND these are good smiths, capable of building top grade rifles. I'm like you, I would like to have a picture in my head of exactly what makes it timed or out of time!
 
34E3D4DE-94DD-45B2-BFB6-69DE3319FA6F.jpeg
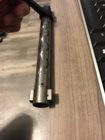
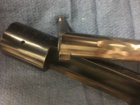
Here is what i mean when i say they must be on the same plane. If not it will over or under rotate and not let the lugs go into the raceway.

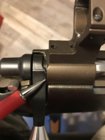
And below is the gap you need to minimize to get as much camming action as you can get. Sometimes the handle needs to be rotated to hit the cam at the right time- if so you have to take some off of the flat on the bolt handle that hits the raceway. Basic overview

043B5515-88AE-4DBB-8DD6-31D9AE6C979A.jpeg
 
View attachment 1110391
Here is what i mean when i say they must be on the same plane. If not it will over or under rotate and not let the lugs go into the raceway.

And below is the gap you need to minimize to get as much camming action as you can get. Sometimes the handle needs to be rotated to hit the cam at the right time- if so you have to take some off of the flat on the bolt handle that hits the raceway. Basic overview

View attachment 1110390
I understand now what is the optimal clearance between the front of the bolt and the back of the action (where you are pointing on the second photo)?
 
I understand now what is the optimal clearance between the front of the bolt and the back of the action (where you are pointing on the second photo)?

The less clearance you have the more cam you get in a way. You can see how far its moved from the back by the gap in the shroud
 
One thing I haven't seen or heard mentioned so far is the fact that with nothing in the chamber the bolt can move front to back some. You don't want that when locating the handle for timing so I suggest you place a case that was fired in the rifle {and not resized obviously} so it holds the locking lugs back against the receiver and then locate your bolt handle for weld/braze/solder.
Don't get me wrong, what little front to back you may have wont kill the thing and render it unworkable...but, if you are going this far to "time" the bolt you might as well have it as "timed" as good as it can be.
I wouldn't worry about it too much anyway...who is that guy that is god's gift to the TIG welding world???...and Christ knows, the absolute only person on god's green earth that actually knows how to TIG weld. What ever you do, DO NOT mention that you are going to TIG weld it yourself...he will blow a gasket and set us all straight!!!!
 
Last edited:
E4F8F61B-EEF2-447F-AA58-C68B0B44CF92.jpeg 0F7C5F7E-E389-4D0A-A86A-B80837B116F6.jpeg
One thing I haven't seen or heard mentioned so far is the fact that with nothing in the chamber the bolt can move front to back some. You don't want that when locating the handle for timing so I suggest you place a case that was fired in the rifle {and not resized obviously} so it holds the locking lugs back against the receiver and then locate your bolt handle for weld/braze/solder.
Don't get me wrong, what little front to back you may have wont kill the thing and render it unworkable...but, if you are going this far to "time" the bolt you might as well have it as "timed" as it can be.
I wouldn't worry about it too much anyway...who is that guy that is god's gift to the TIG welding world???...and Christ knows, the absolute only person on god's green earth that actually knows how to TIG weld. What ever you do, DO NOT mention that you are going to TIG weld it yourself...he will blow a gasket and set us all straight!!!!
 
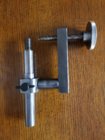
Nice jig Carlsbad! Modified Vise-Grips is a great idea Genepoole! I love good old fashioned ingenuity. Thanks for the pics guys.
 
The modified vise-grips will allow you to clamp the handle to the body and be able to cycle the bolt in the action to ensure everything functions fine before soldering.

 
Last edited:
The modified vise-grips will allow you to clamp the handle to the body and be able to cycle the bolt in the action to ensure everything functions fine before soldering.
So will that jig.

The other thing to remember, you can have a cold braze just like welding. Heat isn't your enemy. Also using properly made handles will aid, PTG handles are pure garbage. I was referred to Andrew Delikat @ AD ARMS for properly made handles from certified 4140CM. They hold better than anything I've used or seen. The other things on his handles is the extraction cam mates perfectly with the Remington cams.
 

Upgrades & Donations

This Forum's expenses are primarily paid by member contributions. You can upgrade your Forum membership in seconds. Gold and Silver members get unlimited FREE classifieds for one year. Gold members can upload custom avatars.


Click Upgrade Membership Button ABOVE to get Gold or Silver Status.

You can also donate any amount, large or small, with the button below. Include your Forum Name in the PayPal Notes field.


To DONATE by CHECK, or make a recurring donation, CLICK HERE to learn how.

Forum statistics

Threads
165,242
Messages
2,191,984
Members
78,771
Latest member
AndrewL
Back
Top