Follow along with the video below to see how to install our site as a web app on your home screen.
Note: This feature may not be available in some browsers.
This Forum is for adults 18 years of age or over. By continuing to use this Forum you are confirming that you are 18 or older. No content shall be viewed by any person under 18 in California.
I'm putting together a prone rifle based on a Savage BVSS. I have an Anschutz sling rail that I'd like to mount to the forend of the stock, but I'm not sure how to approach the fitment of the rail (it's simply an extrusion, no pillars, etc). The stock is the wood laminate kind with the black tip on the end. The approaches I'm considering, in increasing order of complexity: 1) Use hand gouges and pencil tracing to carve out a slot. 2) Create some kind of router guide to zip out a slot. 3) Convince friend with CNC mill to help me cut the slot on his machine.
I'm OK with using Devcon to fill any gaps that might occur on the underside, and I'm ok with it not looking *perfect*, I mainly want it to be aligned and strong. How would y'all approach a project like this?
I installed an Anschutz rail on a new GRS laminate stock. It had a sling swivel attachment screw on the fore end which (along with the front action screw) I used to center the rail. I traced the rail with a steel scribe, and used chisels to remove material. The only issue I ran into was the laminated stock layers don't behave like solid wood when removing material.
Go slow, check your work frequently, and as you suggest, finish with a Devcon bedding job.
That said, if I need to perform this task again, I will seek out a milling machine, due to the amount of time it took.
Good Luck.
I'd get your friend to help. You can make and use the jigs in my stock building thread but that's going to take longer than just chiseling it out by hand. The hard part is getting the depth right. Having a friend with a mill is worth it's weight in beer. It sounds like a case of St. Pauli girl would do it.
I installed an Anschutz rail on a new GRS laminate stock. It had a sling swivel attachment screw on the fore end which (along with the front action screw) I used to center the rail. I traced the rail with a steel scribe, and used chisels to remove material. The only issue I ran into was the laminated stock layers don't behave like solid wood when removing material.
Go slow, check your work frequently, and as you suggest, finish with a Devcon bedding job.
That said, if I need to perform this task again, I will seek out a milling machine, due to the amount of time it took.
Good Luck.
Thanks for the insight. That's pretty much what I was thinking, the chisels would take a long time, and the laminate would act weird. I'm thinking about going this route because I have to relieve some wood around the fancy new barrel nut / recoil lug that don't seem to fit. Any idea if Devcon is suitable to hold the rail in place on its own (ie. use no screws, only Devcon?)
I'd get your friend to help. You can make and use the jigs in my stock building thread but that's going to take longer than just chiseling it out by hand. The hard part is getting the depth right. Having a friend with a mill is worth it's weight in beer. It sounds like a case of St. Pauli girl would do it.
Yeah using a mill would definitely be the nice way to do it. I got to thinking about the jig, and about making a 3D drawing of the stock (a pain because it has many curves or slight curves), and about milling the curves on the rail ends to fit the new slot. Very little machine time, but a deceptively large amount of prep work.
I just found your stock building thread, will have a read. Thanks!
Thanks for the insight. That's pretty much what I was thinking, the chisels would take a long time, and the laminate would act weird. I'm thinking about going this route because I have to relieve some wood around the fancy new barrel nut / recoil lug that don't seem to fit. Any idea if Devcon is suitable to hold the rail in place on its own (ie. use no screws, only Devcon?)
I didn't rely on the Devon for adhesion. Since this was uncharted territory for me I drilled/ countersunk 4 holes in the rail, which is about 8" long. I recessed t-nuts into the barrel channel, using 8-32 flat head machine screws to secure the rail.
I also filed the front end of rail to match the profile of the fore end.
I am using the rail to mount a Duplin bipod for F-TR
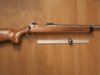
If this is what you're using, unless you're going to use a slot nut that swivels, run the cut all the way to the tip of the forearm.View attachment 1017279
I agree that running thru the tip of the forearm would be the thing to do... I'm just not sure what the tip is made out of! Any idea? I think it's some kind of plastic, I don't want it to shatter and go flying.
I wouldn't chance it. Remember the 737 aircraft fuselage which became a convertible while flying in Hawaii some years ago? It was glued together. They don't do that anymore.
Generally speaking, epoxy products stick well to most materials; however, metals are low on the list of materials which glue well. Furthermore, if you were to select an epoxy product as an adhesive for aluminum, Devcon 10110 would not be your first choice.
Consider that there is nearly no upside to eliminating bolts. Weight and appearance are not important in this instance. The downside to a "glue only" approach is that your rail might fall off in the middle of a match; not good. I would use two or three machine screws and some T nuts.
I agree that running thru the tip of the forearm would be the thing to do... I'm just not sure what the tip is made out of! Any idea? I think it's some kind of plastic, I don't want it to shatter and go flying.
Don't know their manufacturing process with regards to the barrel channel but if they cut it with the foretip attached, I doubt you'll have any problems slotting the bottom. I'd run the cutter fast with a slow feed. To be certain, I'd call them and ask about their process and the material.
Edit, my previous post is a photo of an Anschutz MPR in 17HMR. The rail is drilled and countersunk and fasted with wood screws. It is factory installed.
You would have a tough time chiseling that plastic. A file would do it but up the time involved. Nice looking gun. Get your friend involved or build the jigs and use a router. If you use a router, buy a bit as close to the rail width as you can and make several shallow cuts to get to your depth. Good luck.
You would have a tough time chiseling that plastic. A file would do it but up the time involved. Nice looking gun. Get your friend involved or build the jigs and use a router. If you use a router, buy a bit as close to the rail width as you can and make several shallow cuts to get to your depth. Good luck.
I disagree with your suggestion to use a wide router bit. While milling laminate won't be the same as solid wood, to prevent tear out, it is necessary to cut 'into' the wood on the finished edge as the cutter advances. This would require a bit smaller in diameter than the width of the rail/ finished cut.
I disagree with your suggestion to use a wide router bit. While milling laminate won't be the same as solid wood, to prevent tear out, it is necessary to cut 'into' the wood on the finished edge as the cutter advances. This would require a bit smaller in diameter than the width of the rail/ finished cut.
I had to look up 'climb milling' to answer. The comparison drawing I saw suggests 'conventional' cutting to be the correct method, but
It doesn't apply completely, as
the suggestion was made to rout/ mill a trough, full width.
Doing so would cause tear out where the cutter loses contact with the the material - the ' back side' of the cut, if you will, as the material being cut is not supported by material yet to be removed.
I am at a disadvantage at the moment, as my computer is down, and I am on my phone. Perhaps I can find some online visuals that better explain my concerns.
I suggested a "new" sharp bit and yes, as big as will fit. They have a shallower angle of cut at the finished edge. I find smaller bits are more prone to tear out. Your suggestion about reversing the direction of feed does work. Cutting close to the final line and then cutting "backwards" with the router reduces tearout. Just make sure you aren't cutting a lot of material and keep a good grip on your router, as that method of cutting can cause the router to "get away" from you as it's grabbing material. I'm not starting an argument. Just clarifying my thoughts and experience for you. Do what you like.
This Forum's expenses are primarily paid by member contributions. You can upgrade your Forum membership in seconds. Gold and Silver members get unlimited FREE classifieds for one year. Gold members can upload custom avatars.


")