You are using an out of date browser. It may not display this or other websites correctly.
You should upgrade or use an alternative browser.
You should upgrade or use an alternative browser.
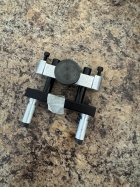
Who makes this riser hardware?
- Thread starter LVLAaron
- Start date
Josh probably knows.
joshb
Gold $$ Contributor
Thanks, but I hadn’t a clue! I’m trying to figure out the engineering for that piece. The pillars are awfully long for fitting in the cheek piece.Josh probably knows.
Wait…wait…! I get it!!! Flip the top piece around. The screws can be “set” for the preferred height where they contact the base. Unlike most set ups, The knob is in the cheek piece……"or I’m crazy! Been out working in the Texas sun. Just sat down.
paperpuncher
Gold $$ Contributor
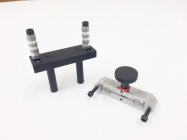
Going off memory here , sometimes a little dangerous. The 2 holes in the cheekpiece are thru drilled allowing the cap screws to be loosened from the top to facilitate some adjustment in the cheekpiece alignment. The 2 pillars are installed in the cheekpiece. The rectangular pc with the 2 rods gets surface mounted to the underside of the cheekpiece. The piece with the thumb screw gets in inletted into the stock knob can go on either side depending on your political affiliation. The block has to be set deep enough to allow the top piece to set into the stock and the cheekpiece to mate to the stock. Some clearance here wont hurt at all. Mine do not have cap screws on the bottom part, they are secured with a "phillips head screw ( like a deck screw). No reason that you cant cement a couple pillars in the stock and use the cap screws just a bit more work. Clear as mud right? Can post pics if you want but it will be after work
LVLAaron
Gold $$ Contributor
Pics would be nice. No rush.Going off memory here , sometimes a little dangerous. The 2 holes in the cheekpiece are thru drilled allowing the cap screws to be loosened from the top to facilitate some adjustment in the cheekpiece alignment. The 2 pillars are installed in the cheekpiece. The rectangular pc with the 2 rods gets surface mounted to the underside of the cheekpiece. The piece with the thumb screw gets in inletted into the stock knob can go on either side depending on your political affiliation. The block has to be set deep enough to allow the top piece to set into the stock and the cheekpiece to mate to the stock. Some clearance here wont hurt at all. Mine do not have cap screws on the bottom part, they are secured with a "phillips head screw ( like a deck screw). No reason that you cant cement a couple pillars in the stock and use the cap screws just a bit more work. Clear as mud right? Can post pics if you want but it will be after work
paperpuncher
Gold $$ Contributor
Sure I will post em later. My set up is a little different than yours The 2 holes in the block with the knob are through drilled and countersunk on the topside so it gets inletted and then secured into the stock from the top. Not sure why that has blind threaded screw holes unless it was designed to be secured from the bottom up?Pics would be nice. No rush.
pdhntr
Silver $$ Contributor
The way I see it is if you take the part with the locking wheel off. As you are looking at it, rotate it clockwise or counter clock wise 180 degrees. The socket screws now can be used as stops for the cheek piece.
In other words, the lock mechanism is upside down as you have it posted.
Maybe I don't understand the question but that is what I would try.
Jim
In other words, the lock mechanism is upside down as you have it posted.
Maybe I don't understand the question but that is what I would try.
Jim
Last edited:
STS
Silver $$ Contributor
Here you go gentlemen.
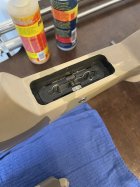
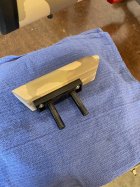 The one that is in the original post is a little different that the three that I have. The cap screws in the butt stock hardware are not present in the current ones. I suspect that those are there to aid in installation. It also doesn’t seem to have two square nuts like mine. The left square nut is threaded, the right is there for the thumb screw to rest against. As you can see, I opted to eliminate the thumb screw in favor of a stainless cap screw. The thumb screw is very difficult to get tight enough with thumb/finger pressure alone. I found the comb piece loose more than once and I knew that eventually it would fall out and get damaged. I don’t need to remove or lower the comb to clean the rifle with the 50mm objective and .885 rings so it rarely ever gets loosened. This is the HTG pattern stock.

 The one that is in the original post is a little different that the three that I have. The cap screws in the butt stock hardware are not present in the current ones. I suspect that those are there to aid in installation. It also doesn’t seem to have two square nuts like mine. The left square nut is threaded, the right is there for the thumb screw to rest against. As you can see, I opted to eliminate the thumb screw in favor of a stainless cap screw. The thumb screw is very difficult to get tight enough with thumb/finger pressure alone. I found the comb piece loose more than once and I knew that eventually it would fall out and get damaged. I don’t need to remove or lower the comb to clean the rifle with the 50mm objective and .885 rings so it rarely ever gets loosened. This is the HTG pattern stock.
STS
Silver $$ Contributor
2 cap screws through the top of the comb insert. Loosen, slide it where you want it, and tighten. It all works pretty well with the exception of that thumb screw. I was not going to live with that thing. It's ugly as a wart on a girls nose, and it looks like it doesn't belong there. I have never regretted replacing it with a socket head cap screw.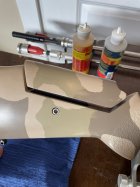

Last edited:
Not if i get ahold of it.Interesting. I would have imagined both pieces flush with their respective part of the stock. On the cheek piece - are there through holes so you can adjust the fitment of the hardware?
The through holes are unsightly, I delete the button and fill hole in butt as well.
Stupid button anyway....

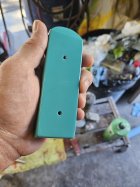 oh yeah...
McMillan hardware
Upgrades & Donations
This Forum's expenses are primarily paid by member contributions. You can upgrade your Forum membership in seconds. Gold and Silver members get unlimited FREE classifieds for one year. Gold members can upload custom avatars.

Click Upgrade Membership Button ABOVE to get Gold or Silver Status.
You can also donate any amount, large or small, with the button below. Include your Forum Name in the PayPal Notes field.
To DONATE by CHECK, or make a recurring donation, CLICK HERE to learn how.

Click Upgrade Membership Button ABOVE to get Gold or Silver Status.
You can also donate any amount, large or small, with the button below. Include your Forum Name in the PayPal Notes field.
To DONATE by CHECK, or make a recurring donation, CLICK HERE to learn how.


