Topstrap
Silver $$ Contributor
Quite a few years ago I cut up some old welding chaps and vest to make a bag I thought fit my needs. Over the years between my Son and myself we've bought nearly every bag you can think of. Some work better for a certain need such as fitting loosely over a tank trap, log or rocks. We've tried various size Protectors which I haven't found to be a benefit for our longrange matches either off a bench or prone. Big and bulky and hard to manipulate around on the table shooting various targets at distance. We've made/tried round, wedge, square, pillow and weird shaped things that just used up leather and beads.
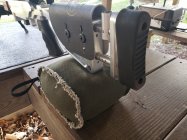
The larger oval shaped bag filled nearly to capacity has nearly always been my favorite with quite a few friends wanting one. The leather worked nice for a while then it started to stretch and get slick from use which caused shooters to start to squeeze it. From those of us that have gotten used to the large oval shape burying the stock solidly into it and if needed rotate slightly till it sits perfect. With the adjustable Henry Rempel or Phoenix this makes an exceptionally stable platform, I can get it all set then back off and the gun will just set there, sneak back up and touch it off.
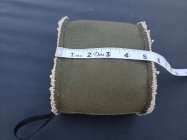
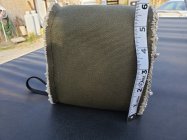
I have been looking for something to use instead of leather and handstitching it together. I acquired a full roll of either WW II or Korean War genuine Military OD Green heavy canvas. This stuff if a bear to work with but talk about tough and the tecture is perfect for a rear bag. I bought a Sailrite heavy duty sewing machine and proceeded to learn to make a bag which was a real learning process. It would be nearly impossible to turn it inside out and hide the seams so I ended up with fraying on the ends. I tried using binding but again me being a noobie that didn't work out well.
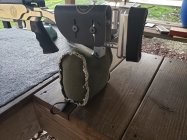
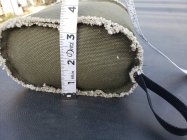
I am using the heaviest thread the machine will handle which is the same as they use on sails on sailboats that venture out into the ocean. I sewed on exterior loop together with one pass of stitching and handed it to my eldest Son. He's 6'6" and no slouch, Chris see if you can tear this apart. Didn't even hint that the thread or seam was going to let go. I'll admit the frayed edges look a bit crude but they will not pull thru the stitched seam and are incredibly tough.
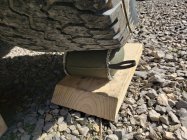
I just ran up on one of the regular finished bags with my Toyota Tacoma seeing if it could withstand the weight, not a problem at all and I was surprised the plastic pellets held up. Got the truck off and bag had not stretched a bit and looked just like the others. Each bag has nearly 3 to 3 1/4 lbs of plactic pellets in it. There is an area approximately 3/4" that is handsewn with brown wax thread to show where it can be cut and opened to add or reduce pellets if needed.
Guess what I'm asking is have others tried a more solid rear oval shaped bag such as this, squeezing can work for certain types of competition but it very hard to get the same consistent tension each shot. I may place an ad but would like to get some feedback from anyone that has experimented but something similiar. I'm hoping this may help offset my keeping my match fees at $10.00 with paint and everything else skyrocketing. Want to keep everyone shooting and not have to quit due to high ammo, gas and range fees.
I know they aren't pretty but I'm a function over form type of shooter, it looks real good sitting under Ugly Beddy. They definitely won't tear open getting caught on a briar or sharp rock. Guess I could have named them Tough SOB or something along those lines but Big Fuzzy is all I could come up with.
Topstrap
The larger oval shaped bag filled nearly to capacity has nearly always been my favorite with quite a few friends wanting one. The leather worked nice for a while then it started to stretch and get slick from use which caused shooters to start to squeeze it. From those of us that have gotten used to the large oval shape burying the stock solidly into it and if needed rotate slightly till it sits perfect. With the adjustable Henry Rempel or Phoenix this makes an exceptionally stable platform, I can get it all set then back off and the gun will just set there, sneak back up and touch it off.
I have been looking for something to use instead of leather and handstitching it together. I acquired a full roll of either WW II or Korean War genuine Military OD Green heavy canvas. This stuff if a bear to work with but talk about tough and the tecture is perfect for a rear bag. I bought a Sailrite heavy duty sewing machine and proceeded to learn to make a bag which was a real learning process. It would be nearly impossible to turn it inside out and hide the seams so I ended up with fraying on the ends. I tried using binding but again me being a noobie that didn't work out well.
I am using the heaviest thread the machine will handle which is the same as they use on sails on sailboats that venture out into the ocean. I sewed on exterior loop together with one pass of stitching and handed it to my eldest Son. He's 6'6" and no slouch, Chris see if you can tear this apart. Didn't even hint that the thread or seam was going to let go. I'll admit the frayed edges look a bit crude but they will not pull thru the stitched seam and are incredibly tough.
I just ran up on one of the regular finished bags with my Toyota Tacoma seeing if it could withstand the weight, not a problem at all and I was surprised the plastic pellets held up. Got the truck off and bag had not stretched a bit and looked just like the others. Each bag has nearly 3 to 3 1/4 lbs of plactic pellets in it. There is an area approximately 3/4" that is handsewn with brown wax thread to show where it can be cut and opened to add or reduce pellets if needed.
Guess what I'm asking is have others tried a more solid rear oval shaped bag such as this, squeezing can work for certain types of competition but it very hard to get the same consistent tension each shot. I may place an ad but would like to get some feedback from anyone that has experimented but something similiar. I'm hoping this may help offset my keeping my match fees at $10.00 with paint and everything else skyrocketing. Want to keep everyone shooting and not have to quit due to high ammo, gas and range fees.
I know they aren't pretty but I'm a function over form type of shooter, it looks real good sitting under Ugly Beddy. They definitely won't tear open getting caught on a briar or sharp rock. Guess I could have named them Tough SOB or something along those lines but Big Fuzzy is all I could come up with.


Topstrap


