Follow along with the video below to see how to install our site as a web app on your home screen.
Note: This feature may not be available in some browsers.
This Forum is for adults 18 years of age or over. By continuing to use this Forum you are confirming that you are 18 or older. No content shall be viewed by any person under 18 in California.
Now that's slick...
I wanted to do something like that- but couldn't figure out a way to "capture" whatever was being used to hold the barrel (tips in your case, v-blocks in mine), and allow 360 degrees of free movement. I tried to find something to press-fit over top of a ball bearing but had no luck.
I got frustrated with brass-tipped screws.
Even their smaller contact area didn't allow the barrel to gimbal freely. It wasn't rocket science- if I tighten one side on the outboard spider, i fully expect the breech of the barrel to move in the appropriate direction.
if it doesn't, I'm bending the barrel. Period, end of story.
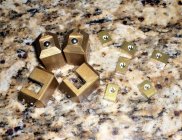
i drilled out the brass tips with a 1/4" ball end mill, about . 075 deep.
Crazy glue a 1/4" steel ball bearing into them.
Milled aluminum v-blocks about 7/16" wide x 1" long. Used the same ball end mill to make the female indent for the ball bearing in the screw, dead center.
Just used it for the first time, v-blocks give good surface area contact, holds the barrel firmly while freely allowed to gimbal on the ball bearings. Now, when i tighten or loosen a screw on the outboard spider, the barrel moves exactly like i expect.
i like this idea- I remember seeing a pic of a chuck someone on here had made like that. is it hard to hold the vblocks in there when setting up? thanks
Now that's slick...
I wanted to do something like that- but couldn't figure out a way to "capture" whatever was being used to hold the barrel (tips in your case, v-blocks in mine), and allow 360 degrees of free movement. I tried to find something to press-fit over top of a ball bearing but had no luck.
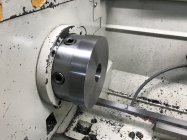
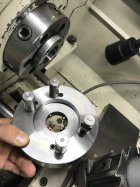
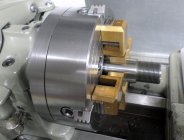
It’s just a thick D mount chuck backplate drilled and tapped for the screws. Check the fit to your spindle nose as this particular one was way off and the taper on my spindle nose did not contact the taper of the backplate.
I got the idea from someone on here (probably Alex) and this works excellent.
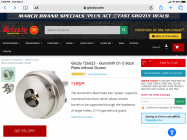
Swivel-Tip Set Screw, Black-Oxide Alloy Steel, 1/2"-13 Thread, 1-1/2" Long
I found this on the grizzly web site. It would be easy to replace the screws with the freely articulating heads Style. This will mount to the D1-5 spindle nose.
Who makes that thick back plate? Thickest ones I can find are 1". Yours looks to be steel rather than cast? If I can't find one I may order us camlock studs and make a solid steel one. One I use now I made years ago out of aluminum and screws stick out.
Who makes that thick back plate? Thickest ones I can find are 1". Yours looks to be steel rather than cast? If I can't find one I may order us camlock studs and make a solid steel one. One I use now I made years ago out of aluminum and screws stick out.
Hi all - been about a year since my last post and my move to Texas (the free-er world). I got a new lathe a couple months ago and while incorporating a spherical bearing into a design at work, I realized its the perfect way to hold a rifle barrel in a lathe completely stress-free. It allows...
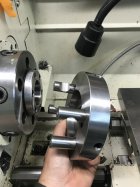
Swivel pads are tin plated copper, attached to brass setscrews, also tin plated. (From electrical switchgear}. 1/2"-20. Note the shorter locking setscrews. The thick iron plate is a D1-4 chuck backplate.
These setscrews have ball ends. Note the thin locknuts. (Pal Nuts to you gear head engine builders)
A 'smith I used to know used pieces of heavy wall aluminum conduit split down the side to accommodate different barrel diameters. He said that the aluminum was softer than any barrel steel and didn't even leave permanent marks on blued barrels. I have his barrel vise that uses these same conduit bushings and the don't permanently mark barrels as long as they are of the proper diameter.
Your lathe will come with some brass tipped screws for the outboard spider. They’ll work fine as is without marring any unfinished barrels. They’ll be fine on most blued barrels too. Simple shim strips can be cut from soda/beer cans that will naturally wrap around the barrel. They can be used as “cushions” under the screws if needed. The copper ring under the chuck jaws works well enough. Made my own spider for the chuck end so I could do shorter barrels and use it with brass tipped screws. See pictures. If you are using your 4 jaw chuck, aluminum, copper or brass strips all work fine. When I’ve used them I made them thin (1/16-1/8” thick) and short (1/4”) long. You need a small contact area that’ll allow the barrel to pivot(gimble) around. The long length of your jaws will hold barrel in line with the jaws regardless of how you move the spider end if you don’t. That’s why the copper ring/wire trick works well. You won’t be making any cuts heavy enough to require anything more.
I have a question. How do any of us know that our 4 contact points are in the same radial plane perpendicular to the bore at different diameters? The answer is we don't.
We can get them close, drilling for the setscrews with the work piece properly set up on a vertical mill, I use a dividing head. But impossible to get them "000.000000".
This is why we use soft copper and a light touch on the chuck wrenches when dialing in. Snugging up as you get nearer to zero indicator swing. Back and forth from the chuck side to the outboard end spider. Heavy hands on the wrench can spring a barrel. But you already know this.
Less critical in my world of building iron sighted boomers. But more critical as you pros build the 1000 yarders.
A "Real" floating reamer holder helps to smooth out the edges.
The one on top is a industrial production reamer holder, cost runs around $800 when new. I have tried the two below. Guess which one gets used in my shop.
My work cannot come close to the work of those like Tooley. I am just a backyard hack tinkering with hunting rifles built for my own use.
An eye opener is to clamp a barrel in the barrel vise at the breech end. Rig a dial indicator to contact the muzzle. Set the indicator to zero. Push on the muzzle with one finger. You will be amazed at how little force it takes to move the muzzle. Less critical with the truck axle sized barrels, more critical with the No. 2, 3 and 4 contours.
An eye opener is to clamp a barrel in the barrel vise at the breech end. Rig a dial indicator to contact the muzzle. Set the indicator to zero. Push on the muzzle with one finger. You will be amazed at how little force it takes to move the muzzle. Less critical with the truck axle sized barrels, more critical with the No. 2, 3 and 4 contours.
Thats what we always say but theres always that guy on these threads that thinks you cant possibly bend a barrel with a little ole set screw 28” away from a chuck
I used to try and explain bending a barrel or a better way to hold it. My advise now, stop asking questions online. You can learn a lot more experimenting on your own and you will know WHY, which is the most important part. Just think through of what you want to accomplish and test the method to see how well it works. Adjust things until you cant fault the setup.
This Forum's expenses are primarily paid by member contributions. You can upgrade your Forum membership in seconds. Gold and Silver members get unlimited FREE classifieds for one year. Gold members can upload custom avatars.