• This Forum is for adults 18 years of age or over. By continuing to use this Forum you are confirming that you are 18 or older. No content shall be viewed by any person under 18 in California.

So which scope leveling tool do I believe?

Bought one of the Xtreme Accuracy scope leveling tools that sit inside your action on the bolt rails. Sounds like a perfect way to level your scope. I also have the B Square model which bolts onto the Pictanny rail. Now I realize there could be a problem with rail mounting holes not being drilled perfect. HOWEVER, On my Surgeon 591 action with built in 20 moa rail when utilizing both tools they do not read level the same. Off by maybe half a bubble, not much but not perfect. So which one do I believe?????? I've mounted the scope both ways, and don't see much difference, but I'm anal and want perfect.

Perplexed.


Danny
 
I put a straight edge level horizontally at 100 yards. I then level my action off whatever point I can which is usually the rear tang. Lastly, I set my cross hairs to be dead on level with the straight edge. Now I have two level points of reference. I have found the same problem. Going back afterwards, most of my bases are off just a slight hair. The only way the level of your bases matter is if you level your scope to the base.

Dan
 
I wouldn't use either, to much inconsistency. Here's how I do it.

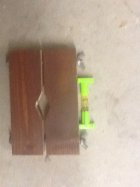
I put the rifle in a rest and place a small level across the rail and level the rifle. Next I use a jig I made ( cost about .50 cents ) on the barrel. The jig is nothing more than a piece of scrap 3/4 lumber about 8" long and 4" wide. Drill holes at either end for screws. Find the center of the wood. From the center mark out then cut 3/4" above and below the center and 1" long ( looks like a diamond) and cut the wood in half.

I place the jig on the barrel and a simple line level on top of the jig. Rotate the jig so the level on the rail and the one on the jig are the same.

Remove the level on the rail and mount your scope. Now put the level you used on the rail on the vertical scope cap. Level the scope to the level on the barrel. If you bump or move the rifle it's simple to re-adjust the rifle to level using the jig on the barrel.
 

Attachments

  • image.jpg
    image.jpg
    114.7 KB · Views: 85
  • image.jpg
    image.jpg
    209 KB · Views: 64
What I do might be different, so this is how it goes:
You have to decide what is your reference point. I have decided that I want t use the horizontal reference that is found on the forestock, meaning the front of the stock ahead of the recoil lug.
I cut a hole in 2 3/4 stock that has been squared, that will be slightly larger than the barrel diameter found at the barrel/action juncture.
I split the wood fixture going both ways to ensure that the cut is symmetrical.(once through the saw, then reverse 180 and cut again)
I then install the resulting half-moon wood piece on the stock, with the rifle installed on a bi-pod or front rest, ahead of the scope and level it with a level that will be used using the scope vertical adjustment cover.
Once levelled, the scope is installed in the half-rings and the level installed using the top of the top screw-on cover.
Then I install the upper ring covers and alternately tighten the screws while ensuring the scope stays level, once the eye relief has been determined.

Just my .02$ Cdn...
 
jr600yd said:
I wouldn't use either, to much inconsistency. Here's how I do it.

I put the rifle in a rest and place a small level across the rail and level the rifle. Next I use a jig I made ( cost about .50 cents ) on the barrel. The jig is nothing more than a piece of scrap 3/4 lumber about 8" long and 4" wide. Drill holes at either end for screws. Find the center of the wood. From the center mark out then cut 3/4" above and below the center and 1" long ( looks like a diamond) and cut the wood in half.

I place the jig on the barrel and a simple line level on top of the jig. Rotate the jig so the level on the rail and the one on the jig are the same.

Remove the level on the rail and mount your scope. Now put the level you used on the rail on the vertical scope cap. Level the scope to the level on the barrel. If you bump or move the rifle it's simple to re-adjust the rifle to level using the jig on the barrel.

Wheeler has been making your setup for a long time now. It's called the Wheeler Professional Reticle Leveling System.

I have been using it for years and it is the best and most convenient method I have ever used. Always provides me with true vertical elevation adjustments at long range when it is used correctly to mount a scope. Really is a high quality product with top notch precision machining. Here's a link to check it out.

http://www.midwayusa.com/product/189016/wheeler-engineering-professional-reticle-leveling-system
 
Wow! That's a good tool to have. Well worth the money. Your right mine does the same thing. Theirs runs about $40 mine runs about .50 cents. Still, I like it and put it on my "I want" list.
 
jr600yd said:
Wow! That's a good tool to have. Well worth the money. Your right mine does the same thing. Theirs runs about $40 mine runs about .50 cents. Still, I like it and put it on my "I want" list.

Really is a great tool. You'll love it. Comes in a nice compact padded hard plastic case that's about the size of a sandwich. Adjustments are very easy to make and it is extremely precise.
 
I take white paper and a 3' level and Mark a line straight up and down with the level. I set me rest so that. It's level and sit my rifle in the rest and then I level the scope to the line. Once level a shoot one shot and then raise the scope 12 moa and shoot another shot and if it's level then both bullets will shoot on the line.
 
I too have been using the Wheeler Engineeri g set and it works very well.
Also I have had great success with there lapping kit as well
 
You stated that one of your levels bolts to the picatinny rail. Bolt it to the rail, level the rifle, remove the level without disturbing the rifle, turn the level 180 degrees of its original position and remount from the opposite side. If the level is good, it should still read level. If it does not read level after the 180 degree turn, the level is bad. You might be able to put a small sliver of .005 or .015 shim stock or what ever is needed on the lower clamping area of the high side to get it level. That should pull that side down, if you do not use a lot of torque. As to the other level you have, I am not familiar with it, but I am certain you can figure out a way to test it along similar lines with a small amount of thought. Something else you can do, set a small level on the top of the bottom half of the ring, again turn the level 180 degrees to assure proper function of the level, level the rifle, then carefully insert scope with anti-cant device, level scope, apply upper portion of rings and life is good.
 
Jim Casey has the right idea. Furthermore, do not depend on the scope caps or turrets to level a scope. The cross hairs themselves, particularily the verical crosshair, is the defining reference as far as true level "if I had to choose the lesser of two evils". It is the device in which you put on target. No matter how expensive a scope is, the posts in which the turrets attach, are part of the erector assembly. They don't have to be perfectly squared to control the erector. And yes, for the most part, they usually end up correct but the operative work here is USUALLY. Drop the scope into the rings loosely, mount your anti-cant device of choice on the scope and use a plumb bob to level vertical crosshair. Set your anti-cant device to the plumb or level of the scope then equal out the scope to the rifle.

Furthermore, do not use the method of setting one end of the bubble to either hash mark on the vial. When the bubble expands or contracts under different atmospheric conditions, this WILL change the "cant" of scope. Center the bubble the best you can between the hash marks. It will always remain centered no matter what happens to the bubble.

As far as the rifle, the same device in which you set onto the raceways can also be set ontop of the scope base for consistency. But then you have to ask yourself, are the bolt raceways cut exact? was the scope base milled correctly? You can drive yourself crazy askingthe "what ifs". Do the best you can and the end result will prove itself downrange.
 

Upgrades & Donations

This Forum's expenses are primarily paid by member contributions. You can upgrade your Forum membership in seconds. Gold and Silver members get unlimited FREE classifieds for one year. Gold members can upload custom avatars.


Click Upgrade Membership Button ABOVE to get Gold or Silver Status.

You can also donate any amount, large or small, with the button below. Include your Forum Name in the PayPal Notes field.


To DONATE by CHECK, or make a recurring donation, CLICK HERE to learn how.

Forum statistics

Threads
165,445
Messages
2,195,294
Members
78,883
Latest member
FIDI_G
Back
Top