My variation on 38 Spl bolt lift mod for Savage Old Style Firing Pin.
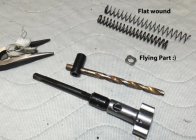
Carbide Micrometer tip (from eBay), New style BAS, 1/4" (for larger contact radius) Si3N4 Ceramic ball, 38 Spl brass case, 10mm thrust bearing race (eBay/China, not from a lift kit) for preload shims, Carbide burrs, file, gold plating kit")
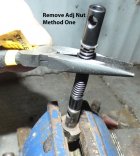
Step one:

Using Carbide burrs, form countersink for Ceramic ball.

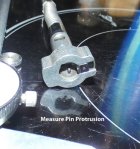
The Carbide tip ends up being about 0.080" recessed in the BAS.
I shaved about 0.065" (with a file) off the end of the BAS leaving Micrometer tip recessed about 0.015".
Various combinations of shims under the Mic tip can be used for more spring preload (when experimenting with different springs).

The 38 Spl case and 1/4" Ceramic ball add about 0.090" to 0.095" to the internal length, and the 0.080" short Mic tip in the BAS results in about 0.015" additional spring preload. Each shim (bearing race) adds about 0.050" each if needed.

I did one with a 7/32" Ceramic ball, 0.048" added height. Would maybe have to shave another 0.005"-0.010"
off the BAS.

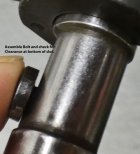
Installed it looks like this;

Lift kits ONLY help with friction between the cocking sleeve and BAS. Other areas, like sharp edges, cocking notch and ramp in the bolt body, and spring coil bind/drag probably contribute more to a hard bolt lift.
Adding or reducing internal length of pin length with shims can help with fine tuning bolt lift.
I've seen friction benefit from various "Lift Kits" but this seems to be the lowest friction, even though it involves some DIY work.
Slight modification to cocking notch and alternate springs, smoothing rough and sharp edges can help.
Carbide Micrometer tip (from eBay), New style BAS, 1/4" (for larger contact radius) Si3N4 Ceramic ball, 38 Spl brass case, 10mm thrust bearing race (eBay/China, not from a lift kit) for preload shims, Carbide burrs, file, gold plating kit
Step one:
Using Carbide burrs, form countersink for Ceramic ball.
The Carbide tip ends up being about 0.080" recessed in the BAS.
I shaved about 0.065" (with a file) off the end of the BAS leaving Micrometer tip recessed about 0.015".
Various combinations of shims under the Mic tip can be used for more spring preload (when experimenting with different springs).
The 38 Spl case and 1/4" Ceramic ball add about 0.090" to 0.095" to the internal length, and the 0.080" short Mic tip in the BAS results in about 0.015" additional spring preload. Each shim (bearing race) adds about 0.050" each if needed.
I did one with a 7/32" Ceramic ball, 0.048" added height. Would maybe have to shave another 0.005"-0.010"
off the BAS.
Installed it looks like this;
Lift kits ONLY help with friction between the cocking sleeve and BAS. Other areas, like sharp edges, cocking notch and ramp in the bolt body, and spring coil bind/drag probably contribute more to a hard bolt lift.
Adding or reducing internal length of pin length with shims can help with fine tuning bolt lift.
I've seen friction benefit from various "Lift Kits" but this seems to be the lowest friction, even though it involves some DIY work.
Slight modification to cocking notch and alternate springs, smoothing rough and sharp edges can help.
Last edited: