urbanrifleman
Site $$ Sponsor
If you printed those housings without warpage, that is impressive. 
Did a couple reprints while doing design modifications and never noticed any issue with warping.If you printed those housings without warpage, that is impressive.
Great job. What's the peak temp you think you are reaching? Looks like the necks are not getting red.Well I just got it uploaded now. Don't have the links to parts or files up on printables yet.
The temp looks perfect.
That's how I have it set now. 3.1 seconds on 6.5 creedmoor brass. Not sure what temp that would be. There's a lot of info and opinions on temp out there. I'm no expert.
Non water cooled induction units are bound for a short life.Very nice work no doubt. But why does it need to be water-cooled. I have never had the occasion where I needed to stop within 50 cases without the water cooled coils. At that point I stop and place the device in a trough with a fan mounted in the end for cooling purposes. By the time I have the cases placed back in the load block it is cool enough to go 50 more cases if I needed to.
this is plenty hot enough to anneal brass. The color is a dead giveaway that you are achieving the necessary temp. Now it is possible to put too much energy into a piece of brass too quickly, which would essentially prevent you from meeting a min time at temp to fully anneal cartridge brass. Personally I’d like to see a slightly slower color change with the reddening of the brass to reside exclusively in the neck and shoulder. However, what you are doing is definitely annealing your brass sufficiently and you should see a huge difference from pre to post induction neck softness. You can easily check this using your finger nail.
That's how I have it set now. 3.1 seconds on 6.5 creedmoor brass. Not sure what temp that would be. There's a lot of info and opinions on temp out there. I'm no expert.
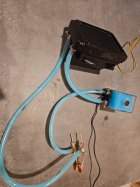
Do you have any other pictures of the cooling system connection to the induction coil? It doesn't seem like there is a full loop for the coolant to plow through and I can't picture how it works. ThanksBrass Induction Annealer by ahn94 | Download free STL model | Printables.com
Download 3D printable STL modelswww.printables.com
Do you have any other pictures of the cooling system connection to the induction coil? It doesn't seem like there is a full loop for the coolant to plow through and I can't picture how it works. Thanks

Thanks for the reply. That makes sense now...I thought that you were just using a wire loop and it didn't make any sense to me. Now I get it. Thanks a lot for clearing it up.Soldered a solid copper wire to one end of a T connector to block the end running into the annealer.
View attachment 1654009
Yes. Should be in the parts list.Thanks for the reply. That makes sense now...I thought that you were just using a wire loop and it didn't make any sense to me. Now I get it. Thanks a lot for clearing it up.
What size tubing is it? I assume you sourced it on the jungle?

