I’ve seen other threads in the archives posted about modification to the LCD. Before I explain what I did or why it differs, let me recap the path the led me to do so.
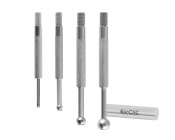
I have a set of “small hole bore gauges” that allow you to dial in quite precisely (<0.001”) a diameter probe that you can measure with calipers or micrometer.
Here’s the kind of gauges to which I refer:

Using the appropriate gauge size, you can probe and feel the inside of your necks with remarkable resolution. You can feel a donut with these long before you’d feel it when seating or have any other indication because your fingers are directly touching a precisely sized probe sliding axially through the neck.
I’ve been wanting to move towards using an “initial decap/body size” with a FL die and oversized bushing (like a body die but with a tiny bit of neck engagement) and then doing a final neck size on the Lee Collet die.
The problem I ran into is that very clearly the LCD was leaving a donut at the neck base where it transitioned from the collet engaging the neck to having no collet contact.
What’s more, I was also noting a “burr” on the case mouth. So as you insert the bore guage into the neck, it would be a bit tight, then normal barely-clearing, then it would tighten again as you had to push past the donut.
Looking at the inside of the collet, it showed the surface finish was pretty poor— lots of tooling mark.
I’ve solved many surface finish problems with Flex Hone brushes before, so I broke out my “243 chamber” brush and flex-honed the collet ID.
The flex hone accomplished three important things for me:
1) Overall improvement in surface finish that is quite drastic
2) Introduced a bit of taper at the bottom of the neck, mimicking the tapered ID of the bushing.
3) Provided a tiny bit of exit taper to eliminate the mouth burr
Subsequent sizing with the LCD showed NO DETECTABLE DONUT. I’m sure it’s still thicker there, it’s just that the taper on the collet ID (again, mimicking a bushing) is allowing the neck to have more room where it needs it to accommodate the thicker material. I’m hoping that this taper on the collet will also contribute the better case-centering (in theory?) at the NSJ since that’s sometimes the first part of the case that engages the chamber.
I doubt there will be noticeable improvements on target. But I feel like the flex-hone modification to the collet is a better way to go than trying to turn down the mandrel, because it mimics some of the proven taper geometry that works so well on the SAC and Wilson bushings.
Flex Hone brushes have a million uses— chamber polishing, die polishing, etc. It’s worth having a couple on hand. (I recommend the 400 grit).
I have a set of “small hole bore gauges” that allow you to dial in quite precisely (<0.001”) a diameter probe that you can measure with calipers or micrometer.
Here’s the kind of gauges to which I refer:

Using the appropriate gauge size, you can probe and feel the inside of your necks with remarkable resolution. You can feel a donut with these long before you’d feel it when seating or have any other indication because your fingers are directly touching a precisely sized probe sliding axially through the neck.
I’ve been wanting to move towards using an “initial decap/body size” with a FL die and oversized bushing (like a body die but with a tiny bit of neck engagement) and then doing a final neck size on the Lee Collet die.
The problem I ran into is that very clearly the LCD was leaving a donut at the neck base where it transitioned from the collet engaging the neck to having no collet contact.
What’s more, I was also noting a “burr” on the case mouth. So as you insert the bore guage into the neck, it would be a bit tight, then normal barely-clearing, then it would tighten again as you had to push past the donut.
Looking at the inside of the collet, it showed the surface finish was pretty poor— lots of tooling mark.
I’ve solved many surface finish problems with Flex Hone brushes before, so I broke out my “243 chamber” brush and flex-honed the collet ID.
The flex hone accomplished three important things for me:
1) Overall improvement in surface finish that is quite drastic
2) Introduced a bit of taper at the bottom of the neck, mimicking the tapered ID of the bushing.
3) Provided a tiny bit of exit taper to eliminate the mouth burr
Subsequent sizing with the LCD showed NO DETECTABLE DONUT. I’m sure it’s still thicker there, it’s just that the taper on the collet ID (again, mimicking a bushing) is allowing the neck to have more room where it needs it to accommodate the thicker material. I’m hoping that this taper on the collet will also contribute the better case-centering (in theory?) at the NSJ since that’s sometimes the first part of the case that engages the chamber.
I doubt there will be noticeable improvements on target. But I feel like the flex-hone modification to the collet is a better way to go than trying to turn down the mandrel, because it mimics some of the proven taper geometry that works so well on the SAC and Wilson bushings.
Flex Hone brushes have a million uses— chamber polishing, die polishing, etc. It’s worth having a couple on hand. (I recommend the 400 grit).


