This is my first attempt at installing one of these. Those of you that choose to do this for a living have my respect.
When making all your final attachments to the gun stock as well as attaching the recoil pad to the aluminum plate, do you use any type of bonding agent? This is obviously after all your fitting has been done.
I'm waiting on a new Kick-Eez recoil pad(not the one in the pic) and some aluminum black metal finish to come in so I can wind this project up.
Any input is appreciated.
-
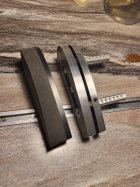
20220912_060653.jpg
703.8 KB
· Views: 36
Even rubber pad to aluminum?
That's actually the answer I was hoping for.
Even rubber pad to aluminum?
That's actually the answer I was hoping for.
Yes. These are generally on match rifles which are always being modified to find improvement. Glue would be a PITA.
Attach the base plate to the stock where it needs to go. If the buttplate is oversize, scribe around the stock with a razor knife and file and sand to the line. If the stock is oversized, put a roundover on the edge. Look here
https://doantrevor.com
For how he fits buttplates by hand.
Then you can use the base plate as a template to drill the holes. This can be done with a hand drill, just be careful. Finally attach with screws.
Looks similar to the Graco I typically use.
Scribe the aluminum buttplate just as you would a recoil pad against the stock, rough trim with a metal bandsaw then finish grind on the belt sander (again, just as you would the pad).
Pad is attached with just machine screws to the backplate- no reason for adhesive.
A recoil pad jig is indispensable for getting the correct toe/comb angles on the pad and blending in the sides of the pad when sanding to size.
Attach the base plate to the stock where it needs to go. If the buttplate is oversize, scribe around the stock with a razor knife and file and sand to the line. If the stock is oversized, put a roundover on the edge. Look here
https://doantrevor.com
For how he fits buttplates by hand.
Then you can use the base plate as a template to drill the holes. This can be done with a hand drill, just be careful. Finally attach with screws.
This pretty much describes what I did. I built a jig to hold my stock in a proper position for cutting it to length needed. Centered and mounted aluminum plate to the stock, then scribed it, removed it and went to whittling.
Looks similar to the Graco I typically use.
Scribe the aluminum buttplate just as you would a recoil pad against the stock, rough trim with a metal bandsaw then finish grind on the belt sander (again, just as you would the pad).
Pad is attached with just machine screws to the backplate- no reason for adhesive.
A recoil pad jig is indispensable for getting the correct toe/comb angles on the pad and blending in the sides of the pad when sanding to size.
I dont have the luxury of a bandsaw. I secured the aluminum plates to a spoil board and carefully roughed in the perimeter with a sliding chop saw. Then carefully ground back to the scribe line on a stationary disc sander with an 80 grit disc. I hade to do this three times with the 3 piece adjustable assembly I am using. Once I got them all close to matching, I assembled them and worked them all at once to get a good match. All final finishing was done with various grits of paper glued to scrap Corian. All by hand of course.
I saw the recoil pad jig being used for the rubber pad. I have it on my mind to make one out of wood given this is a one time use situation. if you look at the pic I posted, you'll see that the toe/comb angle is very minor in my application. I free handed it on the aluminum.
I saw where a gentleman froze the rubber pad prior to shaping to final size. Is this worth the extra step??
A benchtop belt sander works for recoil pads. A disc sander would work too. If you had to you can do it by hand. Scribe your outline on the part that sits against the stock and not the shoulder side. and rub chalk into the scribe line. Wipe opp excess and it will be left just in the line. You could get a pad grinding jig or do it by hand. Unless you are trying to match a toe angle like on hunting rifle or shotgun, just scrub the recoil bad backwards to a piece of wood to lay flat on the sander or use to hold the recoil pad.
A table saw with a cross cut sled works great for shortening stocks.
Thanks for the input folks . I'll post a pic when I'm done.
I saw where a gentleman froze the rubber pad prior to shaping to final size. Is this worth the extra step??
Since you don't have a steep toe angle, probably unnecessary.
The "challenging" part of grinding a soft pad (I use Limbsaver) is when you have a steep toe angle that tapers to near nada.
As the soft rubber gets thinner towards the end of the toe due to the angle, the sanding belt just pushes the rubber out of the way- rather than sanding it out. This is where freezing it can help. In this case, I don't think it will be a problem.
Thank ya. That's kind of my thoughts.
Well....for better or worse, here it is. Thanks for the feedback folks.
-
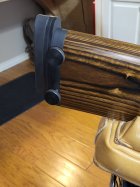
20220918_170219.jpg
352 KB
· Views: 29
Well....for better or worse, here it is. Thanks for the feedback folks.
Looks great! The blackening of the aluminum looks good too.
Looks great! The blackening of the aluminum looks good too.
That ended up being rattlecan high temp paint. I couldn't get the "blackening" I bought to do anything but sit on top of the aluminum. Real disappointment to be honest w you. I don't have high expectations for the paint. We will see.
Thanks for the compliment friend.
Lots of videos on home anodizing or you can have it Cerakoted which will be a lot tougher than paint.
Looks like you did an outstanding job ... congrats
Thanks again.
I have it on my mind to have it cerakoted if it doesn't hold up. There are some local shops here that could do that. No shipping that way.
Sanding that sorbothane recoil pad was like shoving a cat through a keyhole. Still not super happy with the consistency of the finish. I cheated and oiled the hell out of it for now.


