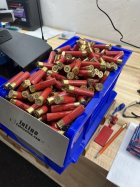
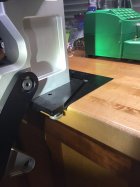
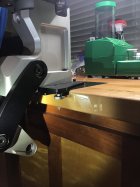
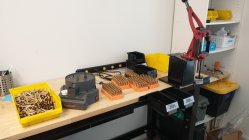
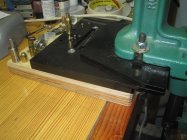
Their led light center mounted in the tool head should be the first accessory bought for a Dillon buyer. It is a great safety device.
You are using an out of date browser. It may not display this or other websites correctly.
You should upgrade or use an alternative browser.
You should upgrade or use an alternative browser.
Inline Fabrication
- Thread starter pontiac2m8
- Start date
F Class John
NRA Life Member
At last count I think they claim to have over 900 possible templates for their quick change plates to cover all kinds of stuff from shooting to knife sharpeners. I use them like this.
bozo699
Gold $$ Contributor
I just bought 5 wall mounts off this forum and I’m going to be buying several more. Doing the same as you.At last count I think they claim to have over 900 possible templates for their quick change plates to cover all kinds of stuff from shooting to knife sharpeners. I use them like this.
Wayne
drop_point
Silver $$ Contributor
John, did you do the routing for a flush mount? I'm going to remodel my basement and I'm considering mounting my Area 419 permanently, but want my Dillon, Rockchucker, Henderson, etc to be able to be used as needed and not permanently affixed. I'm no wizard of a carpenter, but really like the concept if I can do the work myself.At last count I think they claim to have over 900 possible templates for their quick change plates to cover all kinds of stuff from shooting to knife sharpeners. I use them like this.
You have two choices on mounting the Flush Mount Base Plate:
1) route out a recess so that Base Plate sits level with bench top
2) purchase the Spacer Plate that stacks underneath the Base Plate.
> spacer plate provides some additional clearance (approx. 1/8”) that allows you to bolt everything directly on top of the bench top (no routing required)
Cutting out the recess and mounting the plate is straight forward and takes minimal skills and tools. Detailed directions below. I believer there are also videos posted on YouTube.
Creating the recess to flush mount the base plate isn’t difficult. You will need a standard router (not a palm size 1/4hp finishing router) and a 1/2” straight bit or similar bit for following a template. Set your cutting depth and remove majority of material from center of the area for the Base Plate. If you want crisp edges and tight fit then glue up a square template of exterior dimensions of baseplate. Use some scrap wood that is 2.5”-3” wide so that you have adequate support under outside portion of router base to avoid accidentally leaning/angling the router over the free hanging side above the recess area. You can lock the template into position on the bench top using the Blue Tape / CA glue trick (do search on YouTube if this is something new to you). Now route along the template sides for nice straight sides that mirror dimensions of Flush Mount Base Plate. This is where either a straight spiral bit and a bushing guide or a straight bit with ball bearing collar really help out. If you have any “Oops” you can backfill with epoxy or bust out a chisel and glue in a piece of wood to fill the gap.
Remember the section at rear of Flush Mount Plate where there is the rectangular cutout and some of the area directly behind (underneath mount plate) will need to be recessed an extra 1/8” deep. This allows the rear tail of the mounting plates to easily slide underneath the of the mounting plate to secure it in place. You will stop short of where the rear middle mounting screws go. You can do a test fit inserting a quick change plate into the mounting plate to determine how far to the rear that the QC plate seats underneath the rear of the mounting plate. Inline Fabrication sends a paper template to assist in aligning amount of overhang and location for drilling hole.
Last edited:
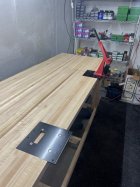
If you don’t want to mount the quick change Base Plate flush with bench top then you can simply mount it on top. Base Plate (flipped upside down so you can see underside) and the Spacer Plate (approx. 1/8” thick).
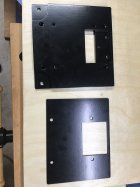
This is the two plates stacked with Spacer Plate on the bottom.
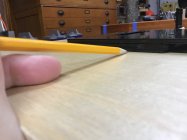
Sorry- my example of mounting on top of bench top is at workshop so above representation will have to do for now… Locate position to mount and then simply drill doles for the bolts and screw it down.

This is the two plates stacked with Spacer Plate on the bottom.

Sorry- my example of mounting on top of bench top is at workshop so above representation will have to do for now… Locate position to mount and then simply drill doles for the bolts and screw it down.
Last edited:
Ilikepie7
Silver $$ Contributor
Where did you get those metal nuts to replace the plastic wing nuts?Here is flush mounted. Just remember that if there is a drawer or cabinet door directly below where you Mount your press then might need to remove press every time you want to access the door/drawer. Ask me how I know
View attachment 1659959
View attachment 1659960
bozo699
Gold $$ Contributor
I was wondering the same thingWhere did you get those metal nuts to replace the plastic wing nuts?
Wayne
F Class John
NRA Life Member
You mean the T-Track? Yeah I did all that with a Dewalt cordless router. It's not perfect (my router jumped once) but overall if you take your time and with a. couple tricks you can easily do it.John, did you do the routing for a flush mount? I'm going to remodel my basement and I'm considering mounting my Area 419 permanently, but want my Dillon, Rockchucker, Henderson, etc to be able to be used as needed and not permanently affixed. I'm no wizard of a carpenter, but really like the concept if I can do the work myself.
F Class John
NRA Life Member
I like his metal nuts and I've been using something similar and they're so much easier no matter which style you get. Round goes on and off so much faster.
https://www.amazon.com/dp/B0792ZQVN2
https://www.amazon.com/dp/B0792ZQVN2
As I recall I bought them from McMaster Carr. I like the thumb nuts better than the wing nuts.Where did you get those metal nuts to replace the plastic wing nuts?
Edit: here is a link to the product
https://www.mcmaster.com/products/thumb-screws/knobs-1~/threaded-through-hole-knobs-6/
Last edited:
Another shout out to Inline Fab.
I bought a bunch of stuff several years ago. One of their press lighting systems failed rather quickly and I contacted the company to see what they would do. The owner said he would send a replacement part out immediately but I told him to hold off...the postage would be about as costly as the part. I told him that I was sure I would order more stuff in the near future and he could just add it in then. He thanked ME for being fair with him and said to remind him with my next order and he would do that.
Well, life got in the way and my next order wasn't for about 5+ years...until I took advantage of the memorial day sale this year. I reminded him of the communication and, low and behold, he sent not just the part but, the whole lighting system. I can't thank him enough for taking care of me and I will continue to order from Inline for any reloading items he produces, likely more often now that I am retired. They are a great company to do business with and their products are amazingly well thought out and built.
AlNyhus
Silver $$ Contributor
I used their short mount to move a press up and forward. It worked out well. The mounting hardware sent was pretty cheesy. The press mounting holes are 5/16". The holes in the plate are made 5/16" but the powder coating process makes them smaller. So their solution is to supply 1/4" dime store quality fasteners. Seriously...that's the solution? 
 It can't be much of a stretch to size the mounting holes so that the finished holes will be the correct size after powder coating. Or...sell a non-powder coated plate for those that aren't into cosmetics. In the end, I enlarged the too-small powder coated holes and mounted the press using actual heavy duty hardware. I also enlarged the flange holes.
I sent my thoughts to them...zero response. Good product but hold the fluff. It plays well with the social media influencer types, though.
Good shootin' -Al
-Al

I sent my thoughts to them...zero response. Good product but hold the fluff. It plays well with the social media influencer types, though.
Good shootin'

shoot4fun
Gold $$ Contributor
He is paying attention but maybe you aren't?Yeah I do. Just dont need inline products to do it. Pay attention
Or possibly you just don't take reloading and shooting to the level of all the Inline Fab users out there (and especially our forum).
I load for many cartridges of all sizes from the tiny 17 Ackley Hornet to the quite large 338 Lapua Magnum.
There are tools and presses that do small jobs better and those that excel at the big stuff. Having the Inline QC Plates keeps me from having to find bench top space for four presses, not to mention other tools I regularly use but like stowing out of the way.
I certainly don't want my behemoth Dillon 550Bout on a bench and in the way at this point.
bozo699
Gold $$ Contributor
That looks so similar to mine.Built my bench from a chunk of bowling alley, set on 4"x6" legs inset 2x6 perimeter. Because of that I couldn't mount like most shown here. Instead, I used a 1" chunk of plywood, recessed mounting holes to my bench then routed the slot and attached the base plate.
View attachment 1667519
Wayne
Similar threads
- Replies
- 9
- Views
- 632
- Replies
- 4
- Views
- 1,021
Upgrades & Donations
This Forum's expenses are primarily paid by member contributions. You can upgrade your Forum membership in seconds. Gold and Silver members get unlimited FREE classifieds for one year. Gold members can upload custom avatars.

Click Upgrade Membership Button ABOVE to get Gold or Silver Status.
You can also donate any amount, large or small, with the button below. Include your Forum Name in the PayPal Notes field.
To DONATE by CHECK, or make a recurring donation, CLICK HERE to learn how.

Click Upgrade Membership Button ABOVE to get Gold or Silver Status.
You can also donate any amount, large or small, with the button below. Include your Forum Name in the PayPal Notes field.
To DONATE by CHECK, or make a recurring donation, CLICK HERE to learn how.


