I too experimented with a couple of circuits for inductive annealing. I have a box of extra MOS power FETs and high quality capacitors as well as copper tubing and ferrite cores and Litz wire.
Then along came Annie!
By profession I am an electronic engineer so building my own induction annealer didn't sound too difficult, but...
Building electronic stuff isn't fun anymore!
I bought an Annie. It took a while to get it with all the longshoreman strikes and Fluxeon moving to Arizona, but I have it now! I grabbed a bunch of 284 WIN and 6BRX cases to experiment with Tempilak to get the right time. Well, 1/2 hour later, I had 200 cases annealed!
I would recommend trying to copy the coil used by Fluxeon. They will sell you the cores as well as some Litz wire for a reasonable price.
As brass is non-ferrous, it puts different demands on the induction heater. A simple copper coil won't hack it without a lot of power. You do need a flux concentrator like a ferrite core with a gap big enough to insert a case neck. Your oscillator coil needs to be more turns, maybe 10 or so and it must be coupled by a couple turn secondary to a ferrite cored coil with maybe 5 turns. And to cut the gap in one side of the core pair, you will need a diamond blade Dremel type tool. And, water must flow over the core while you cut it or it will splinter into pieces. Ferrite is as brittle as glass
Hollywood said:
This is the main unit. Going to try to build a timer or a thermocouple trigger to a door actuator that will hold the case in place and release it at the appropriate time/temp instead of the pliers.
I think this is a brilliant idea.
The strait copper coil out of 12/2 house wire does not cut it. It works well for only a few cases then the coil itself gets too hot and glows red before the the case is hot enough. I was unable to get 1/4 od copper tube wound to a small enough diameter that I wanted. So I got some 1/8 od tubing and that worked well. I will end up soldering the 1/8 into the 1/4 and run water threw the coil via a 12v mini pump to remove the extra heat out of the coil material itself. Per itchyTF suggestion. I'll post more pics when it comes together a little more.
Hey Hollywood, thinking of doing this myself. How did your project turn out?
Hey Hollywood, thinking of doing this myself. How did your project turn out?
Turned it very well. Thermocouple idea did not work though. Got the coil design figured out. It's now water cooled. It has a trap door for the case. Coil activation and trap door all on a timer, controlled down to .01 second. I was helped with the trap door design by gina1 another member of the forum.
The strait copper coil out of 12/2 house wire does not cut it. It works well for only a few cases then the coil itself gets too hot and glows red before the the case is hot enough. I was unable to get 1/4 od copper tube wound to a small enough diameter that I wanted. So I got some 1/8 od tubing and that worked well. I will end up soldering the 1/8 into the 1/4 and run water threw the coil via a 12v mini pump to remove the extra heat out of the coil material itself. Per itchyTF suggestion. I'll post more pics when it comes together a little more.
Hollywood, I heard that you can fill the 1/4" tube with play sand to make the bend. I was just trying to do a 3/4" inner diameter and The tube was crushing while bending. I need to get some play sand.
I'm using the same induction circuit with a 48v / 12.5AMP (600w) mean well power supply. I tried a coil using 3/16" tube turned to a 0.70" inner diameter 6 coils, it wasn't generating enough heat. Although I may have damaged my induction circuit.
Do you have a working coil design? How many watts?
It's funny to see so many PLC recommendation. I'm going to use an Arduino Nano ($2) and an SPI LCD ($24). I'll use it to drive a trap door using a little 24v solenoid. That's the easy part for me.
waldo
1/8 in tube soldered into 1/4 in is what's needed, it has to be liquid cooled to not overwork the PS. The work coil in the video is my final design. You can vary your amp draw by reducing the amount the case is inside the work coil. Having the case flush with the top of the work coil should run close to 12 amps.
Thanks HW, I am going to start building mine in the next couple weeks. I appreciate some of the information that you have shared.
Waldo,
I had a friend make me some winding mandrels -
Approx. resulting coil ID from top to bottom- .470, .525, .575 & .716
The big one doesn't really work with my system as it stands. It was an experiment.
I call this my shaping mandrel. It's for bending the ends.
The mandrels keep the distance between turns close and consistent.
Pictures aren't seem to be working.
Waldo,
I had a friend make me some winding mandrels -
Approx. resulting coil ID from top to bottom- .470, .525, .575 & .716
The big one doesn't really work with my system as it stands. It was an experiment.
I call this my shaping mandrel. It's for bending the ends.
The mandrels keep the distance between turns close and consistent.
Itchy let me know if you get this working. I was thinking about the trap door design, might ask AdamJ if he can 3D print/resell something.
Hollywood is that annealing only the neck/shoulder or is some of the sides getting annealed as well?
Gina1 here.....
How much of your case gets annealed is dependent on how long you keep the inductor PCB powered on. That is set up by your timer.
In my case on 6mm dasher cases 5.4 seconds, for the neck and a little ways pass the shoulder.
BTW hollywood and I worked on this together.
-
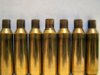
cases.JPG
142.6 KB
· Views: 87
Pictures aren't seem to be working.
They show up in the post and in your reply.
Itchy let me know if you get this working. I was thinking about the trap door design, might ask AdamJ if he can 3D print/resell something.
Get the annealer working? It does.
Bigger and heavier than it needs to be. Optical sensor in lower phenolic block to detect
the presence of a case.
Top view of work coil. Brass blocks for electrical connection. Screws are just snug, don't want to deform the copper.
The guts. A little busy in there.
Underside of phenolic blocks with trapdoor.
Blurry close up of tubing & brass blocks.
Trapdoor held half open.
Just did a few cases in a dark room. 6-7 seconds to see a faint sine of red in the case. It seems to only really heat the area inside the work coil and dosent sow much heat travel like I've seen pics of if torches are used.
My question, is heating just at the bottom of the case shoulder ideal and I should not try to go any further down the case?
Heat travels regardless of method of heating, it's a characteristics of brass and not how it is heated. If you use gas, the area being immediately heated will be much hotter and if you heat it enough, you will see the same faint sign of red but only in the area the torches are pointing at.
In terms of where to heat, you want to anneal the neck and shoulder as evenly as possible. The reason is you size the neck and you bump the shoulders back.
Out of curiosity, is everyone using the 1/8" to 1/4" tubing design, with a taper at the end? How many coils, around 5? I am only supplying my ZVS with 600W as that is the power supply I was able to source, and it seems as though it may not have enough jam. Thoughts?
I run straight 1/8" tubing on mine.
I use 1/8" tubing for the coil but solder it into 1/4" heavy walled tubing. Images on my post above have disappeared.


