• This Forum is for adults 18 years of age or over. By continuing to use this Forum you are confirming that you are 18 or older. No content shall be viewed by any person under 18 in California.

Hot-rodding my Tactical Stock 4: Inletting for PTG Bottom Metal

Savage owners have very limited options when it comes to adding a detachable box magazine to their stocks. PTG has stepped in to fill the void. As far as I can see they are the only product that accommodates the newer Savage designs where the bolt release is in the trigger guard. When PTG came out with their new design for Savage, I jumped on board and received one of the first deliveries back in August.

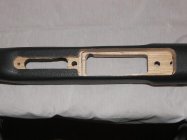
My previous posts in this series show the work I have done to customize a Boyd’s Tacticool stock for my Savage Model 11 chambered in .260. I described the jig I built to secure a stock while it is being machined. I also developed a technique for generating patterns out of plywood to use with a Bosch Colt router equipped with an array of template bushings. I generated four different patterns to create the cavity that would accept the PTG bottom metal.

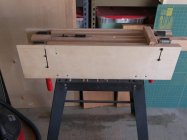
Jig

Here is a picture of the stock jig ready for serious work!
 

Attachments

  • Detachable Box Magazine 1.jpg
    Detachable Box Magazine 1.jpg
    70.4 KB · Views: 56
Patterns


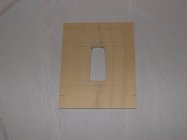
A. Pattern A outlines the shape of the nose of the bottom metal that protrudes all the way through the stock and up into the action. I used a ½ inch template guide and a ¼ straight bit to make this cut. Because of the depth of this cut, I had to approach it from both sides – first from the underside of the stock and then from the barrel channel.
 

Attachments

  • Detachable Box Magazine 24.jpg
    Detachable Box Magazine 24.jpg
    100.7 KB · Views: 30
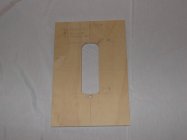
B. Pattern B provides a shelf for the Outer flange of the bottom metal. The depth of this cut is critical as it influences the clearance between the bolt head and the feed lips of the magazine.
 

Attachments

  • Detachable Box Magazine 25.jpg
    Detachable Box Magazine 25.jpg
    102.7 KB · Views: 32
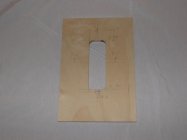
C. Pattern C creates a channel for the trigger and bolt release. The bolt release is a small sliding nub that rides behind the bolt release lever on the side of the trigger. When this little nub is slid backwards, the bolt release opens. The depth of this cut also influences the clearance between the bolt head and the feed lips of the
magazine.
 

Attachments

  • Detachable Box Magazine 26.jpg
    Detachable Box Magazine 26.jpg
    103.2 KB · Views: 27
D. I discovered why Savage steps the cut for the outer flange of bottom metal. When I used Pattern A and cut deep enough to create the proper clearance between the bolt head and the feed lips, I cut into the slot for the recoil lug. I created Pattern D with a smaller perimeter so the next innermost flange would seat properly without cutting into the slot for the recoil lug. The next rifle I will inlet will look a little prettier.
 

Attachments

  • Detachable Box Magazine 27.jpg
    Detachable Box Magazine 27.jpg
    35.5 KB · Views: 19
The depth of cuts B and C have to be successively tested for proper clearance between the bolt head and the feed lips of the magazine. A call to Tech Support at PTG told me that the clearance should be .020-.025 inches. This adjustment assures that the installed assembly will feed cartridges reliably. I tested the rifle at the range several times before I converged on the final solution.

My Savage factory action screws turned out to be too short for the new bottom metal. I bought several ¼-28 machine screws and cut them to the proper lengths to hold the action securely and still clear the bolt and bolt lugs.
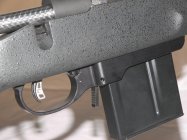
Here are pictures of the finished product. (The new scope is a Steiner Military 3-12x50.)
 

Attachments

  • Detachable Box Magazine 16.jpg
    Detachable Box Magazine 16.jpg
    57.5 KB · Views: 35
  • Detachable Box Magazine 17.jpg
    Detachable Box Magazine 17.jpg
    51.4 KB · Views: 22
Here is a close-up of the installation. With the bolt retracted you can see the little nub that operates the bolt release.
 

Attachments

  • Detachable Box Magazine 21.jpg
    Detachable Box Magazine 21.jpg
    106.2 KB · Views: 30
Nice piece of work. I started out with the templates but my stock turned out to be too deep for it to work. Almost 4 inches, so after the router cuts, I had to use the old drill press and chisel method. See "testing pics, new stock build" on the main board, and you'll see what I mean. Backed myself into a corner on that one.
 

Upgrades & Donations

This Forum's expenses are primarily paid by member contributions. You can upgrade your Forum membership in seconds. Gold and Silver members get unlimited FREE classifieds for one year. Gold members can upload custom avatars.


Click Upgrade Membership Button ABOVE to get Gold or Silver Status.

You can also donate any amount, large or small, with the button below. Include your Forum Name in the PayPal Notes field.


To DONATE by CHECK, or make a recurring donation, CLICK HERE to learn how.

Forum statistics

Threads
166,299
Messages
2,216,237
Members
79,554
Latest member
GerSteve
Back
Top