Ned Ludd
Silver $$ Contributor
The Labradar is a tremendously valuable piece of equipment for reloaders that consider velocity measurements a critical part of load development. Nonetheless, many of those that use the Labradar have experienced dropped shots, or having their neighbor's muzzle blast trigger the unit inappropriately.
I first became aware of the existence of an external kinetic trigger for the Labradar from posts by F Class John here at the forum. Based on his advocacy of the kinetic trigger, I decided to purchase one for myself. I purchased the same unit John described, as well as a soft plastic picatinny mount, both of which are manufactured by JKL Precision (https://jklprecision.com/product/labradar-trigger/). The only issue with which I was not completely satisfied was the velcro mounting solutions provided. I'm sure they work just fine, but I find velcro to be problematic over the long haul, and thus decided to create a quick-detach magnetic mount, using the JKL picatinny holder and a short section of picatinny rail I had lying around.
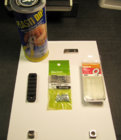
The components I used to assemble the QD magnetic kinetic trigger mount mount are illustrated in Fig. 1. The parts list and cost of each item are shown in the Parts List.


The magnets were obtained from totalElement (https://totalelement.com/) and the rest of the components purchased at Lowes or Home Depot.
I started with a 2.75" picatinny 6-slot rail section that had already two pre-drilled holes, a 1.5" x 1/2" x 1/4" permanent magnet, countersunk on BOTH sides, and two 1/2" x 1/2" x 1/4" permanent magnets, countersunk only on one side. The primary reasons for using two different types of magnets was to obtain plenty of grip, use the holes that were already drilled, but not have to drill more than two extra holes.
The picatinny rail segment was marked and 9/64" holes drilled using a drill press from bottom to top to secure the center 1.5" magnet (Fig. 2).

The 9/64" holes were then countersunk using a 5/16" bit to accommodate the small nut and washer for each screw. I used a very small file to remove any flashing and smooth the edges of the holes prior to attaching the magnets, as shown in Fig. 3. The top of the picatinny rail following attachment of the magnets is shown in Fig. 4. It is important to note that the 1/2" square magnets will only seat adjacent to the center 1.5" magnetic in one orientation without being violently repelled, which is the reason for purchasing the center magnetic with countersunk holes on both sides.


I first became aware of the existence of an external kinetic trigger for the Labradar from posts by F Class John here at the forum. Based on his advocacy of the kinetic trigger, I decided to purchase one for myself. I purchased the same unit John described, as well as a soft plastic picatinny mount, both of which are manufactured by JKL Precision (https://jklprecision.com/product/labradar-trigger/). The only issue with which I was not completely satisfied was the velcro mounting solutions provided. I'm sure they work just fine, but I find velcro to be problematic over the long haul, and thus decided to create a quick-detach magnetic mount, using the JKL picatinny holder and a short section of picatinny rail I had lying around.
The components I used to assemble the QD magnetic kinetic trigger mount mount are illustrated in Fig. 1. The parts list and cost of each item are shown in the Parts List.


The magnets were obtained from totalElement (https://totalelement.com/) and the rest of the components purchased at Lowes or Home Depot.
I started with a 2.75" picatinny 6-slot rail section that had already two pre-drilled holes, a 1.5" x 1/2" x 1/4" permanent magnet, countersunk on BOTH sides, and two 1/2" x 1/2" x 1/4" permanent magnets, countersunk only on one side. The primary reasons for using two different types of magnets was to obtain plenty of grip, use the holes that were already drilled, but not have to drill more than two extra holes.
The picatinny rail segment was marked and 9/64" holes drilled using a drill press from bottom to top to secure the center 1.5" magnet (Fig. 2).

The 9/64" holes were then countersunk using a 5/16" bit to accommodate the small nut and washer for each screw. I used a very small file to remove any flashing and smooth the edges of the holes prior to attaching the magnets, as shown in Fig. 3. The top of the picatinny rail following attachment of the magnets is shown in Fig. 4. It is important to note that the 1/2" square magnets will only seat adjacent to the center 1.5" magnetic in one orientation without being violently repelled, which is the reason for purchasing the center magnetic with countersunk holes on both sides.


Last edited:


