You are using an out of date browser. It may not display this or other websites correctly.
You should upgrade or use an alternative browser.
You should upgrade or use an alternative browser.
Grading a Caliper
- Thread starter Rick Ratzlaff
- Start date
-
- Tags
- test caliper
butchlambert
Site $$ Sponsor
That is why I use micrometers for accurate measurements. I have 175 Deltronic pins and a set of gauge blocks. I don't care what any of my calipers say, I use micrometers for accurate measurements.For a 6 inch rack and pinion Dial caliper clean and adjust slide TENSION.
A gage pin measured at 2 points along the jaws verifies parallelism.
Once the initial rack length for outside measurement is verified with a gage block (4 inchs should be adequate) It is not likely to change unless damaged, dirty, or worn.
The rack can be verified at a few lengths with the appropriate blocks.
Note that thermal expansion of S.S. is about 6 microinches per inch and the rack was made to be accurate @ 68 degrees F.
For measurement @ 88F that would be 20F X 6 X 4 or or about a half thou for a 4 inch measurement. Readings would be LOW due to a longer rack.
Don't HOLD the caliper for long periods or body temperature might cause readings to change with time. Try it.
For measurements of an inch or less thermal effect is about a needle width.
For most dial calipers the rack pitch is 0.025" per tooth. The teeth of the rack, pinion and needle gear train are subject to dirt and wear.
Running a Dial Caliper in or out several inches FAST increases wear.
Remember that there is a delicate gear train in there.
Take one apart to see all the cute little parts
Idler gears are spring loaded to help reduce backlash caused by wear.
Try to feel/visualize thumb wheel movement to a slow smooth dial/needle movement, looking for jumps or erratic movement.

How does a dial caliper work? - Wonkee Donkee Tools
How does a dial caliper work? Shop for Dial Calipers Dial calipers use a rack and pinion mechanism system, which transfers the linear movement of the jaws of the caliper to the rotary motion of the dial indicator. Inside the dial there is a train of gears which mechanically drive the dial...www.wonkeedonkeetools.co.uk
Operator FEEL can cause errors that are reduced with PRACTICE (experience) measuring KNOWN lengths, flat and round.
Feel is likely the major measurement error in caliper use, with wear coming up second. These are CRITICAL for repeatability.
Sometimes absolute accuracy isn't needed, like sorting parts.
Relative measurements can be used to find small or large dimensions.
Repeatability of the mechanism and the USER will determine how accurate YOUR measurements are.
A cheap pin gage set might be useful for PRACTICE.
Take a 0.061"-0250"set and dump them on a towel. Sort them back into the box with your Caliper. Check your work.
Fred Bohl
Gold $$ Contributor
Back in the past, a piece of ground steel called a standard would be included with the devise. In that case a gage block could be used as s standard, but the standard could not be used as a gage block. Now days in the world of ISO, everything is only a standard if it is calibrated and certified by an ISO certified lab. Sighis standard the same as gage block?
Most 0-1" mics don't include a "standard". You set Zero and depend on the mic head.
1"-2", 2"-3", 3"-4" mics usually include a setting standard.
Internal mics usually include (or need ) a setting ring.
Depth mics (over one inch) need Blocks to set.
Pins and blocks are good to have for incremental checks.
The Speed Mic is really nice.
In addition to "setting" a mic, various pins, blocks and rings might be needed to check mics for wear.
An Optical Flat might also be handy to check anvils for flatness and squareness.
Here's a few of my mics.

For most reloading measurements (brass, bullets and cartridges) a 0.001" caliper is likely "good enough".
Until I got the SpeedMic I used calipers a lot more for repetitive measurements.
How come reloaders need Jo-Blocks, but are content with saving a 'Special Bullet' to calibrate their scales?
1"-2", 2"-3", 3"-4" mics usually include a setting standard.
Internal mics usually include (or need ) a setting ring.
Depth mics (over one inch) need Blocks to set.
Pins and blocks are good to have for incremental checks.
The Speed Mic is really nice.
In addition to "setting" a mic, various pins, blocks and rings might be needed to check mics for wear.
An Optical Flat might also be handy to check anvils for flatness and squareness.
Here's a few of my mics.

For most reloading measurements (brass, bullets and cartridges) a 0.001" caliper is likely "good enough".
Until I got the SpeedMic I used calipers a lot more for repetitive measurements.
How come reloaders need Jo-Blocks, but are content with saving a 'Special Bullet' to calibrate their scales?
Last edited:
WOW - I didn't mean to stir up such a dialog. But good stuff. If I can figure out how to add a spreadsheet, I'll show you my farmer fix test.
I took 10 cases and measure each one 10 time in a round robin format. First with one caliper, then with the second (different make) caliper. Looks to me that they are equally good, or bad
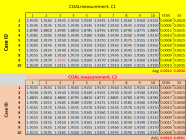
I took 10 cases and measure each one 10 time in a round robin format. First with one caliper, then with the second (different make) caliper. Looks to me that they are equally good, or bad

I guess I'll throw in my 2 bits as well. The gauge R&R referenced on the 1st page is where its at. I've used a LOT of different calipers and mics over the years working in machine shops, reloading, and doing quality inspections on various pieces of automation. On my reloading bench I have a set of calipers from Midway that I bought on sale over 25 years ago along with a nice set of Starrett calipers that I've had for a little over a decade, and a Mitutoyo digital caliper with a dead battery that's about 25 years old. On my welding bench I have a cheap set of SPI calipers that I often use as a scribe. At work, at my desk I have the same pair of Starrett calipers (bought 2 pair at the same time, and took the 2nd pair to work a my personal calipers).
Typically speaking, if you NEED better accuracy and precision than 0.005", you should really be using a micrometer. the accuracy of a caliper is often misleading because of its precision. It may give a consistent reading for a specific part, but the accuracy of that reading is the unknown part. In order to say that the caliper is accurate to within 0.002", the caliper needs to be checked regularly against NIST tracible standards at every inch across its range of measurements. For reloading, we really don't need to know that something is 2.731" +/-.0005" We need to know that a specific dimension is consistent across a number of different cartridges, and compare those measurements to our own makeshift standard (such as a dummy round). So for a reloading, you want smooth, consistent operation, and almost any set of dial or digital calipers will give you that. By comparison, if you're in a machine shop and you're supposed to be making a part that's 0.271" +/- 0.001" wide, you're absolutely going to be using a set of micrometers to measure the part because you'll know that your Brown and Sharp calipers just can't be trusted to ensure that level of accuracy and precision even though your calibration department checks their calibration regularly, and you've used them every day for over a decade with no issues.
Typically speaking, if you NEED better accuracy and precision than 0.005", you should really be using a micrometer. the accuracy of a caliper is often misleading because of its precision. It may give a consistent reading for a specific part, but the accuracy of that reading is the unknown part. In order to say that the caliper is accurate to within 0.002", the caliper needs to be checked regularly against NIST tracible standards at every inch across its range of measurements. For reloading, we really don't need to know that something is 2.731" +/-.0005" We need to know that a specific dimension is consistent across a number of different cartridges, and compare those measurements to our own makeshift standard (such as a dummy round). So for a reloading, you want smooth, consistent operation, and almost any set of dial or digital calipers will give you that. By comparison, if you're in a machine shop and you're supposed to be making a part that's 0.271" +/- 0.001" wide, you're absolutely going to be using a set of micrometers to measure the part because you'll know that your Brown and Sharp calipers just can't be trusted to ensure that level of accuracy and precision even though your calibration department checks their calibration regularly, and you've used them every day for over a decade with no issues.
Personally, every set of 0-1" mics I've ever seen came with a 1" standard. Anything larger came with standards for the min and max of the measurement range. That doesn't mean that I've seen very many though.Most 0-1" mics don't include a "standard". You set Zero and depend on the mic head.
FWIW, you're typically going to want to do 15 to 20 measurements on at least 3 different pcs for a total of 45 to 60 data points. That tells you how repeatable the tool is for YOU. If you use 3 different people, and do 10 measurements per person for 3 different parts (90 data points), you will know how the tool performs in general. From there, its a question of how critical the dimension is. 3 STDV in each direction is common assuming there are no outliers. If there are outliers, those need to be addressed (why did they happen) and then they need to be replaced, or you need to increase your sample size (drastically) to give them more chances to occur. If the dimension is critical (life/death), 4stdv is a minimum and a single outlier is basically considered an overall failure of your test method.WOW - I didn't mean to stir up such a dialog. But good stuff. If I can figure out how to add a spreadsheet, I'll show you my farmer fix test.
I took 10 cases and measure each one 10 time in a round robin format. First with one caliper, then with the second (different make) caliper. Looks to me that they are equally good, or bad
View attachment 1601877
Under NO circumstances do you EVER take an average of your STDV or ES when evaluating a test method. When comparing multiples like that, you're basically looking at the maximums because that's the best that you can commit to. In your case, the best you can commit to with either caliper for that measurement is a Stdv of 0.0017", which means you can say with (I think) 99.9% certainty that your measured value is within 0.005" of its actual dimension, which is about right for a caliper. In order to say that your measurement system is any better than that, you have to be able to show why some of the extreme variations occured which includes demonstrating those failure modes (turn the problem "on" and then turn the problem "off" on command). Once you can do that, you can replace the measurements, but only so long as you have reliable measures in place to ensure that the "problems" remain in the "off" condition.
Last edited:
Most of the measurements that I take with calipers are less than an inch, and those that are more are not that critical. For serious work I use a micrometer that measures to .0001. Some years back a fellow gifted me a couple of different gauge blocks that had gone out of spec. because of corrosion being polished off. Their shop has a bench mic, that is used to check standards and he measured and labeled the blocks to five places (if memory serves, and sent them to me in little cases. every so often I get out all of my calipers and mics and measure the blocks. So far so good. I have learned how to adjust calipers for parallelism, and mics for spindle thread fit and zero. The mics stay in their cases , and I am always careful when handling any measuring tool. The caliper that travels in my range kit is my cheapest, and even it is checked like the others.
To qualify a measurement process in a shop/factory you DO need to evaluate multiple inspectors.
Using test articles that are worthy of being measured.
That means surface finish, taper, roundness of the part.
The measuring instrument MUST perform to specs with a GOOD inspector, on good parts, in a good environment.
At the factory I worked at, as a senior Metrologist, we checked calibration on hundreds of calipers, cal cycle after cal cycle, for years. Cleaned, stoned jaws, adjusted the grub screws for proper jaw tension, in a controlled environment, IF the Extreme Spread, in the lab, showed outside +/- 0.001" it was rejected. We checked for beam errors (per inch up to full travel), spot checked per 0.025" tooth, and 0.1" gear errors (dirt and wear).
Send those same calipers out to the shop with 100+ machinists/quality inspectors using any one of a few hundred calipers, in shop environments, the process tolerance was expanded.
Caliper performance is the sum of Human, Tool, Part, and environment.
For the Home Reloader, errors across multiple people and multiple instruments is not normally included in an process evaluation. Measuring parts like brass cases might not be the best way to evaluate an individual or an instrument. Especially after the Home Reloader has messed with the cases .
.
Case length, or COAL with pointed bullets, will have variances due to poor part design (not suitable for precision measurement). CBTO and CBTDatum measurements are plagued with measuring a tapered part, usually with an accessory. Accept the fact that some measurements will always be in the good enough range.
I propose a home test, over months and months of testing.
You, and only you and one set of decent calipers. If you must, compare two calipers.
Clean and adjust, and check ZERO. Once, 3 times, 10 times, 50 times.
If you EVER get a whole thousandths spread, something is WRONG.
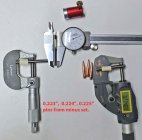
Select 3 gage pins, separated by 0.001", like 0.223", 0.224" and 0.225".
Put a small piece of masking tape over the etched size.
Zero, measure one pin, the next, and the next.
Do this for 7000 times
Kidding. If you can't pick out the three pin sizes from your measurements 99.999% of the time,
something is WRONG.
There might be a small amount of taper or roundness with the bullets that you didn't see with the pins, but good bullets should be fairly uniform (probably better than +/- 0.001"). My Hornady Ogive tool ALWAYS (since new) measures almost 0.001" short requiring a zero reset. Ogive measurements will also include errors between bullet taper and the tool.
Not best for accurate measurements, but oh well.
So, back to the bullets.
Check ZERO, measure the pins, measure a few bullets.
Bullet diameters, loaded neck diameters are just made for caliper measurements.
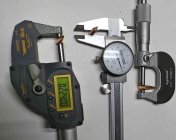
Now check your bullet diameter measurements with a one tenth (or better) micrometer.

Using test articles that are worthy of being measured.
That means surface finish, taper, roundness of the part.
The measuring instrument MUST perform to specs with a GOOD inspector, on good parts, in a good environment.
At the factory I worked at, as a senior Metrologist, we checked calibration on hundreds of calipers, cal cycle after cal cycle, for years. Cleaned, stoned jaws, adjusted the grub screws for proper jaw tension, in a controlled environment, IF the Extreme Spread, in the lab, showed outside +/- 0.001" it was rejected. We checked for beam errors (per inch up to full travel), spot checked per 0.025" tooth, and 0.1" gear errors (dirt and wear).
Send those same calipers out to the shop with 100+ machinists/quality inspectors using any one of a few hundred calipers, in shop environments, the process tolerance was expanded.
Caliper performance is the sum of Human, Tool, Part, and environment.
For the Home Reloader, errors across multiple people and multiple instruments is not normally included in an process evaluation. Measuring parts like brass cases might not be the best way to evaluate an individual or an instrument. Especially after the Home Reloader has messed with the cases
Case length, or COAL with pointed bullets, will have variances due to poor part design (not suitable for precision measurement). CBTO and CBTDatum measurements are plagued with measuring a tapered part, usually with an accessory. Accept the fact that some measurements will always be in the good enough range.
I propose a home test, over months and months of testing.
You, and only you and one set of decent calipers. If you must, compare two calipers.
Clean and adjust, and check ZERO. Once, 3 times, 10 times, 50 times.
If you EVER get a whole thousandths spread, something is WRONG.
Select 3 gage pins, separated by 0.001", like 0.223", 0.224" and 0.225".
Put a small piece of masking tape over the etched size.
Zero, measure one pin, the next, and the next.
Do this for 7000 times
Kidding. If you can't pick out the three pin sizes from your measurements 99.999% of the time,
something is WRONG.
There might be a small amount of taper or roundness with the bullets that you didn't see with the pins, but good bullets should be fairly uniform (probably better than +/- 0.001"). My Hornady Ogive tool ALWAYS (since new) measures almost 0.001" short requiring a zero reset. Ogive measurements will also include errors between bullet taper and the tool.
Not best for accurate measurements, but oh well.
So, back to the bullets.
Check ZERO, measure the pins, measure a few bullets.
Bullet diameters, loaded neck diameters are just made for caliper measurements.
Now check your bullet diameter measurements with a one tenth (or better) micrometer.


Last edited:
Old Navy
Gold $$ Contributor
That is a good tool but only for those that can still see.100%
Although there are significant quality variations in what we can source today.
Some 50 yrs ago pop gave me a set on 6"/150mm Kanon calipers and today they are still some of the best I have used albeit they only had a vernier scale.
What sets them above others is the thumbwheel allowing for better 'feel' to provide repeatable measurements.

I like Vernier calipers. They just seem more durable. While they have some of the same issues as a Dial caliper there is no complicated mechanism to wear or get dirty, but they still have a Beam to keep in good shape, Jaws that can become loose and misaligned. Readings still depend on FEEL.
Good reading glasses needed.


Good reading glasses needed.


Last edited:
Similar threads
- Replies
- 87
- Views
- 7,733
- Replies
- 65
- Views
- 3,804
Upgrades & Donations
This Forum's expenses are primarily paid by member contributions. You can upgrade your Forum membership in seconds. Gold and Silver members get unlimited FREE classifieds for one year. Gold members can upload custom avatars.

Click Upgrade Membership Button ABOVE to get Gold or Silver Status.
You can also donate any amount, large or small, with the button below. Include your Forum Name in the PayPal Notes field.
To DONATE by CHECK, or make a recurring donation, CLICK HERE to learn how.

Click Upgrade Membership Button ABOVE to get Gold or Silver Status.
You can also donate any amount, large or small, with the button below. Include your Forum Name in the PayPal Notes field.
To DONATE by CHECK, or make a recurring donation, CLICK HERE to learn how.


