• This Forum is for adults 18 years of age or over. By continuing to use this Forum you are confirming that you are 18 or older. No content shall be viewed by any person under 18 in California.

Fiber Laser Settings

It's been a while since I set mine up, but make sure the rotary is set up correctly. Meaning; if lightburn tells it to turn 180 degrees, it actually turns 180 degrees.

When I first got it going the number in the rotary setup was inaccurate for the steps per rotation and was only turning about 2/3. Omtech says 12800 is the number which I found in Omtech’s FAQ page. I then tested that for full revolution and it seems to accurate.
 
Also... I believe for best results, you need to NOT use a crosshatch. So the laser should only travel the direction of your rotary spindle. I might be wrong, but that's my amateur understanding.
 
Try "run all shapes in each slice"

I tried that one, it was a no go.

Yes, “laser everything” said to turn off crosshatch when running a rotary, or at least a roller type over a chuck type. I turned it off regardless.

Do you know how to mess around with the slices? That is what seems to be out of order. They are broken up but not in sequence.
 
Well, insert hand on forehead image here… realizing the chuck was starting on the left and going right all I had to do was flip the switch for “reverse rotary direction” and then it work.
Thanks! I have a feeling this will help me in the future. I don’t use a rotary but the one whom we must obey wants me to laser some Yeti cups so I suspect one is coming :)
 
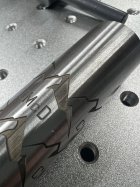
On to the next head scratcher… I am running .200 split size and have ran up to .100 overlap and it doesn’t seem to do anything to get rid of the split lines. Any ideas?

IMG_3638.jpeg
 
Last edited:
So my split size is set at .005" or .127mm.

Run whole shapes if possible. (Set your layer to this also) You'll have to figure out how big of a shape you can run without distortion. It's circumference dependant. I would guess you'd be around .5-.75" for a part as big as you posted.
 
Diameter is good, .942 in this case. I tried going up on focus and it didn’t seem to do much as far as cleaning up the split lines.

So you are running pretty small split sizes then? I took the overall length of the graphic and divided it by 5 (.1884 per split) and ran with that as my split size. Sounds like you have a lot of processing slices correct?

.……………………………..

Update:

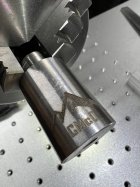
I ran .005 split which is better, but the “floor” of the engraving looks kinda crummy.

For context I am running 4 sub-layers. I have no idea if that makes sense really, it just does in my head.

2 roughing passes at different scan angles, 95% power, 1 finishing pass at 0 scan angle, 32.50 power and a line pass for edges

I can post snap shots of all the layers if you’d think it helps?

IMG_3646.jpeg
 
Last edited:

Upgrades & Donations

This Forum's expenses are primarily paid by member contributions. You can upgrade your Forum membership in seconds. Gold and Silver members get unlimited FREE classifieds for one year. Gold members can upload custom avatars.


Click Upgrade Membership Button ABOVE to get Gold or Silver Status.

You can also donate any amount, large or small, with the button below. Include your Forum Name in the PayPal Notes field.


To DONATE by CHECK, or make a recurring donation, CLICK HERE to learn how.

Forum statistics

Threads
167,367
Messages
2,231,234
Members
80,377
Latest member
Jahnny
Back
Top