Follow along with the video below to see how to install our site as a web app on your home screen.
Note: This feature may not be available in some browsers.
This Forum is for adults 18 years of age or over. By continuing to use this Forum you are confirming that you are 18 or older. No content shall be viewed by any person under 18 in California.
Several other threads on E targets that I have read have focused on mostly accuracy, certification and a couple of other user preferences and I do not think I have any more to learn from reading more replies on these issues. I would like to hear some reports on how the various brands compare in other areas specifically installation and maintenance. What annual maintenance cost can a club expect? How do the various brands compare on ranges where they must be set up and removed for each use, our club uses a military range and when we leave for the day or weekend the range has to look like we were never there. What are current prices including complete systems and various replacement parts might be helpful.
Perhaps P.M. 'SDDasher'...Wes shoots matches on Eglin AFB, Hurlburt Field and E-targets are used. He may have some insight as far as how they are set-up/torn down and the time involved, target brand etc.
How do you control the squareness of the installation? My feeble mind thinks the geometry is important to positional accuracy as one gets away from center.
How do you control the squareness of the installation? My feeble mind thinks the geometry is important to positional accuracy as one gets away from center.
I depend on the squareness of the target frame. I use this method for the Rattlesnake target frames. I used to use a horizontal 6' 1x6 slat with vertical endpieces as a cross piece and aligned it with marks on the vertical slats to assure horizontal spacing and vertical alignment but I gave that up since I was not concerned with ultimate accuracy.
I shot my first E-target match yesterday. I can't shoot matches without a puller, and pullers don't pull fast enough for me to lie prone for 20+ shots. So for me, it's E-target or nothing. I may still not be able to go very often, but I feel the ET's are the wave of the future. I look forward to sitting in my living room and hitting the website for a match, watching all the shots on all the targets, and seeing the match play out for all the great shooters I know out there. That'll keep me from falling asleep in front of Wheel of Fortune in the nursing home. I want a 4-panel screen shot, showing a list of shooters on the line, with one panel through a spotting scope, so I can dope the mirage, and another showing the line and all the available wind flags, etc. Then I can plot every shot and replay the ones I miss (this is going to be a YouTube Live show). The fourth panel will have the E-target display, and I want to be able to see all the data - SD's, velocity at the target, running totals. I want to be able to toggle through all the shooters, and also to be able to see each individual hit as it is scored, and that's what I'll keep track of, like scoring a baseball game. I paid extra (well worth it) to shoot with E-targets; I'd pay to see the live webcast. Thanks to whoever is doing the heavy lifting on this project, especially at Bayou Rifles.
How do you control the squareness of the installation? My feeble mind thinks the geometry is important to positional accuracy as one gets away from center.
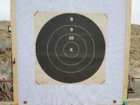
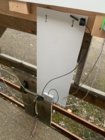
(Ok shot marker at least) I used a jig to set the bases square to each other so they’re super repeatable and less than 1/8” off square. They don’t have to be square as much as you just have to have a “square” rectangle so that the distance between the top two are the same at the bottom but the height between them doesn’t matter as much. Once that’s set you just take the measurements and input them and calibrate which takes three to five shots and you’re done. Here’s one of mine getting ready to calibrate.
FWIW I built them so the Wi-Fi unit sits below grade (second pic) and can’t be shot and just has the tiny extended antennae that comes up for line of sight for better signal and less chance of someone accidentally shooting my Wi-Fi unit.
How do you control the squareness of the installation? My feeble mind thinks the geometry is important to positional accuracy as one gets away from center.
Seal sound chambers are heavy, require storing in the upright position as used. High maintenance ( can be shot out by 800 rounds ) Rebuild cost $1700AUD not including the frame or electrics plus 2 1/2 hrs to rebuild.
We did a redesign rebuild. We glued the rubber for the sound chamber to a sheet of coreflute, glued the coreflute to the polystyrene. Cut a hole in the coreflute rubber panel 30mm smaller than the hole in the polystyrene. Screwed the new panels to the frame. Then made cassettes to fit in the front and rear holes. cassette construction ; rubber coreflute two sheets of very dense foam coreflute rubber all glued together like a sandwich, size a firm fit in the holes then taped into place
The cost $500Aud for the modified sound chamber $50 Aud for the cassettes. Now have a life greater than 2,000 shots and counting with a rebuild time of less than 5 minutes to replace cassettes.
That is our Kongsberg over 100 in use and more to be done. The only weakness left to upgrade are the cables and joiners. This mostly is wear and tear with rough handling. The monitors are simple and robust. The power source can be converted to solar then the only weakness there is the batteries. Small generators are fine but wont over rule a defective battery. Aiming marks are easily changed using centres glued to coreflute screwed onto target with small light duty cordless drivers. The system has a simple spectator means of watching what is going on once setup.
My SMT G2
light easily moved and stored as I only use a 300m aiming mark for all ranges.
Calibration had to be done at the longest range shot for best accuracy. Now reads 1mm or less at 900yds.
Use coreflute as target this requires dust cover rubber glued to back to hold coreflute together . Have plans to cassette the centre area for less cost longer life.
Down sides.
Range must be square and in line for best accuracy. Target carriers to be square to the firing line and vertical. There has to be enough room between the target and mantelet for the sensors to fit through. Frames must not move in any direction at any time whilst shooting. Not all devices are suitable to be used on the mound/line need good wifi / aerials. Make sure the equipment you are looking at is suitable to be used as a gang not single personal use. Be mindful that not all people should have access to devices that they don't know how to use!!!!!! BIG WEAKNESS.
Devices that can be read in sunlight plus have more capacity than minimum required. Battery life or wired power, two devices per shooter or shooter supplies his own, scorer uses supplied one which is the admin one as well.
Upside
record keeping is good. changing aiming marks will be as quick as you make it to be
The only rebuild cost you will have is the changing the aiming marks so cheap and if you can work out how to replace the centre piece even cheaper. Having on hand extra batteries charged up ready to go is easy and cost effective.
Unknowns
Is there a limit of how many devices can log on to the system to watch. If so how do you control this.
Can hackers gain access whilst shooting is in progress.
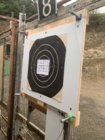
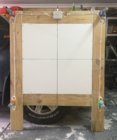
For my ShotMarker, I used 3/4 Baltic birch plywood and added a couple of adjustable hooks so it could just hook over the top of the existing frames at our range. Took extreme care to keep the sensor locations square, and it calibrated with one shot.
The front surface is all one plane to eliminate any chance for echos that might effect the signals, so most of it is 2 layers of plywood thick.
In addition I drew lines on the frame and the cloroplast target backer, so I could locate all my targets accurately.
The center section is 24 X 24, so I can place an IBS 600 yd BR target on the plastic backer.
hooks, block is removeable for the
thicker target frames.
I made some holders for the access point and the tablet.
It would be nice to see firmware that helps with popular load development. For instance a ladder/ocw program. You shoot a group/shot at the same POA and press next for each group and at the end it can give you POI shifts for each group/shot. The CMP kongsberg targets have the ability to show x and y coordinates in MOA compared to center of target for each shot but I don't think it has one for the group center so you would need to figure that out on your own (and it only goes to one decimal place). Also if you could connect to it with your phone and get a raw file with the info and then look at it on a PC app at home and if the app is well written you can change what you want to look at (group size, offsets, shot order, time between shots etc).
@powderbrake I very much like that design! My initial version was a small 24x30" model that folded for a little easier transport in the trunk of the car. It worked fine, but turned out to be more of a PITA than it was worth, so I'm looking at building version 2.0
Although I may have to do something like what @F Class John did with the off-set hanger for the sensor hub. Found out the hard way what happens when your sensor hub is mounted up top, and your ballistics program is off a couple MOA
Although I may have to do something like what @F Class John did with the off-set hanger for the sensor hub. Found out the hard way what happens when your sensor hub is mounted up top, and your ballistics program is off a couple MOA
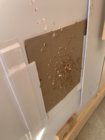
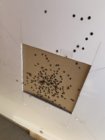
In terms of maintenance what I did is build a replaceable center where I just slide in pieces of cardboard since that’s where 99% of the shots land anyway. Obviously you can see what happens when other people shoot on the board but this backer material last for a very long time and with the replaceable center I can’t for see having to change it anytime soon. I’ve had some people that want me to replicate this for them so I’m probably going to start building them for people. It has an adjustable hanger system that fits almost any club rack and also stabilizing fee to hold the bottom and down so it doesn’t swing in any wind. When I have this thing installed it is rocksolid.
My SMT G2...
Down sides.
Range must be square and in line for best accuracy. Target carriers to be square to the firing line and vertical. There has to be enough room between the target and mantelet for the sensors to fit through. Frames must not move in any direction at any time whilst shooting. Not all devices are suitable to be used on the mound/line need good wifi / aerials. Make sure the equipment you are looking at is suitable to be used as a gang not single personal use. Be mindful that not all people should have access to devices that they don't know how to use!!!!!! BIG WEAKNESS...
Seal sound chambers are heavy, require storing in the upright position as used. High maintenance ( can be shot out by 800 rounds ) Rebuild cost $1700AUD not including the frame or electrics plus 2 1/2 hrs to rebuild.
We did a redesign rebuild.
This Forum's expenses are primarily paid by member contributions. You can upgrade your Forum membership in seconds. Gold and Silver members get unlimited FREE classifieds for one year. Gold members can upload custom avatars.


")