• This Forum is for adults 18 years of age or over. By continuing to use this Forum you are confirming that you are 18 or older. No content shall be viewed by any person under 18 in California.

Cut case for measuring COAL/CBTO

Wolfdog91

Silver $$ Contributor
Quick question. For you guys using the deal where you take a pice of brass cut the neck long ways so you can squeeze it to hold you bullet but still let it move so you can measure you CBTO/COAL , how are you doing your brass before cutting ? Like do you just fireform and that's it ? Or to you for from them resize it the same way you would if you where reloading it for that gun ?
Thanks !
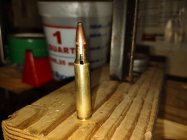
IMG_20220205_030822669.jpg
 
You must be the same kind of dinosaur I am!

I just full size it. My neck-cut is only done to the bottom of the neck. I also drill out the primer pocket to make it easy to push the bullet out.

I cut both sides, just down to the shoulder. I like to feel decent tension on the bullet.

Now you're about to be asked how come you don't just buy the Hornady or Stoney Point tool. jd
 
What tool is best to cut the slot in the case neck?
Thanks
A Dremel will work. I bought a jewelers saw 40 years ago that works well. BTW I use a fired case that I size the body on not moving the shoulders when I do this.

I got the Sinclair tool about 7 years ago after using the Hornady set up. They are pretty cheap and I feel give me much more repeatable numbers. I keep exemplar bullets so I always have the same bullet in play for measurement. I have maybe 675 bullets labeled with all their specs done up in a spreadsheet.
 
Quick question. For you guys using the deal where you take a pice of brass cut the neck long ways so you can squeeze it to hold you bullet but still let it move so you can measure you CBTO/COAL , how are you doing your brass before cutting ? Like do you just fireform and that's it ? Or to you for from them resize it the same way you would if you where reloading it for that gun ?
Thanks !
View attachment 1339404
I make a cut with a dremel tool, much less width than your cut. Done many touch determinations with a slit neck. The neck tension seems to be critical. If the tension is just right I can determine touch for 4 different bullets very quickly. If the tension is wrong you get a huge scatter in results. After pushing a bullet into the case about 5 times the neck loses tension and I resize it. Sometimes the case just doesn't work for touch after several good measurements.

A guy on this website made fun of my method but it is accurate and indicates if you did a good job. One guy called it averaging. It's a statistical best fit to the data. I know from experience that if you just put the bullet in the chamber a couple of times and accept the extracted length as touch it's possible to be way off. The R squared indicates the accuracy. Ideally it should be over 98%. If the data doesn't cross the zero value which is touch, you divide the smaller y value into the larger value.


Top graph poor quality results. Bottom graph much better results.

1652196243235.png

I tried it last week with my 6BRX and gave up because of the scatter I was getting.

Added later: Bottom chart comments. The out column shows the variation I got after extracting the bullet. Each number in the out column should be touch. If the determination was perfect, all the numbers in the out column would be the same. I think the variation is caused by barrel erosion and I don't remove the ejector. The ejector pushes the bullet hard against the receiver when extracting. I push on the case body when extracting to try to prevent the bullet from rubbing against the receiver. The touch value is just a starting point for reference when seating bullets. I would think any machinist would tell you any method to determine touch is an approximation. If you used the square rifling mark method you would get a slightly different result. Each bullet is a slightly different length from ogive to tip and we are usually measuring overall length with a digital caliper.

If touch is 2.169" as was determined you will notice that 5 of the 6 out numbers are bigger than 2.169" indicating that the bullets stuck a little and got pulled out 3 to 8 thousands. None are smaller than 2.169".
 
Last edited:
I prefer the stoney point, extra bucks yes, but I can feel the bullet kissing the lands instead of jamming them in with the bolt. In the past, I have used fire formed cases and used locktite with a lightly snug bullet to get a permanent measurement into the lands. I found that when using split case sometimes the bullet would grab on the lands and get pulled out a hair on extraction.
 
I just don’t understand why you can’t make a dummy round and polish the bullet tip with 0000 steel wool and put a tiny coat of imperial sizing wax on the bullet and seat progressively deeper until it leaves no mark on the bullet under a magnifying glass. It’s simple and takes me less than 5 minutes to get consistent results. Use very high neck tension to assure the bullet doesn’t pull out.
Dave
I tried this method. Maybe I had bad luck because of erosion of the rifling?
 
I tried this method. Maybe I had bad luck because of erosion of the rifling?
I think it’s really easy. Firing pin removed and close bolt fully and open. Either you will see no marks at all or tiny rectangles/squares. Keep seating the bullet deeper in .001” increments when the marks get really faint, because you are getting very close. I’ve found this method to be repeatable to +/-.001”
 
I just don’t understand why you can’t make a dummy round and polish the bullet tip with 0000 steel wool and put a tiny coat of imperial sizing wax on the bullet and seat progressively deeper until it leaves no mark on the bullet under a magnifying glass. It’s simple and takes me less than 5 minutes to get consistent results. Use very high neck tension to assure the bullet doesn’t pull out.
Dave
Basically the same system ,I just paint the bullet black with a sharpie and seat deeper and deeper until there are no marks on the bullet
 
Basically the same system ,I just paint the bullet black with a sharpie and seat deeper and deeper until there are no marks on the bullet
I cut one slit in the neck, drill the flash hole out with a 1/8 drill bit and tap it with an 8-32 tap so I can screw the case on a cleaning rod section to insert it into the chamber to check the max coal for that bullet.
 

Upgrades & Donations

This Forum's expenses are primarily paid by member contributions. You can upgrade your Forum membership in seconds. Gold and Silver members get unlimited FREE classifieds for one year. Gold members can upload custom avatars.


Click Upgrade Membership Button ABOVE to get Gold or Silver Status.

You can also donate any amount, large or small, with the button below. Include your Forum Name in the PayPal Notes field.


To DONATE by CHECK, or make a recurring donation, CLICK HERE to learn how.

Forum statistics

Threads
166,267
Messages
2,215,385
Members
79,508
Latest member
Jsm4425
Back
Top