• This Forum is for adults 18 years of age or over. By continuing to use this Forum you are confirming that you are 18 or older. No content shall be viewed by any person under 18 in California.

Brass prep procedure?

  • Thread starter Thread starter Deleted noremaximus
  • Start date Start date

Deleted noremaximus

Good morning guys,
I'm always trying to improve my reloading practices. Would you guys mind posting your brass prep for new brass, as well as once fired brass? I'm looking for a method that would yield the best results when it comes to accuracy, and precision. I'll list my brass prep, any critiques would be appreciated.
Lapua Brass
New Brass:

FL size
use mandrel to open up necks (Dry lube)
turn necks
clean in dry media
resize again with FL size to shrink the necks (Should use a neck only die)
run through mandrel once more to set neck tension with a .002 mandrel (Dry lube)
Uniform primer pockets
Deburr flash holes
Clean in dry media
Run a socket with 0000 wool on a drill to clean brass necks
Ready to load

Once Fired Brass:
clean on dry media
Anneal Brass with an Anneleez or what ever its called.
FL size with .002 shoulder bump
set neck tension with .002 mandrel (Dry lube)
clean on dry media
check if brass needs to be trimmed, if so ill trim, deburr, and chamfer brass
brush out necks with nylon bore brush
Run a socket with 0000 wool on a drill to clean brass necks
Ready to shoot.

I'm not saying this is the correct way, but if anyone has any suggestions to improve my brass prep I would really appreciate it. This usually yields me a 4SD, and 25ES with a 20 shot string. Thanks again.
 
Last edited by a moderator:
Looks good to me, but I'm no expert. I would suggest adding an annealing step after your initial cleaning in dry media. Anneal after each firing.
thank you, for some reason I'm always forgetting to add the annealing step.
 
Brass prepping techniques have a habit of changing as new methods and ideas come out. Therefore, unless I need more rounds NOW I don't even clean and prep my brass until I actually need it. I used to do the brass prep right up to the actual loading of it and then store it. Then my reloading method changes but now I'm stuck with all this brass the is prepped a different way.

So, bottomline is that after I shoot it the brass goes into a zip lock bag with the firearm that it was fired in clearly marked on the bag. Only when I actually need to load some rounds will I then start the brass prepping procedure using the my latest methods.
 
I'm in the process right now with a fast twist 243 win.
100 Lapua brass, run through a Lee neck collet die, do a model on QL, load 5 rounds jammed 0.010" into the lands, check velocity, adjust QL program to the tested velocity, adjust powder charge to an OBT, load and shoot until all the brass is formed.
Now, anneal, bump shoulders with a Redding body die, trim case to all the same length, skim turn the necks, chamfer and load again.
Basically with no brass prep in the fireform stage has yielded and ES of 22 ft/s and 0.750" 5 shot groups at 100m.
 
Lapua Brass

1. Run Expander in neck to straighten out necks.
2. Check for metal flake in flash-hole. If present (maybe 1 in 30), remove with pin vise. Do NOT ream.
3. Shoot first as Fouler BEFORE trimming.
4. Trim to length with length left to longest 95% of cases.
5. Chamfer case mouth gently inside and out. Spin chamfer tool BACKwards after chamfer to smooth edge.
6. ASAP after shooting, wipe necks with spray Ballistol on patch to remove carbon.
7. Before reloading, brush inside of neck 2-3 times with nylon brush; no lube.
8. Lube case body lightly with spray Ballistol on patch.
9. FL size, load
10. Measure loaded rounds base to ogive. I look for max .0015" variance with pre-sorted bullets. If out of line, I will reseat bullet again. If I can't hold .0025" I will mark that round for fouler/sighter.

Because my cases do not hit the ground, I do not dry-tumble, wet-tumble, or ultrasound.
I do not lube inside of necks.
I do not uniform flash-holes (other than check from flake obstruction).
I have bushing Whidden FL dies and honed Redding, Whidden, and Forster FL dies.

My ES with Varget is 11-12 fps for five shots. These 6BR and 6BRA loads will shoot in high ones for 4 shots in calm conditions.

Re case prep with Lapua brass -- Sometimes less is more.
If I have a case that shows as a flyer or unusual FPS, I set that aside for fouler or varmint round.

YMMV if you are doing annealing.
 
My last batch of "New" Lapua fit my chamber like it was made for my rifle , soooo .... first step was to deburr the neck , inside & out .
Run the expander mandrel
light square-up of primer pocket corner - A one time only op.
Insert primer
Load
Shoot
With the second loading ; I run them thru my cleaning process ,
deburr necks if necessary
primer
load
shoot
I do anneal on the third reload , and every reload there-after .
I do pay attention to burrs on the neck , and always do a light inside chamfer on every case .
deburr outside of neck , if necessary .
 
Good morning guys,
I'm always trying to improve my reloading practices. Would you guys mind posting your brass prep for new brass, as well as once fired brass? I'm looking for a method that would yield the best results when it comes to accuracy, and precision. I'll list my brass prep, any critiques would be appreciated.
Lapua Brass
New Brass:

FL size
use mandrel to open up necks (Dry lube)
turn necks
clean in dry media
resize again with FL size to shrink the necks (Should use a neck only die)
run through mandrel once more to set neck tension with a .002 mandrel (Dry lube)
Uniform primer pockets
Deburr flash holes
Clean in dry media
Run a socket with 0000 wool on a drill to clean brass necks
Ready to load

Once Fired Brass:
clean on dry media
Anneal Brass with an Anneleez or what ever its called.
FL size with .002 shoulder bump
set neck tension with .002 mandrel (Dry lube)
clean on dry media
check if brass needs to be trimmed, if so ill trim, deburr, and chamfer brass
brush out necks with nylon bore brush
Run a socket with 0000 wool on a drill to clean brass necks
Ready to shoot.

I'm not saying this is the correct way, but if anyone has any suggestions to improve my brass prep I would really appreciate it. This usually yields me a 4SD, and 25ES with a 20 shot string. Thanks again.

Lapua Brass
New Brass:

Neck Size with collet die (mainly to smooth out neck interior and remove dents to assure their roundness)
Deburr flash holes (Lapua brass has few burr issues, but I always do it anyway)
Uniform Primer Pockets
Load for fire forming
Fire them

Once Fired Brass:
Anneal Brass with my Annealeez
Soak brass in wet tumbler for 30 min (no tumbling,HOT water with Dawn)
Rinse brass then wet tumble (no SS media) for 15 minutes with Lemi Shine and a final rinse.
Dry brass on towel (sometimes using heat gun to reduce drying time)
Clean/uniform primer pockets with uniforming tool
Dry tumble with medium grain rice (30 minutes provides a nice lube feel to seating and turning)
FL Size with no expander ball bumping shoulder .002
Expand neck with expander mandrel ready for neck turner
Trim brass length with Tri-Way trimmer
Turn necks (.308 brass turned to .014 thickness)
Size necks with collet die
Ready for loading

Subsequent Fired Brass:
Anneal Brass with my Annealeez
Soak brass in wet tumbler for 30 min (no tumbling,HOT water with Dawn)
Rinse brass then wet tumble (no SS media) for 15 minutes with Lemi Shine and a final rinse.
Dry brass on towel (sometimes using heat gun to reduce drying time)
Clean/uniform primer pockets with uniforming tool
Dry tumble with medium grain rice (30 minutes provides a nice polish and lube feel for seating)
Size necks with collet die (neck tension .002)
Bump shoulder .002 (bumping only with Forster Bump Neck Sizing Die)
Trim brass length with Tri-Way trimmer
Ready for loading
 
Last edited:
A 4 SD, ES of 25, with n=20 means your components and loading discipline is way above average and not an issue in my opinion.

You didn’t mention if you were happy with your vertical or group size?

Nothing wrong with keeping your eye on loading tech, but you clearly are not suffering from that with the stats you show. So I will let the post flow with loading tech from the experts and instead I will remind you that good prep and tuning are not the same topic. I will encourage you to push farther into tuning and wind reading cause I think your loading must be good but must be balanced with everything else.

I would make sure you are tuned to the right charge and depth, and go shoot as much as you can with flags (and a wind coach if you can). Your loading process isn’t what is holding you back.

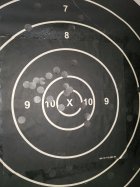
Your target may be telling us you should have shifted all those shots from the upper left 9 ring, cause that was what cost you. Could you have dropped those shots in or was it due to poor tuning?

My own issues are driven by trying to avoid a bbl tuner. I really should buckle and throw them on, but I am stubborn in this respect. I should take my own advise and get past it. Once you have yourself satisfied with your loading, will you be using a tuner?

Experience will teach you a few things, one of them is how the life of the barrel and cleaning regimen affects your scores. Learning to keep a mental image of when to adjust your tune recipe to follow the wear or weather takes some time, and hopefully you are learning to drive better while you accumulate that wear.

I am also guessing you have that ID chamfer under control, but remember to pay attention to it cause bad chamfering can spoil all that careful neck prep. Good Luck and Hold Hard! Thanks for all your help with finding supplies.
 
I am also guessing you have that ID chamfer under control, but remember to pay attention to it cause bad chamfering can spoil all that careful neck prep. Good Luck and Hold Hard! Thanks for all your help with finding supplies.
What would you consider bad chamfering?
 
What would you consider bad chamfering?
If an ID chamfer leaves any nascent burrs or smears, it damages the jacket as you seat and contributes to some tribological variations in seating force that inevitably ruin your velocity stats.

It also potentially seeds a “shelf life” issue with that ammo where the topic turns to cold welding.

A very close visual exam helps.

Since we are talking details... I also recommend to serious students the use of a Wilson style seating with the force pack to verify the seating force whenever there is a question to study the effects of process changes or component batch changes. It doesn’t have to be done this way or used all the time, but sure comes into learning if neck prep changes have any effects. Completely optional and YMMV.

Without those, I would still recommend paying attention to the “feel” of the bullet seating for signs that your ID chamfer and neck tension came out the way you wanted them. A bad chamfer job will show up as deep scratches, erratic seating forces, and even contributes to long term ”sticking”.
 
A 4 SD, ES of 25, with n=20 means your components and loading discipline is way above average and not an issue in my opinion.

You didn’t mention if you were happy with your vertical or group size?

Nothing wrong with keeping your eye on loading tech, but you clearly are not suffering from that with the stats you show. So I will let the post flow with loading tech from the experts and instead I will remind you that good prep and tuning are not the same topic. I will encourage you to push farther into tuning and wind reading cause I think your loading must be good but must be balanced with everything else.

I would make sure you are tuned to the right charge and depth, and go shoot as much as you can with flags (and a wind coach if you can). Your loading process isn’t what is holding you back.

Your target may be telling us you should have shifted all those shots from the upper left 9 ring, cause that was what cost you. Could you have dropped those shots in or was it due to poor tuning?

My own issues are driven by trying to avoid a bbl tuner. I really should buckle and throw them on, but I am stubborn in this respect. I should take my own advise and get past it. Once you have yourself satisfied with your loading, will you be using a tuner?

Experience will teach you a few things, one of them is how the life of the barrel and cleaning regimen affects your scores. Learning to keep a mental image of when to adjust your tune recipe to follow the wear or weather takes some time, and hopefully you are learning to drive better while you accumulate that wear.

I am also guessing you have that ID chamfer under control, but remember to pay attention to it cause bad chamfering can spoil all that careful neck prep. Good Luck and Hold Hard! Thanks for all your help with finding supplies.
Thank you, Great information. I think the high shots were due to my fixed power scope. I had an SWFA 16x. I have recently upgraded to a Nightforce scope. This will be my first time using the scope on Saturday. Hopefully my shot groups get better. I already did OCW, and Seat depth test. I was just wondering if I was missing something with my brass prep. Something interesting that Boss, and fellow club mates brought up regarding not tumbling brass. Is there a deference from cleaning brass on a tumbler, and just wiping them down before prepping brass? I might try it.
 
Part of my past I was called a “tribologist” since I was responsible for things that included friction and wear. If you think about any other metal on metal friction science, it is common knowledge that being “too clean” can bring a risk of galling. Now if we transfer what we know about shooting and combine it with tribological concepts, it isn’t hard to imagine that some cleaning methods can have unintended consequences that we must learn to manage.

Topics like bullet coatings, barrel cleaning, neck prep, etc., can fill volumes of banter on Internet forums. You are clearly on the learning curve and must learn to pay attention to all those little details that can make a difference to you that 99.97% of shooters will never care about.

I recommend that you pay attention to how you address the cleaning in detail. Pay attention to “overkill” with wet tumbling or ultrasonic, it has bitten many loaders. Even good cleaning needs to be tested to understand the short and longer term effects in downrange performance.

When you travel to matches for several days, loading ahead of time is a necessity. So test the “shelf stability” when you get a chance to make sure you are happy with ammo that has sat around for a long time. That force pack I mentioned earlier will teach you if bad groups down range were due to erratic grip on the bullet from unintended consequences and such.
 
I'd think it'd be that the chamfer is not uniform, like the chamfering tool wasn't square to the neck . . . ??? And it's possible too that the chamfering tool can put a bit of a burr at the bottom edge of the chamfer. . . ???
Yes. A short story...
A good friend was having group performance troubles. He wasn’t a believer in chronographs and such, so I asked him to shoot against my Shotmarker while I also took LabRadar data. He had a “good batch” and a “bad batch” of what was supposedly the same loading. There was a direct correlation between groups and good and bad velocity stats even with the average being the same, so we start the story with him being stubborn about velocity. (He now regularly checks his ammo batches by running against my chrono, and he has learned that SD and ES really are coupled to vertical at 1000 yards.)
I went to visit to look at his loading process. It looked like a glitter factory. I asked him if he always had that much metallic glitter when he loaded and he didn’t notice or know. Scrapped up bullet jacket material isn’t good for the loads or the gun. It also fouls the bbl much more than normal.
His chamfer was scraping and scratching the heck out of his bullets as he seated, so the visual of an ugly chamfer and scratched jackets was a bad warning that he ignored.
Shortening the debugging story, I found his chamfer tool was to blame and once we changed it, his glitter issue went away, his seating forces got under control, and his velocity stats and group size went back to “good”.

I don’t try to turn everybody into a machinist or statistician, but a little attention to cutting tool sharpness doesn’t hurt anybody, except maybe in the kitchen... LOL
 
New Lapua Brass
1. Expand neck for desired neck tension
2. Load

I will not turn necks until after two or three loadings.

Fired Brass
1. Clean carbon from necks.
2. De-prime
3. Clean primer pocket
4. Anneal
5. Full length size (no expander)
6. Expand necks with a pin to the desired neck tension
7. Trim if necessary
8. Load

Edited to add Annealing
 
Last edited:
For whatever reason, it seems easier to get low es/sd with newly fired or brass fired 3 times or less. I believe this is a result of the reloading process. When I am getting single digit es with brass fired 4+ times, I know I have my process normalized.
Also, I have found that tune effects es. As your load moves closer to proper tune, es generally will decrease irrespective of your loading technique. Others may disagree.
I think you have been given a lifetime of knowledge in the posts above. The proof is in the pie. You will have to figure out what works for you. As you test, change only one thing at a time. As you find and make changes or adjustments that work, repeat them to see if they hold up until you are comfortable with what you see and believe.
 
Two enhancement I've incorporated in my reloading process a few years agoly are:

1. Using a low RPM drill with an RCBS nylon brush to clean the interior of the necks before sizing. The drill speeds up the process considerably and does such a good job that I don't have to lube in the inside of the necks.

2. Wiping off cases with a cloth light saturated with mineral spirits after tumbling with treated corn cob media. The media tends to leave a residue - removing it eases full sizing and avoids gumming up the die.
 

Upgrades & Donations

This Forum's expenses are primarily paid by member contributions. You can upgrade your Forum membership in seconds. Gold and Silver members get unlimited FREE classifieds for one year. Gold members can upload custom avatars.


Click Upgrade Membership Button ABOVE to get Gold or Silver Status.

You can also donate any amount, large or small, with the button below. Include your Forum Name in the PayPal Notes field.


To DONATE by CHECK, or make a recurring donation, CLICK HERE to learn how.

Forum statistics

Threads
166,280
Messages
2,215,475
Members
79,508
Latest member
Jsm4425
Back
Top