Follow along with the video below to see how to install our site as a web app on your home screen.
Note: This feature may not be available in some browsers.
This Forum is for adults 18 years of age or over. By continuing to use this Forum you are confirming that you are 18 or older. No content shall be viewed by any person under 18 in California.
Seems like theres a fair amount of variance in bullets, better ones just have less. Ive made a basic type "tool" to measure COL at contact. I use a drill rod thats an easy slide into the barrel. I cut the ends square and break the edge. I cut a piece of 1/2" aluminum rod into 2-, 1/2" lenghts, Drill a slip fit hole for drill rod on center in each. Drill and tap side of aluminum piece for thumb screw.
Bolt goes in the rifle, drill rod in bore to contact with boltface. Slide both aluminum pieces firmly to muzzle, set thumbscrew on most distant piece. Remove bolt, use rod guide to align bullet with throat and hold in contact with lands. Hold it all together and set second aluminum collar on muzzle and tighten set screw. Measure the distance between the aluminum collars to get COL at contact with lands. Repeat with several bullets to get a "good" average COL. Need to do that due to variance in bullet tips and some variance in contact area of ogive.
i have this same comparator , I have used it for seating depth but after I bought the Bob Green bullet comparator with the granite base I use this one for checking shoulder bump measurements,.... nice simple to adjust tool.
Wayne
I also like and use the Bob Green tool for both sorting bullets and checking loaded rounds.I do not bump by measurement but by feel with a stripped bolt.
FWIW, this is what I do. A spare Hornady insert reamed to take a standard bushing. Put in any size you desire. I use bore size for bullet seating measurements. Makes me feel better, anyway..........
One thing you have to understand. What they call the ogive of a.bullet is not the point where the curve starts and the bearing surface stops. The entire curve from bearing surface to tip is the ogive. Different bullet comparators are going to hit that curve at different points. The seater stem on your seating die will hit at a different point. As long as you always use the same comparator and seating die this is not a problem. What is a problem is some bullets have inconsistent ogive curves. Hunting bullets.and cheaper bullets not so consistent. Premium target bullets you should find very consistent. If the curve varies from bullet to bullet then you will be scratching your head wondering why base to ogive isn't consistent. Lots of.reasons for.inconsistent seating depth. This is one to keep in mind
Thanks Richard, a while back I did buy the Bob Green Comparator to solve that issue. On the comparator end of things, I just want measure the oal of my loaded rounds to check for consistency round to round. I want my bullet jump to me the same on every round.
Remember the device used to measure the "base to ogive" reading is a COMPARATOR. You MUST always use the SAME device to "compare" your readings of bullet seating depth. Using a different comparator will not work because the hole for the bullet may be a different diameter, have a different chamfer etc. The number that you use is just a number of a spot somewhere between the ogive and the full bullet diameter. So one "comparator" is no better than some other "comparator"
I strongly suggest you have only one comparator in your tool box...… store any others securely away from the loading area.
If you are measuring a large lot of bullets prior to loading, a dial indicator stand set-up may work quicker than a caliper set, but remember the number, and realize it is just a number for that lot of bullets, and doesn't mean anything, as long as the number doesn't vary outside of your chosen range.
I highly recommend the Wheeler stripped bolt method for finding the the seating depth for bullets. Once you decide on a seating depth, I highly recommend you write it down, along with the date, and the number of rounds shot in that barrel, AND THE LOT NUMBER OF THE BULLET BATCH. You will find that the shape of the ogive and the seating depth may vary up to .015" lot to lot for the same part number of factory bullets, so you will need to adjust when you change bullet lots.
You also may need to adjust when the lands wear on your barrel, and you have to change the seat depth to maintain the same "jump" or "jam". Remeasuring every few hundred rounds is a good idea.
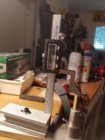
This is what I did some time ago as I was tried of getting a lot a parallax when measuring with the Hornady Comparator. This dig Height gauge is about $40 on amazon I milled a slot in the base to bolt it to a flat stock piece of Aluminum. Also I made the Hornady style Shell holder that snaps in place to measure the COAL and CBTO. Picture here is a setup to measure Base to Datum on some recently fired cases.
Seems like theres a fair amount of variance in bullets, better ones just have less. Ive made a basic type "tool" to measure COL at contact. I use a drill rod thats an easy slide into the barrel. I cut the ends square and break the edge. I cut a piece of 1/2" aluminum rod into 2-, 1/2" lenghts, Drill a slip fit hole for drill rod on center in each. Drill and tap side of aluminum piece for thumb screw.
Bolt goes in the rifle, drill rod in bore to contact with boltface. Slide both aluminum pieces firmly to muzzle, set thumbscrew on most distant piece. Remove bolt, use rod guide to align bullet with throat and hold in contact with lands. Hold it all together and set second aluminum collar on muzzle and tighten set screw. Measure the distance between the aluminum collars to get COL at contact with lands. Repeat with several bullets to get a "good" average COL. Need to do that due to variance in bullet tips and some variance in contact area of ogive.
My current rod is a brass brazing rod from the welding supply store. I also have some brass bar stock that I make buttons a couple .001s smaller than bore size to screw onto the end of the rod that I threaded. It makes for more accurate measurements on larger bore barrels and bullets. I sometimes do measure more than one bullet, but mostly I just use the bullet I took the measurement with. I’ve also made several check buttons with holes in them that closely match bore diameter of the barrel and bullet I measuring. The button needs to be long enough that a loaded round bullet tip doesn’t stick through it, you can’t measure the seated depth with the bullet sticking out of the button. To find that desired length, I slowly seat the single bullet that I used to take the measurements with and seat it to that COAL. Now I have a STANDARD to base all my seating depths off of. I’ve made a few buttons with typical case shoulder angle chamfer on a hole drilled through them too. That is used to measure case length/headspace. If you have a chambering reamer you can make similar buttons for that chamber. To use the buttons you just slip them over the bullet and measure the overall distance from the case head to the top surface of the test button, then do the math and make notes. You can buy all the fancy factory measurement tools you want, but I’ve not found one more accurate than this. But if you don’t have a lathe, or a friend who does, well, one of the commercial setups is your next best option.
Well once i started using wilson inline seaters and an arbor.press, got brass prep and neck tension dialed.in i started getting very consistent base to ogive measurements. Now once i get that seating die dialed in i lock it down and seldom.ever even check. Variances of .001 don't bother me.
What’s currently the most precise (accurate), piece if equipment for measuring seating depth of loaded cartridge. I know there is the Redding instant indicator, which seems great in theory to be able to do this with a press. Some may consider not benchest standard I guess. Then I say the Davidson seating depth checker (from benchrite) that attaches to your calipers. Any others? What does everyone use.
I'm not interested in measuring seating depth, I'm only interested in setting it! To that purpose, I cut-to-the-chase and just use the rifle chamber that I will be loading for, dummy cartridges using the particular prepped bullet lot that I will be loading for that chamber, a decent caliper tool, a Wilson chamber type bullet seater die with micrometer top/Sinclair arbor press, and a desk lamp with heavy magnification. First, I will seat a dummy round to a depth that will most likely touch the lans, and gently try to close the bolt. Assuming the bolt will not close, I seat that bullet deeper and try again, and so on until the bolt will gently close. At that point, I use a new dummy round with a fresh bullet seated to the same depth as previous. Then I remove the bolt (Barnard, of course), place the new dummy round on the face of the bolt with it held in place by the extractor. Next, I carefully insert the bolt/cartridge into the chamber while elevating the rifle muzzle to the vertical with butt on the loading bench. Now I raise and lower the bolt handle several times, extract the dummy cartridge, and examine the bullet bearing surface for engraving by the lans. Under the magnified desk lamp, I measure the width of the engraving, which for all practical purposes represents the length of "jam" into the bearing surface. Generally, I like to just "touch" the bearing surface on my 180 hybrids, which for me equates to approximately a 5 thousands "jam". I get to that point by making depth adjustments directly on the micrometer top, and test the results with a few more dummy cartridges.
What’s currently the most precise (accurate), piece if equipment for measuring seating depth of loaded cartridge. I know there is the Redding instant indicator, which seems great in theory to be able to do this with a press. Some may consider not benchest standard I guess. Then I say the Davidson seating depth checker (from benchrite) that attaches to your calipers. Any others? What does everyone use.
Even with the nifty round hole youre hoping you get a collective average. Like I said even all bearing surface to ogive dimensions can vary. Once you establish a "standard" you can manipulate COL and see if you can find your sweet spot.
not when you SORT bullets by ogive length.
the whole idea is to pick a spot and move in and out to find the sweet spot.
the tools give you REPEATABLE reference points, so you can move in and out.
I do not get averages, I get repeatable numbers.
This Forum's expenses are primarily paid by member contributions. You can upgrade your Forum membership in seconds. Gold and Silver members get unlimited FREE classifieds for one year. Gold members can upload custom avatars.
This site uses cookies to help personalise content, tailor your experience and to keep you logged in if you register.
By continuing to use this site, you are consenting to our use of cookies.


") To that purpose, I cut-to-the-chase and just use the rifle chamber that I will be loading for, dummy cartridges using the particular prepped bullet lot that I will be loading for that chamber, a decent caliper tool, a Wilson chamber type bullet seater die with micrometer top/Sinclair arbor press, and a desk lamp with heavy magnification. First, I will seat a dummy round to a depth that will most likely touch the lans, and gently try to close the bolt. Assuming the bolt will not close, I seat that bullet deeper and try again, and so on until the bolt will gently close. At that point, I use a new dummy round with a fresh bullet seated to the same depth as previous. Then I remove the bolt (Barnard, of course), place the new dummy round on the face of the bolt with it held in place by the extractor. Next, I carefully insert the bolt/cartridge into the chamber while elevating the rifle muzzle to the vertical with butt on the loading bench. Now I raise and lower the bolt handle several times, extract the dummy cartridge, and examine the bullet bearing surface for engraving by the lans. Under the magnified desk lamp, I measure the width of the engraving, which for all practical purposes represents the length of "jam" into the bearing surface. Generally, I like to just "touch" the bearing surface on my 180 hybrids, which for me equates to approximately a 5 thousands "jam". I get to that point by making depth adjustments directly on the micrometer top, and test the results with a few more dummy cartridges.
To that purpose, I cut-to-the-chase and just use the rifle chamber that I will be loading for, dummy cartridges using the particular prepped bullet lot that I will be loading for that chamber, a decent caliper tool, a Wilson chamber type bullet seater die with micrometer top/Sinclair arbor press, and a desk lamp with heavy magnification. First, I will seat a dummy round to a depth that will most likely touch the lans, and gently try to close the bolt. Assuming the bolt will not close, I seat that bullet deeper and try again, and so on until the bolt will gently close. At that point, I use a new dummy round with a fresh bullet seated to the same depth as previous. Then I remove the bolt (Barnard, of course), place the new dummy round on the face of the bolt with it held in place by the extractor. Next, I carefully insert the bolt/cartridge into the chamber while elevating the rifle muzzle to the vertical with butt on the loading bench. Now I raise and lower the bolt handle several times, extract the dummy cartridge, and examine the bullet bearing surface for engraving by the lans. Under the magnified desk lamp, I measure the width of the engraving, which for all practical purposes represents the length of "jam" into the bearing surface. Generally, I like to just "touch" the bearing surface on my 180 hybrids, which for me equates to approximately a 5 thousands "jam". I get to that point by making depth adjustments directly on the micrometer top, and test the results with a few more dummy cartridges. 