• This Forum is for adults 18 years of age or over. By continuing to use this Forum you are confirming that you are 18 or older. No content shall be viewed by any person under 18 in California.

Bedding Problems

Jud96

Site $$ Sponsor
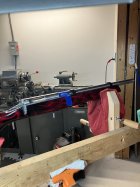
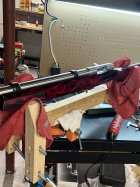
I’m at my whits end with a bedding job on my LV rifle and I’m looking for some help. I have already missed one match because of it and I’m fearing I’ll miss another one if I don’t get this thing together. I’ve made about 7 attempts at bedding this stock and it’s been unsuccessful every time.

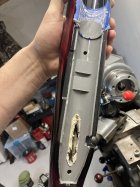
The backstory is I bedded this stock last year. The action had a 1/2” keyway lug bolted to the bottom of it. Fast forward to this year and I couldn’t get the rifle to shoot smaller than mid .2-.3s at 100. I checked my bedding to find out that the recoil lug had come loose. I tightened the lug back down and found that the bedding job now had .003-.004 stress in it. I was irritated the lug came loose, so I decided to machine two slots in the bottom of the action similar to what’s on a short BAT Neuvo and have those become the recoil lugs when I re-bedded it. Well 7 attempts later and I can’t get the bedding to turn out stress free. I’ve tried several methods and have bugged a few people already about it and I still haven’t gotten success. My goal is to get a stress free (less than .002 movement) bedding job so then I can glue it in over a good bedding job. I don’t know if the recoil cuts in the action are what’s causing me issues or what. I’m thinking of milling away the center part, and make one big “XP” cut. Any help is very much appreciated. Below is an outline of how I’ve tried bedding it the last 3 times. Thank you!

- Stock leveled both ways and held in a wooden stock vice
- Wrap tape around the barrel at the end of the stock and a band ~2” in front of the action. The tape bands sit on the bottom of the barrel channel, but one more wrap of tape would make the band too tight to sit on the bottom of the barrel channel. Basically I made the bands as big as they could be and still rest on the bottom.
- Check that both bands of tape are touching the barrel channel on the bottom and the weight isn’t being supported by the action
- Tape the fronts of both “lug” slots
- Two layers of release, each layer buffed off
- Guide screws wrapped in tape to fit snugly in the pillar bores
- One layer of masking tape around the barrel butted up against the action face to allow clearance around the barrel from the excess bedding that flows forward
- Devcon 10610 mixed by weight 9:1 and mixed for 5-10 mins
- Liberally applied mud to the stock inlet and action body
- Then I lowered the barreled action into the stock and pressed down on the barrel bands until they were bottomed out. Nothing left on the barrel or action to hold it down, just gravity.
- Clean up excess and wait until the next day
- Machine out trigger pocket, bolt stop screw, and bedding ahead of the action. File edges of bedding to eliminate a sharp edge. Open pillar ID’s up to 0.312 to give plenty of clearance for the action screws
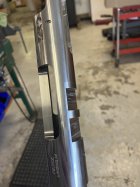
- Check bedding with an indicator with the rifle vertical. Every time the stress has been .004-.010IMG_8633.jpegIMG_8677.jpegIMG_8675.jpegIMG_8644.jpeg
 
Last edited:
You said your stress was coming from a sagging tang area in the bedding, right?

This is where I'm curious. When I have trouble, that's where I have issues... with the rear screw/tang.

I wouldn't have thought much about it, but I have a stock that a well known pro did, and it has a little stress in the tang as well...
 
i know next to nothing but, why not pull the barreled action down into the stock? either the action screws or clamps on the outside to get everything to squish down a bit?
 
I’m at my whits end with a bedding job on my LV rifle and I’m looking for some help. I have already missed one match because of it and I’m fearing I’ll miss another one if I don’t get this thing together. I’ve made about 7 attempts at bedding this stock and it’s been unsuccessful every time.

The backstory is I bedded this stock last year. The action had a 1/2” keyway lug bolted to the bottom of it. Fast forward to this year and I couldn’t get the rifle to shoot smaller than mid .2-.3s at 100. I checked my bedding to find out that the recoil lug had come loose. I tightened the lug back down and found that the bedding job now had .003-.004 stress in it. I was irritated the lug came loose, so I decided to machine two slots in the bottom of the action similar to what’s on a short BAT Neuvo and have those become the recoil lugs when I re-bedded it. Well 7 attempts later and I can’t get the bedding to turn out stress free. I’ve tried several methods and have bugged a few people already about it and I still haven’t gotten success. My goal is to get a stress free (less than .002 movement) bedding job so then I can glue it in over a good bedding job. I don’t know if the recoil cuts in the action are what’s causing me issues or what. I’m thinking of milling away the center part, and make one big “XP” cut. Any help is very much appreciated. Below is an outline of how I’ve tried bedding it the last 3 times. Thank you!

- Stock leveled both ways and held in a wooden stock vice
- Wrap tape around the barrel at the end of the stock and a band ~2” in front of the action. The tape bands sit on the bottom of the barrel channel, but one more wrap of tape would make the band too tight to sit on the bottom of the barrel channel. Basically I made the bands as big as they could be and still rest on the bottom.
- Check that both bands of tape are touching the barrel channel on the bottom and the weight isn’t being supported by the action
- Tape the fronts of both “lug” slots
- Two layers of release, each layer buffed off
- Guide screws wrapped in tape to fit snugly in the pillar bores
- One layer of masking tape around the barrel butted up against the action face to allow clearance around the barrel from the excess bedding that flows forward
- Devcon 10610 mixed by weight 9:1 and mixed for 5-10 mins
- Liberally applied mud to the stock inlet and action body
- Then I lowered the barreled action into the stock and pressed down on the barrel bands until they were bottomed out. Nothing left on the barrel or action to hold it down, just gravity.
- Clean up excess and wait until the next day
- Machine out trigger pocket, bolt stop screw, and bedding ahead of the action. File edges of bedding to eliminate a sharp edge. Open pillar ID’s up to 0.312 to give plenty of clearance for the action screws
- Check bedding with an indicator with the rifle vertical. Every time the stress has been .004-.010View attachment 1550604View attachment 1550602View attachment 1550603View attachment 1550605
You stated: Stock leveled both ways and held in a wooden stock vice.
The wooden stock vise maybe stressing the stock while bedding.
I have bedded only a few stocks and no expert however, I learned from a couple of DVD's from Richard Franklin & Darrel Holland. Both instructional DVD's demonstrated bedding the stocks while the barreled action is held in a vise or barrel vise. The picture on the link below may explain it better than I can.
 
Last edited:
Don't clamp anything. Put supports under the gun as close as possible to being opposite your tape on the barrel. I'd probably put tape on the back side of your cutouts so you have clearance like you would on a recoil lug. That should prevent binding during testing and be take up of you do a glue in anyway
 
Since this method has failed several times, try bedding it upside down with the barrel clamped in a padded vise and nothing but the weight of the stock itself pressing down.

Any extremely light wrap of painters tape around the center of the action will keep anything from shifting.

I agree that the stress is annoying, but I’m not convinced that’s why the rifle won’t shoot under .250 either. Guess we will see.
 
Just had another thought…. What if the tape is compressing from the weight of the barrel as the bedding cures? You could put a couple of saddles of bedding in there (over painters tape so they’ll break out) then remove the tape and bed it again.
 
'Morning, Jud96. Here's a couple things to consider.

-You only want one recoil surface. Multiple recoil surfaces will add stress and prevent the action from finding it's natural 'neutral' position before and after firing.
-You said you tape the fronts of both lug slots. The front edge is the recoil surface....it needs to fit tight to the bedding. The  rear edge is what should be taped to provide a bit of clearance.
-The style of action screws used can at times give some 'fake out' stress. It can come from how the screws fall away from screw heads mating surfaces...pillars, trigger guard, etc.
-Using sleeves in the pillars with your guide pins to locate the action into the pillars when bedding can also help clean up some stress.

Good shootin' -Al
 
Last edited:
Since 1978, I have been floating the tang, from the front of the trigger group, on most single shot bolt actions. I agree with Al on the multiple recoil surface thing, and of course, the taping of the wrong surface of the notch. In general, I figure a decent glue in doesn't need a recoil surface; the glue does that. WH
 
Plenty of good advice here, my experience: Glue in is the only true "zero stress" mounting system. The tang is a weak area that's prone to flex, since you're modding the action, try adding an action screw ahead of the trigger, float the tang and abandon the tang screw altogether.
 
@Jud96 ... I use the same type of woodworking clamps to 'hold' my stocks when i do work like this.

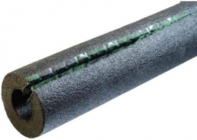
However, I do not really 'clamp' them down around the stock. That's because I put foam padding around the jaws and the stock just rests in the clamps. I noticed you are using the red shop towel as the part that is protecting the stock. Try some pipe insulation. The kind that you get from Home Depot to insulate the hot water pipes in your house. It is perforated length wise so you can fit it around the clamp jaws. I also put the pipe insulation around the top screw of the woodworking clamp between the wood jaws.

Or a pool noodle that you cut down the length of the noodle.

1714402041976.png

In no way do I think this is the root of your problem, but I thought I would share what I use with a similar setup.
 
I’m at my whits end with a bedding job on my LV rifle and I’m looking for some help. I have already missed one match because of it and I’m fearing I’ll miss another one if I don’t get this thing together. I’ve made about 7 attempts at bedding this stock and it’s been unsuccessful every time.

The backstory is I bedded this stock last year. The action had a 1/2” keyway lug bolted to the bottom of it. Fast forward to this year and I couldn’t get the rifle to shoot smaller than mid .2-.3s at 100. I checked my bedding to find out that the recoil lug had come loose. I tightened the lug back down and found that the bedding job now had .003-.004 stress in it. I was irritated the lug came loose, so I decided to machine two slots in the bottom of the action similar to what’s on a short BAT Neuvo and have those become the recoil lugs when I re-bedded it. Well 7 attempts later and I can’t get the bedding to turn out stress free. I’ve tried several methods and have bugged a few people already about it and I still haven’t gotten success. My goal is to get a stress free (less than .002 movement) bedding job so then I can glue it in over a good bedding job. I don’t know if the recoil cuts in the action are what’s causing me issues or what. I’m thinking of milling away the center part, and make one big “XP” cut. Any help is very much appreciated. Below is an outline of how I’ve tried bedding it the last 3 times. Thank you!

- Stock leveled both ways and held in a wooden stock vice
- Wrap tape around the barrel at the end of the stock and a band ~2” in front of the action. The tape bands sit on the bottom of the barrel channel, but one more wrap of tape would make the band too tight to sit on the bottom of the barrel channel. Basically I made the bands as big as they could be and still rest on the bottom.
- Check that both bands of tape are touching the barrel channel on the bottom and the weight isn’t being supported by the action
- Tape the fronts of both “lug” slots
- Two layers of release, each layer buffed off
- Guide screws wrapped in tape to fit snugly in the pillar bores
- One layer of masking tape around the barrel butted up against the action face to allow clearance around the barrel from the excess bedding that flows forward
- Devcon 10610 mixed by weight 9:1 and mixed for 5-10 mins
- Liberally applied mud to the stock inlet and action body
- Then I lowered the barreled action into the stock and pressed down on the barrel bands until they were bottomed out. Nothing left on the barrel or action to hold it down, just gravity.
- Clean up excess and wait until the next day
- Machine out trigger pocket, bolt stop screw, and bedding ahead of the action. File edges of bedding to eliminate a sharp edge. Open pillar ID’s up to 0.312 to give plenty of clearance for the action screws
- Check bedding with an indicator with the rifle vertical. Every time the stress has been .004-.010View attachment 1550604View attachment 1550602View attachment 1550603View attachment 1550605

The bedding looks beautiful. Since you have multiple attempts it's time to change something. Personally I would do the same as you except once all together and bedded, I would push down on the action and spring it a little and then let it naturally return to it's final resting place. Just a thought and has worked great for me. Sometimes the bedding compound is thick enough to spring the action up a few .001. An indicator will show how easy it is to spring an action or barrel and indicators don't lie. A few .001 and you have induced stress. The very thing we are trying to eliminate. Good luck to you.
Paul
 
Personally, I would have milled only one slot with chamfered edges for a lug. I use tape at the end of the forend around the barrel to control center and height, and at the tang to secure lightly, after barreled action has been pushed down to desired depth in bedding compound. Then flip rifle upside down by the barrel to cure in the vise. Prior to this, everything is pre-fit and checked for no stress. I also bed pillars attached to the action and all at the same time. I find this gives much better results than doing it in 2 separate steps, prep is key.

I make my own pillars with 5/16" hole for the action screws. I do not use the action screws with tape or something else to keep them centered in the pillar. I turned down some oversized socket head screws to make custom shoulder bolts fitted for a slip fit through the pillar to keep centered. Threaded at the end for whatever action you are bedding. Make the custom screws long enough to accommodate different pillar lengths. When the custom shoulder screw is too long, you can use washers between the screw head and pillar to adjust length needed. This has worked phenomenal for the last 20 years for me.

I however don't have any experience with 10610 Devcon.

Good luck, you will figure it out.
 

Upgrades & Donations

This Forum's expenses are primarily paid by member contributions. You can upgrade your Forum membership in seconds. Gold and Silver members get unlimited FREE classifieds for one year. Gold members can upload custom avatars.


Click Upgrade Membership Button ABOVE to get Gold or Silver Status.

You can also donate any amount, large or small, with the button below. Include your Forum Name in the PayPal Notes field.


To DONATE by CHECK, or make a recurring donation, CLICK HERE to learn how.

Forum statistics

Threads
165,822
Messages
2,204,013
Members
79,148
Latest member
tsteinmetz
Back
Top