


I thought this might help anybody that has purchased the AGS annealing machine.
For starters, this is money we'll spent. This annealer is very well made. It's compact size makes it all the sweeter.
From what I understand the size might be dictated by freight/shipping costs. This particular size might be fitting at the edge of the "next price up" tier. Smart move if you ask me.
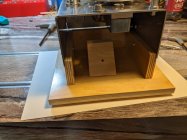
As some of you have read, the height of it has a potential to cause brass to stand up underneath it. I am an old finish carpenter at heart, so needless to say I made something out of wood to raise it up 1 1/2". Ran a 1/2" x 1/16" rabbet around the top of the three boards to give the stainless a nesting point. As you can see, I ran a simple machine screw with washer and wing nut just touching the edge of the stainless. When you tighten the wing nut, it compresses the stainless into the rabbet and holds on to it quite well. I then cut a small piece of wood with a 45° bevel on it and secured it below the exit hole where the brass falls through. Now when it falls through, it shoots out the front. This all is attached to a wood base. I set the whole assembly in a cake pan while using. This keeps all the brass from running wild.
For starters, this is money we'll spent. This annealer is very well made. It's compact size makes it all the sweeter.
From what I understand the size might be dictated by freight/shipping costs. This particular size might be fitting at the edge of the "next price up" tier. Smart move if you ask me.
As some of you have read, the height of it has a potential to cause brass to stand up underneath it. I am an old finish carpenter at heart, so needless to say I made something out of wood to raise it up 1 1/2". Ran a 1/2" x 1/16" rabbet around the top of the three boards to give the stainless a nesting point. As you can see, I ran a simple machine screw with washer and wing nut just touching the edge of the stainless. When you tighten the wing nut, it compresses the stainless into the rabbet and holds on to it quite well. I then cut a small piece of wood with a 45° bevel on it and secured it below the exit hole where the brass falls through. Now when it falls through, it shoots out the front. This all is attached to a wood base. I set the whole assembly in a cake pan while using. This keeps all the brass from running wild.


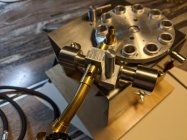
") Weight and size is a limiting factor for affordable shipping so I have to stay in this size/weight limit, but the deflector you made looks awesome (simple and elegant, true workmanship). Now I will have to scratch my head on how to make a version of this upgrade lol.
Weight and size is a limiting factor for affordable shipping so I have to stay in this size/weight limit, but the deflector you made looks awesome (simple and elegant, true workmanship). Now I will have to scratch my head on how to make a version of this upgrade lol.