timeout
Silver $$ Contributor
I just compiled instructions to help a forum member regarding a modification to the Kwik Klip system which will result in reliable feeding of the 6BR series cartridges (in 700 Rems). These systems are available here: http://www.cabelas.com/product/Kwik...WTz_l=Header;Search-All+Products#BVQAWidgetID
Since so many on this forum have helped me, I decided to post this in hopes that I might return the favor to a few.
1. Procure a Kwik Klip magazine kit.
2. Procure a strip of Delrin .750" wide, .250" thick and the shortest length available through McMaster-Carr. This will be the foundation material for the magazine spacer which you will install at the rear of the magazine, and also the magazine follower.
Available here: http://www.mcmaster.com/#delrin-(made-with-acetal-resin)/=10jai0i
3. Procure a piece of 3/4" (.750") round bar of Delrin. I recommend a long enough piece that you don't cut you finger off ripping the bar in two. This will form the front piece in the magazine, whose purpose is to raise the front of the cartridge upward, as the bolt forces the cartridge into the chamber.
4. Procure a tube of Permatex Super Weather-strip adhesive. This will be used to bond the rear spacer and the front elevated spacer into the magazine.
5. Procure a standard 700 Remington short action magazine follower spring. Note: I have found some to be weaker than others. I like the strongest one possible. Try to find some OEM springs. The weaker ones tend to struggle a bit keeping the front of the magazine follower forced upward.
Once you have all of the materials needed, here is the process to proceed.
A. Remove and discard the standard Kwik Klip magazine follower and spring. There will be two tabs near the front of the magazine box that you need to carefully bend straight upward. These can remain in the straight up position forever more.
B. Cut a piece of the 1/4"X3/4" flat Delrin approximately 1 3/8" long. Glue that to the rear of the magazine using the Super Weather-strip Adhesive.
C. Cut the round bar of Delrin in half lengthwise. I would recommend a table saw for this process.
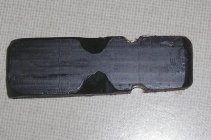
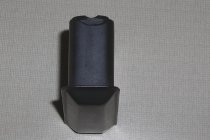
Purchase a long enough piece of Delrin that you do not need to get your hands anywhere near the blade!!Cut one of the halves approximately 1.200" long. I like to use the Dremmel with a cut off wheel for this. The Delrin will then need to be fashioned on a bench grinder to the approximate following dimension:.160" thick overall and round both front sides to mate with the rounded front corners of the magazine. Check the fit. Repeat shaping of the sides as needed. Next, glue the completed piece into the front of the magazine. Once it has been glued into place, use your Dremmel to fashion an incline ramp into the top center of the Delrin. This helps to guide the cartridge toward the center as it raises it upwards. I like the lower edge of the "ramp" wider than the top. You can experiment with that to suit.
D. Fabricate a magazine follower by initially cutting a piece of the 1/4"X3/4 flat stock Delrin to approximately 2.350" in length. In order to match the contour of the magazine box, it will be necessary to do the following. 1. Taper the sides down to approximately .675" in the front. This is easiest accomplished with a bench grinder. 2. Round both front corners slightly. 3. With your Dremmel and 1/8" grinding bit, mill side slots into the follower. These will need to be centered approximately .685" from the front of the follower. 4. On the top side of the follower, mill relief areas to provide clearance for the magazines front feed lip indentations. These will be centered approximately 1.250" from the front of the follower.
E. Using a tin snips, shorten the top of the magazine follower spring by approximately 1/4" (A bit more may be necessary. Rather than trim too short, use trial and error to check for dragging or binding.) I also recommend rounding the outside edges a little. Install the spring in the exact direction I have indicated with the attached photo. It will only work correctly in one direction, both as to front & rear, top & bottom.
F. Using a needle nose pliers, turn the follower sideways and slide it rearward (above the spring). As you approach the rear of the magazine, twist the follower down into position. I coat the bottom of the follower with some light grease to ensure easy movement between the spring and follower.
G. Check for any binding brought about by incorrect sizing and milling of the follower and or, spring. Correct as needed.
H. Load 3 dummy cartridges into the magazine and install it into your rifle. With the safety on and rifle pointed in a safe direction, proceed to cycle the rounds through the chamber. Make any adjustments that may be needed. If you have followed these instructions carefully, you will now have a fully functioning 6BR detachable magazine!
Note: I am using Berger 105 gr. VLD's in a Dasher with .130" free bore and an overall length of approximately 2.346". More or less cartridge length can be accommodated simply by altering the spacer block thickness. If you undertake this project and have questions, let me know. This all must sound like a lot of work. It is some measure of work, however nowhere near the work I went through to finally make a system operable!


