Follow along with the video below to see how to install our site as a web app on your home screen.
Note: This feature may not be available in some browsers.
This Forum is for adults 18 years of age or over. By continuing to use this Forum you are confirming that you are 18 or older. No content shall be viewed by any person under 18 in California.
Got another off the mill today, this one will get dyed light brown. Going to lay down black first to bring out the maple, sand and then apply the brown..
WOW, I bit my tongue, because at first I wanted to suggest a nice dark blood burgundy would have looked better but you weren't finished yet...
You mailed it man!!!! Phenomenal work!
WOW, I bit my tongue, because at first I wanted to suggest a nice dark blood burgundy would have looked better but you weren't finished yet...
You mailed it man!!!! Phenomenal work!
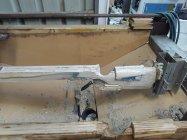
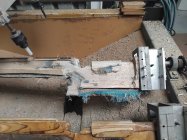
CNC inletting is complete except for the recoil lug cut out.
This design has a very low profile, keeping the weight centered low. Has the taller rails on the forend since it’s going to be a magnum.
Should finish out nicely.
The holes for the action screws are 1/4”, will be getting bored out 3/4” for a nice set of 3 - 9/16” aluminum pillars.
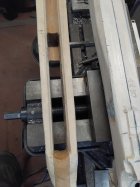
Will be getting it sanded and cleaned up for dye over the next week or so..
Thats an interesting wood, is it strong enough to be stiff?
Or due to its lightweight like Alum. does it need to be thicker to have same strength as Walnut?
A light as carbon fiber wood stock would be so cool
So it's a lightweight timber but has the same structural integrity as western red cedar . I have build probably 30 stocks out of it over the last 6 years . I use carbin fibre matting between the timber layers when glueing up . Finished stocks weighs under 1kg / 2lbs once off the machine . Have made stocks for ftr and fopen rifles from 308s up to 7mm . Never had 1 crack or do stupid stuff
Took the hot summer off from working in the shop, half hearted deer hunting still; but figured I should get back to this project before I forget what I was intending to do.
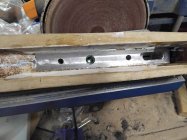
Bedded in two stages, set the recoil lug first, then the rear of the receiver.
Working on inletting the trigger guard presently.
Got another one dyed and sealed. Went with Smiths penetrating epoxy on this one. Going to try Total Boat on the next one, Smiths definitely better than the System Three, cured a lot quicker.
Read nothing but good things about Total Boat.
This one has 3 coats of Smoths and will get wet sanded and cleared with 3 coats.
Had a lot of figure in the maple, should finish out very nice..
Got another one dyed and sealed. Went with Smiths penetrating epoxy on this one. Going to try Total Boat on the next one, Smiths definitely better than the System Three, cured a lot quicker.
Read nothing but good things about Total Boat.
This one has 3 coats of Smoths and will get wet sanded and cleared with 3 coats.
Had a lot of figure in the maple, should finish out very nice.. View attachment 1715246View attachment 1715247View attachment 1715248View attachment 1715249View attachment 1715250
The sealer brushes on fairly good, and sanding goes quick. I may build one it would definitely be better.
I used to build custom fishing rods so very aware of the finish you get with slow cure epoxy’s.
Thank you!
So many people with a wide range of skills posting . Rod build ,lure making and painting plus doing stock work all goes hand in hand .
Using total boat ,boat coat or west systems epoxy take your pick . They all turn out hard and glossy in the end . Some come be harder than others if you need ti do a bit of sanding to it .
Got another one dyed and sealed. Went with Smiths penetrating epoxy on this one. Going to try Total Boat on the next one, Smiths definitely better than the System Three, cured a lot quicker.
Read nothing but good things about Total Boat.
This one has 3 coats of Smoths and will get wet sanded and cleared with 3 coats.
Had a lot of figure in the maple, should finish out very nice.. View attachment 1715246View attachment 1715247View attachment 1715248View attachment 1715249View attachment 1715250
If you just do the epoxy, it can be sanded and filled with new epoxy. Then you can sand it flush and polish it out. I find that a thick epoxy finish done in the rotisserie comes out high gloss and needs nothing further.
Total Boat epoxy had some issues of yellowing over time. On most wood stocks, that isn’t a big deal. It just blends in. On bright colors, it might be a problem.
It’s an easy fix, if just in the clear sand, fill and re-clear. I use automotive clear w/ UV protection on all my stocks. The epoxy sealer is just to seal the wood and makes the 1st coat of automotive clear lay down. Then apply a total of 2 more coat of clear after a round of wet sanding with 1500 grit.
If you just do the epoxy, it can be sanded and filled with new epoxy. Then you can sand it flush and polish it out. I find that a thick epoxy finish done in the rotisserie comes out high gloss and needs nothing further.
Total Boat epoxy had some issues of yellowing over time. On most wood stocks, that isn’t a big deal. It just blends in. On bright colors, it might be a problem.
I’ve never heard of a clear epoxy sealer yellowing with added UV protection and that’s been cleared w/ UV protection clear.
The below pictures are the 1st coat of automotive clear applied over the sealer. Will dry for 24 hours and then wet sand and then 2 more coats of clear.
This Forum's expenses are primarily paid by member contributions. You can upgrade your Forum membership in seconds. Gold and Silver members get unlimited FREE classifieds for one year. Gold members can upload custom avatars.